• Just a reminder that you won't be able to start new posts or reply to existings posts in the Archive forum.

    This is where all the old posts go so they can still be used for reference and searched.
  • Welcome to ClassicBroncos! - You are currently viewing the forums as a GUEST. To take advantage of all the site features, please take a moment to register. It's fast, simple and absolutely free. So please join our community today!
    If you have problems registering or can't log into your account, please contact Admin.

Tim D. - 1973 Bronco Build

Tim D.

Jr. Member
Joined
Mar 6, 2007
Messages
135
Loc.
Houlton, ME
1973 Early Bronco

Plan of attack/proposed specs:
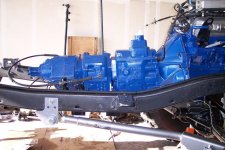
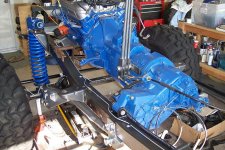
1973 Early Bronco
302 (until I build the 351W)
NP435
NP203/NP205 Short Shaft Doubler
HD D70 Rear
HP D60 Front
4.56:1 Gears--120:1 Crawl Ratio
Cage 5.5" Coils
Cage 5.5" Leafs
Cage Long Arms w/SAS Brackets
Cage Shock Hoops
Cage 14" Travel Shocks
38.5" Swamper SX's on HUMM-VEE Beadlocks
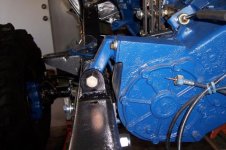
NP203 Rebuild:

Here’s what I picked up for the rebuild:

1978 Light & Heavy Truck Factory Shop Service Manual:
FordFactoryServiceManual.jpg


Transmission Exchange Company NP203 Rebuild Kit:
NP203RebuildKit.jpg


This is what I started with: NP203 Range Box and Front Output
NP203_007.jpg


NP203_010.jpg


203_022.jpg


Cleaned the case up a bit before digging into it:
NP203_016.jpg


1. Sprayed PB Plaster on the Poppet retainer and remove it, and the poppet spring:
NP203_018.jpg


2. With the poppet retainer and spring (as seen in the pic) were removed, I was able to remove the shift fork and sprag:
NP203_017.jpg


This is what it looks like with the above parts removed:
NP203_019.jpg


3. Next I pulled the shift levers and range selector shaft as well as the poppet plate:
NP203_020.jpg
 
OP
OP
Tim D.

Tim D.

Jr. Member
Joined
Mar 6, 2007
Messages
135
Loc.
Houlton, ME
4. I then pulled the lock-out selector haft out:
NP203_022.jpg


5. After that was out, I removed the input bearing and bearing retainer and pulled the input out:
NP203_024.jpg

NP203_023.jpg

NP203_025.jpg


6. Then I knocked out the counter shaft and pulled the counter-gear assembly out making sure not to loose the 72 roller bearing, spacer, and thrust washers:
NP203_027.jpg

NP203_028.jpg


Empty Case:
NP203_026.jpg


7. Cleaned-Up all the parts with Castrol Super Clean in my "parts washer":
NP203_030.jpg

NP203_029.jpg
 
OP
OP
Tim D.

Tim D.

Jr. Member
Joined
Mar 6, 2007
Messages
135
Loc.
Houlton, ME
Clean Case:
NP2032_001.jpg

NP2032_002.jpg

NP2032_003.jpg


Time to put it all back together

8. I put everything back-in in reverse order from that of taking it apart. First came the cluster gear. I coated 72 new roller bearings, the thrust washers and spacer with Vaseline and placed them inside the cluster gear:
203_008.jpg


It seemed that after I pulled this can out, my friends decided it was time to leave, how come??:
203_009.jpg


9. Thrust washer in place and coated with Vaseline to keep it in place:
203_010.jpg


10. Cluster gear/thrust washers in place, counter shaft installed:
203_011.jpg

203_012.jpg


11. Slid the input gear back in place:
203_014.jpg

203_016.jpg
 
OP
OP
Tim D.

Tim D.

Jr. Member
Joined
Mar 6, 2007
Messages
135
Loc.
Houlton, ME
12. Installed a new input-gear bearing and snap ring:
203_017.jpg


13. Installed the bearing retainer with a new gasket:
203_019.jpg


14. Put the shifter shafts back in with a bit of gear lube and new o-rings:
203_018.jpg

203_021.jpg


15. Put the shift-fork, sprag, poppet, poppet pin, poppet spring and retainer back in:
203_020.jpg


Front Output Rebuild:
Here is the front output with low range gear, output bearing, spacers and thrust washers:
203_023.jpg


1. Took it apart – removed 2 snap rings and everything came apart. To the parts washer (oil pan full of Castrol Super Clean):
203_024.jpg


For the doubler kit, I have to modify the front output bearing retainer by removing a key:
Before:
203_0222.jpg


After:
203_026.jpg

203_027.jpg
 
OP
OP
Tim D.

Tim D.

Jr. Member
Joined
Mar 6, 2007
Messages
135
Loc.
Houlton, ME
2. I installed a new bearing in the retainer then I put it all back together – excluding 2 thrust washers, 1 dowel pin, 1 spacer and the original output shaft – necessary for the doubler kit:
203_029.jpg


Factory shaft on the left, Doubler shaft on the right:
203_028.jpg


3. I then installed 15 roller bearing in the input shaft coating them with Vaseline and installed the output assembly in the case:
203_033.jpg

203_034.jpg


Here’s what I’m starting with:
NP435_001.jpg

NP435_002.jpg

NP435_003.jpg

NP435_004.jpg


NP435 Rebuild Kit: From Novak Conversion INC.
NP435RebuildKit001.jpg
 
OP
OP
Tim D.

Tim D.

Jr. Member
Joined
Mar 6, 2007
Messages
135
Loc.
Houlton, ME
1. Starting the NP435 rebuild:
np435_001.jpg


2. Pulled the throw-out bearing, clutch fork and bellhousing:
NP435_2.jpg


3. Removed the shifter by pressing down on the cap and rotating:
NP435_3.jpg


4. Removed the top-cover:
NP435_4.jpg


5. Internals: First speed/reverse gear on the left, second speed syncro, second speed gear, third speed gear, third/fourth gear syncro, fourth speed gear. Reverse counter gear upper left.
NP435_5.jpg


6. Removed the input shaft bearing retainer:
NP435_7.jpg


NP435_8.jpg


7. Pulled the input out, then slid the mainshaft back and tapped the bearing off. Then tilted the shaft upwards and pulled it out:
NP435_10.jpg


NP435_11.jpg


8. Counter-shaft and reverse counter-shaft:
NP435_12.jpg
 
OP
OP
Tim D.

Tim D.

Jr. Member
Joined
Mar 6, 2007
Messages
135
Loc.
Houlton, ME
9. Tore the mainshaft down by removing the snap rings and sliding the assemblies apart:
NP435_13.jpg


10. Cleaned everything up:
NP435_14.jpg


11. The new short-shaft for my short shaft doubler kit above, the old shaft below:
NP435_18.jpg


Assembly:

12. Clean Case:
np435_034.jpg


13. Tapped in a new Torrington bearing, put a new thrust washer and slid the countershaft back in:
NP435_035.jpg


NP435_036.jpg


14. Pulled the roller bearing race out of the retainer with a 3-jaw puller and a bung placed in the bottom:
NP435_038.jpg


15. Installed a new roller bearing race, cage and rollers in the retainer. Intsalled a new thrust bearing race and thrust bearing. Installed bearing retainer:
NP435_039.jpg


16. Installed a new syncro brake on the second speed gear, slid it on the new mainshaft and installed the retaining ring:
NP435_040.jpg


17. Slid the third speed gear on the shaft:
NP435_041.jpg
 
OP
OP
Tim D.

Tim D.

Jr. Member
Joined
Mar 6, 2007
Messages
135
Loc.
Houlton, ME
18. Installed the whole pack of syncro shims and slide a syncro outer ring on, along with the syncro clutch drive gear:
NP435_042.jpg


19. Slid the third/fourth speed syncro on along with the front outer ring:
NP435_044.jpg


20. Put the mainshaft assembly back in the case and pressed the rear mainshaft bearing on:
NP435_047.jpg


NP435_048.jpg


21. I now had to remove the input shaft tapered roller bearing races. I didn’t have a puller long enough to remove the bearing from the shaft so I tried heating it, hoping it would relax enough to slide off with a few blows from a hammer. Didn’t happen. So then I figured if I took a cut-off wheel on the dremel and cut a slit as deep as I dared I’d be able to crack the race with a blow from a cold chisel. That didn’t work either. So I moved on to the retainer. The bottom of the retainer is blind, where by no means can you get a punch or puller behind the bearing, as it is pressed up against this surface. Here again, I tried cutting the bearing and hitting it with a chisel, hoping it would crack. No worky, I did however end up getting part of the race to shatter and imbed in the knuckle of my finger. The solution was to plunge a solid carbide 4 flute endmill close to the wall of the retainer and down through the race. This allowed the race to relax enough to be removed. For the shaft, that race was removed by turning it down on the lathe.

NP435_050.jpg


NP435_051.jpg


NP435_053.jpg


NP435_054.jpg


NP435_055.jpg


Bearing Race after plunging a solid carbide 4 flute endmill, this relief allowed the race to relax enough to be easily removed:
NP435_057.jpg


What remained of the race on the input after turning it down. Just had to split the rest with a hardened pick:
NP435_058.jpg
 
OP
OP
Tim D.

Tim D.

Jr. Member
Joined
Mar 6, 2007
Messages
135
Loc.
Houlton, ME
I put the input shaft in my mom’s freezer along with the retainer race. I set the oven to 200deg and put the input bearing and the retainer in. After the parts had become cold/warm, I was able to slide the corresponding components together:
NP435_060.jpg


NP435_061.jpg


Installed the roller bearings in the end of the input with Vaseline. Installed the thrust washer and retaining ring then loaded the assembly into the case.
NP435_062.jpg


NP435_063.jpg


This is where my brother called and I stopped taking pictures. First off, I set the endplay on the input/mainshaft. This is established by the thickness of gasket used behind the retainer. I put everything together sans any gaskets and measured the gap between the case and the retainer with some feeler gauges. To this I added the amount of desired endplay and selected the proper gasket combination. I then reinstalled the retainer, this time including the gaskets and set-up a dial-indicator. I zeroed the dial with the shaft pushed all the way back and then pulled the shaft forward. I adjusted gaskets till this reading was acceptable. NOVAK says the endplay should be .001 - .005, Ford says the endplay should be .007 - .017. I ended up with .010 and can’t get any lower with out getting some different gaskets. After this was established, I set the syncro back-off by adding subtracting shims. This is supposed to be set to .050 - .070. I ended up with .058. To do this, measure the gap with a 2 sets of feeler gauges, remove/add shims as necessary, re-measure, and re-adjust until correct. After setting the back-off, I rechecked the input end play.

Measure back-off between the syncro drive plate and the input gear:
NP435_065.jpg


Case all buttoned up and ready for paint:
NP435_064.jpg


Everything is being painted with the color scheme of choice:
color.jpg


NP205 Rebuild:

Rebuild kit from Transmission Exchange Company:
NP205_008.jpg


What I started with. Just like the rest of the driveline, caked with an inch of dried gear oil mixed with dirt and dust. Someone wasn’t concerned with leaks too much.
NP205_003.jpg


1. Sprayed down with engine-brite. I worked the biggest part of crud off with a wire brush and then hauled it off to the local coin-op for a shower:
NP205_006.jpg
 
OP
OP
Tim D.

Tim D.

Jr. Member
Joined
Mar 6, 2007
Messages
135
Loc.
Houlton, ME
2. Semi clean case ready for disassembly:
NP205_010.jpg


3. Unbolted the adapter and removed it along with the shifter and linkages:
NP205_013.jpg


I didn’t accomplish as much as planned over the weekend. The town summer festival was in full swing so I went out and spent some time with the friends. Also ran out of supplies so that slowed things down to. I did manage to tear the case down, clean all the parts and assemble the rest of the drive-train that I had painted.

4. First I pulled the yokes off. Them things were stinkin tight, had to resort to the persuader. I’m quite satisfied with it, all the power I’ll ever need out of a ½” drive:
np205_014.jpg


NP205_015.jpg


5. Taped the front output shaft rearward to knock the bearing retainer loose, then I slid the front output assembly out the back:
NP205_017.jpg


NP205_018.jpg


NP205_020.jpg


6. Removed the rear output and front out bearing retainers. Pulled the input/rear output shaft assemblies out:
NP205_021.jpg


NP205_024.jpg


7. Knocked the freeze plugs into the case in order to gain access to the roll pins in the shift rails. Knocked the roll pins out with a roll pin punch and removed the shift forks and shift rails:
NP205_025.jpg
 
OP
OP
Tim D.

Tim D.

Jr. Member
Joined
Mar 6, 2007
Messages
135
Loc.
Houlton, ME
8. Removed the locking nut for the counter shaft and removed the backing plate. Knocked the shaft out of the case and carefully removed the counter gear, bearings, thrust washer and shims:
NP205_027.jpg


Doubler Assembly:

Painted all the components and started putting things together.
NP205_032.jpg


NP205_035.jpg


NP2052_039.jpg


The gear teeth that engage the sliding clutch to select low/high were eaten up bad, to the point that on the low gear only half the tooth width is remaining. Appears someone tried to change range while moving at a fair speed. Gonna try and track down some new parts and at least see how much they cost.

NP205 Assembly:

9. Cleaned all the parts with Castrol Super Clean. Warning, aluminum parts left in Castrol Super Clean over night will have a thick crystalline, salt-like form of oxidation. This mess is very concentrated at the fluid line and though not as thick, but still occurs below the fluid level.

10. First step was to knock out the old bearing races in the idler gear and replace with new tapered roller bearing races.

11. Next I assembled the idler gear and shaft with its bearings, shims and spacer in order to set the preload. I then laid a tapered bearing on the bench, set the idler gear on top of it and continued the assembly: bearing spacer, shim pack, and bearing. I then slid the idler shaft through the assembly. I made a spacer to slide over the end of the shaft, slid on a thick washer the nut and torqued the assembly to 150ft/lb. Then, clamped in a vise, I set up a dial-test indicator and measured the play. When the nut is tightened, the two bearings sandwich the spacer and shim pack. The more shims you add, the more endplay you have, and vice versa. It is very important that the spacer/shim pack be compressed. If those units are loose after tightening the nut, you do not have enough shims; the bearings will fail in a short time frame. The book calls for .000 to .002 of endplay. I set mine up with all the shims I had and had right around .0005 of endplay. It felt a bit tight by hand, but the shims and spacer were properly compressed and the number is within the limits as specified by Ford.
np205day2_002.jpg


np205day2_003.jpg


12. Then I lathered up the new thrust washers with Vaseline and put them in there place in the case. I then very carefully (trying to keep everything together) slid the idler assembly in its place. Once satisfied, the idler shaft was slid through the assembly and pressed in place and the lock nut torqued to 120ft/lbs. Then came a new input bearing and the input shaft.
np205day2_004.jpg


13. Then the sliding clutch was lubed and installed along with the shift fork.
np205day2_005.jpg


14. I don’t have any in-process pics, but the rear output assembly was rebuilt with new roller bearings in the bore, new rollers for the low range gear and a new thrust washer pin. Here it is installed in the case.
np205day2_007.jpg


np205day2_006.jpg
 
OP
OP
Tim D.

Tim D.

Jr. Member
Joined
Mar 6, 2007
Messages
135
Loc.
Houlton, ME
15. I then moved on to modifying the shift rail for independent range operations of the front and rear outputs.

This is the rear output rail, (rail closest to the input), it is the rail that must be modified.
np205day2_010.jpg


I completed this mod by extending the rear detent by 0.4375 (7/16). This material was removed to the original depth of the detent. I then modified the front detent by also extending it 0.4375. However the detent was extended while maintaining original taper. Thus material from the flat in the bottom must be removed. I was careful to only remove as little material as I had to so that engaging one output in high while the other is in low is not possible.
Before:
np205day2_010.jpg


After:
np205day2_011.jpg


np205day2_012.jpg


np205day2_013.jpg


While waiting for parts I painted the t-case and finished assembling the rear output. Pressed a new caged roller bearing in the tail-housing, installed it, a new output bearing, and the bearing retainer.

The gear and yokes I ordered came in so I was able to finish the rebuild.

1410 U-Bolt yoke compared to the stocker:
np2052_003.jpg


np2052_005.jpg


The new front output high range gear compared to the old:
np2052_009.jpg


16. Rebuilt the front output shaft with new roller bearings and a new high range gear:
np2052_011.jpg


17. Installed the shift rails:
np2052_012.jpg
 
OP
OP
Tim D.

Tim D.

Jr. Member
Joined
Mar 6, 2007
Messages
135
Loc.
Houlton, ME
18. Installed the front output shaft assembly and slid the shift fork onto the shift rail:
np2052_015.jpg


Finished product, minus the yokes:
np2052_019.jpg


picked these up: '78-'79 Ford HP D60, Ford MotorHome D70

Axle_002.jpg


Chassis Build:

Started with a 1973 stock rolling chassis: Out with the Old,

73earlybronco001.jpg


73EarlyBronco002.jpg


73EarlyBronco004.jpg


73EarlyBronco005.jpg


Sand blasted and primed the frame
The factory weld quality of this thing is really poor:

73EarlyBronco008.jpg


73EarlyBronco009.jpg


73EarlyBronco010.jpg
 
OP
OP
Tim D.

Tim D.

Jr. Member
Joined
Mar 6, 2007
Messages
135
Loc.
Houlton, ME
Went around and rewelded stuff that is not going to move during the build:

73EarlyBronco012.jpg


Frame up on stands and leveled:

302 back in (until the 351 is ready)
NP435 in
NP203/NP205 Doubler in
9” back (for setup only)

73EarlyBronco013.jpg


73EarlyBronco016.jpg
 

Juntura

Jr. Member
Joined
Jan 17, 2007
Messages
90
Nice work! Thanks for all of the photos and info. Amazing how poor some of the factory welds are. The welds on the '66 Bronco I just picked up are way worse than anything I saw on my '66 F100.
 

bax

Contributor
Old Member
Joined
Aug 22, 2005
Messages
14,493
Great post. lots of good pictures and info. love that doubler, it sure is purdy.
 

crawln68

Bronco Guru
Joined
Oct 8, 2004
Messages
3,045
Hey Tim,

Really nice work so far. I found some pics of mine during my build for you. Here is waht mine looks like. I think you will need to lower your t-cases a bit. If you leave them where they are, you will have body fitment issues. Where I left mine, I had to notch into my floor panels to clear the 205. I have a 2 inch body lift on mine. If I was running a 3 inch body lift, I MIGHT have cleared the floor with out cutting into it.
 

Attachments

  • 435_203_205_1.JPG
    435_203_205_1.JPG
    71.5 KB · Views: 58
  • 435_203_205_2.JPG
    435_203_205_2.JPG
    95.5 KB · Views: 48
  • 11766100_0329-med.jpg
    11766100_0329-med.jpg
    58.5 KB · Views: 40
Top