Great Progress!


Community
Message Forum
Photo Gallery
Event Calendar
Book Reviews
Bronco Wallpaper
Bronco FAQ
Link Back to CB!
Photo Gallery
Event Calendar
Book Reviews
Bronco Wallpaper
Bronco FAQ
Link Back to CB!
Buy / Sell


Bronco Tech
3 Arm Wiper Setup
Fix Motor Mount
Roll Cage Braces
Throttle Body 65mm
Wheel Alignment
Heat Riser Replacement
Vent Window Repair
Center Console Mount
Straighten Bumper
Ford 6R80 6 spd
More Tech...
Fix Motor Mount
Roll Cage Braces
Throttle Body 65mm
Wheel Alignment
Heat Riser Replacement
Vent Window Repair
Center Console Mount
Straighten Bumper
Ford 6R80 6 spd
More Tech...

Install the app
-
Welcome to ClassicBroncos! - You are currently viewing the forums as a GUEST. To take advantage of all the site features, please take a moment to register. It's fast, simple and absolutely free. So please join our community today!If you have problems registering or can't log into your account, please contact Admin.
You are using an out of date browser. It may not display this or other websites correctly.
You should upgrade or use an alternative browser.
You should upgrade or use an alternative browser.
TX SS – 1973 Ford Bronco Build
- Thread starter TX SS
- Start date
Scott...that looks great! Giving me something to shoot for...also making me want to finally start a build thread.
Digging the flush windshield. What were the steps you did for the black perimeter if you don't mind to share. TIA and great looking build!
Thanks. I used the blue tape, 3/4", then the green, 1 1/2", and then removed the blue tape leaving 3/4" area to paint around the perimeter of the glass. For the black itself, it is 3m primer, part number 08682 from Amazon. To apply you use wool daubers. I bought a cheap 100 pack on Amazon. The primer sets up very fast and you should brush/apply once thick enough and then keep going around the glass. If you try to go back over the already applied and drying primer it will streak and give you brush strokes. No special prep for the glass other than to clean before applying the primer.
- Joined
- Mar 8, 2007
- Messages
- 81,747

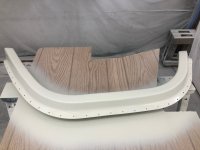


Hood ready to go on. Now on the top. Black epoxy on inside, to be covered with dynamat and headliner and trim panels. Final primer on exterior bottom side. Need to block and paint, hopefully in the next 3 or 4 days. Then will flip it over and do top side.
Attachments


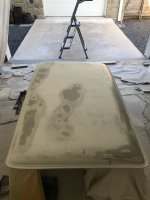
Finished bottom side of top and wet sanded to 1500. Guess I forgot to take pictures. Now on roof skin. Bare metal to first epoxy last Saturday. Filler yesterday and final epoxy today.
Attachments


Looking good.
Thanks gnsteam. Can’t wait to see yours done.
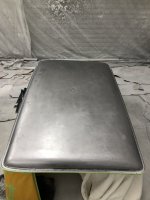
Finished up painting top today. Did seam sealer in the gutter, sprayed a sealer coat and then four coats of paint. Today was a decent paint day, less orange peal than some prior tries. Gun settings, low humidity, who knows, just glad its down.
Finished up painting top today. Did seam sealer in the gutter, sprayed a sealer coat and then four coats of paint. Today was a decent paint day, less orange peal than some prior tries. Gun settings, low humidity, who knows, just glad its down.
Attachments


Great work! Where are the flares from?
Great work! Where are the flares from?
Thanks. The flares are Wildhorses gorilla war flares, trimmed down and notched for replacement rockers.
Good to know. I want to paint my war flares and was curious how they accept paint. I was hoping I didn't have to move to fiberglass.
Good to know. I want to paint my war flares and was curious how they accept paint. I was hoping I didn't have to move to fiberglass.
I scuffed and used an adhesion promoter first, but normal paint process after that (epoxy, sand, sealer, paint). Hopefully they hold up.
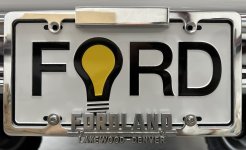

I really like how you incorporated the dealer emblem into the frame.
nice seeing all the details coming together.
Similar threads
NV
***Wanted*** 1973 Ford Bronco Ranger Parts, tire cover, air cleaner, valve covers, steering wheel
City: Reno, NV
- Replies
- 1
- Views
- 408
- Locked
City: Melbourne
Price: $210
- Replies
- 0
- Views
- 328
- Replies
- 1
- Views
- 847