 Following are my notes from installing an Aussie Locker from Torq Masters into my Dana 44 front end. The unit itself is well made and very stout. The instructions are detailed and well thought out. They don't leave you scratching your head trying to figure them out like many product sheets. The install went very smoothly and would probably have taken half a day if I hadn't also been taking photos and setting up new gears. I ran into only one issue and that was with my existing parts, not the locker. Hopefully my experience will help you avoid the same problem. In addition the tech support (Bill Cole in particular) was very responsive in helping me track down and solve the problem. Following are my notes from installing an Aussie Locker from Torq Masters into my Dana 44 front end. The unit itself is well made and very stout. The instructions are detailed and well thought out. They don't leave you scratching your head trying to figure them out like many product sheets. The install went very smoothly and would probably have taken half a day if I hadn't also been taking photos and setting up new gears. I ran into only one issue and that was with my existing parts, not the locker. Hopefully my experience will help you avoid the same problem. In addition the tech support (Bill Cole in particular) was very responsive in helping me track down and solve the problem.
Trail Review:
A couple of weeks after writing this article I was finally able to get out on the trail and really see what it could do. My test trail was Lower Terminator because it's fairly technical (rated 3-4 depending on conditions) and I've been on it several times before. I was familiar with the obstacles that had given me problems in the past and was curious to see how my new Aussie Locker would handle them.
I can tell you right now that I'm not going back to an unlocked rig. I upgraded from a factory limited slip to the Aussie Locker and the difference was amazing. I imagine going from an open differential would be that much more impressive. The extra traction meant I was able to use much less throttle and much more finess. Obstacles that took me several attempts in the past were conquered in a single try. And all of this is still with my rear end unlocked.
One item of note is the affect on steering. It's minimal, but there (at least on my install). I can definitely tell the difference now between driving down a dirt road in 2 and 4 wheel drive. Also, in the rocks the wheel tends to fight you a little more. I don't consider the affect severe enough to be a negative, but rather just something to get used to and keep in mind.
Overall I'm very happy with the Aussie Locker. It's easy to install, performs great and for about $230 it's an excellent value.
|
A few notes before you begin.
- The Aussie Locker is designed to be installed in an open carrier. If you have a limited slip differential (ie. the factory installed Trac-Lock) you'll need to switch to an open carrier. See the end of this article for more info.
- This article assumes you will be reusing your old carrier, ring & pinion gears and bearings. That way everything can go back in the way it came out and you won't need to setup new gears, which is a much more involved process. Look for a separate tech article in the near future on new gear setup.
Because of the length of this article I've split it up into a few sections:
|
Parts Overview:
|

|
When you open the box you'll find (2) cam gears, (2) axle gears, (2) spacers, (4) pins and (4) springs. Also included is the installation manual and Operator's Guide.
|
Differential Disassembly:
|

Here's what a few deep water crossings will give you. Hopefully your gear oil looks a little clearer than this.
|
Park on a level surface. Put the transmission in gear (or park) and chock the rear tires. Raise the front axle with a floor jack and secure jack stands under each end. Place a drain pan under the differential and remove the cover bolts, which should start the flud draining. Let it drain while you work on taking out the axle shafts.
First remove both tires and then disassemble the locking hubs. If you have disc brakes remove the calipers, hub/rotors, sprindles and backing plates. If you have drum brakes remove the drums, shoes and backing plates. You should now be down to the bare knuckles on both sides and can pull out each axle shaft.
|
|
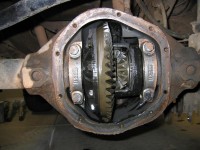
By now the differential should be completely drained. Finish removing the cover if you haven't already. Inspect the gear and inside of the housing for any metal shavings or damage.
|

|
Now take a look at the pinion shaft (cross shaft) in relationship to the ring gear. If the ring gear is thin enough you may be able to slide the shaft out past the teeth, which means you don't have to take the carrier out of the housing. But typically with a Dana 44 the ring gear is too thick and so the carrier has to come out and the ring gear removed. (See photo)
|

|
Before you remove the carrier side bearing caps you need to mark them. They need to be reinstalled in exactly the same way they came out. You can't turn them over or switch sides. If they haven't been marked by the factory or a previous owner (see photo for example) then you'll need to mark them with a punch or dremel.
Next loosen the cap bolts, but leave them just a few turns from coming all the way out. Now pry and wiggle the bearing caps away from the carrier, being careful not to damage the races. Leaving the caps loosely attached will allow you to pry the carrier most of the way out, but also keep it from suddenly falling out and dropping on the floor (or your toes).
|

|
Now it's time to remove the actual carrier. This can seem like the most difficult part of the whole process. Most carriers take a lot of determination and some really choice words to get out. Start by using a large prybar, but be careful not to pry against the ring gear teeth or inner spider gears. You might try a chain or strap wrapped around the carrier. Then you can slip the prybar through the strap and leverage against the axle housing instead of the carrier or gears. One trick is to wedge a rag below the ring gear and then turn the gear (or pinion). This forces the rag to get sucked in where the ring gear and pinion gear teeth mesh and should help leverage the carrier out a little. Then follow up with the prybar.
|

|
Once the carrier is loose finish pulling the side bearing caps and lift the carrier completely out of the housing. Be sure to keep each side carrier bearing race with it's respective bearing since they're matched.
Move the carrier to a clean work surface. If you plan to re-install your old ring gear then mark it's position on the carrier. It needs to be reinstalled the same way it came off. Once it's marked unbolt the ring gear and set it aside.
|

|
Now use a punch to tap out the roll pin holding in the pinion shaft (cross shaft). If you don't have the right size punch an old drill bit makes a good substitute. Just be sure to use a brass or plastic dead blow hammer and definitely wear eye protection. Drill bits are hardened and a normal steel hammer can shatter them. (Photo shows roll pin already removed)
|

|
Tap the pinion shaft (cross shaft) out of the carrier and the spider gears should fall right out. You can toss all 4 spider gears, but you need to re-use (or buy new) the thrust washers. These are the larger washers behind each side spider gear. (2 total)
Now you're left with the pinion shaft, thrust washers, and the carrier itself.
|
Examination of the parts:
|

|
These are the parts you'll use from your existing open carrier; pinion shaft, thrust washers, and the carrier itself. You should also buy a new roll pin to secure the pinion shaft in the carrier.
The spider gears (side gears) inside the carrier will be discarded since the Aussie Locker replaces them.
|
|
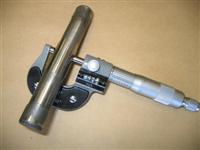
Check that the pinion shaft isn't worn. Using a micrometer compare the diameter at the end of the shaft with a spot where the side gears ride. There should be no more than .002" difference.
|
|
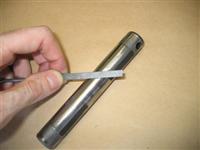
Double check the hardness of the shaft by scratching it with a small file near the center. The file should slip off the surface, not leave a groove. If it leaves a groove then the shaft should be replaced.
|
|
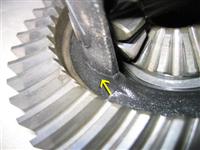
Examine your carrier for chips, cracks or other damage. If you find any you'll need to get a new carrier. Here you can see one of the four cracks that I found when I removed my carrier. This was a disaster waiting to happen! Luckily I wasn't going to reuse the carrier anyway since it's a limited slip carrier and the Aussie Locker requires an open carrier.
|

|
Check your thrust washers for wear and warping. When I first insalled the locker I couldn't get the tolerances to meet specs (see next section). It turns out my original washers were warped. A quick trip to the Ford dealer got me two new ones. See the photo to the left comparing the new (left) and the old (right).
|
Checking Case Tolerances:
|

|
In this step you'll need to partially assemble the locker in the carrier/case to be sure the tolerances are within spec.
First, place your carrier in a bench vice. Be sure to use plastic or rubber vice jaw inserts so you don't damage the carrier. Open the Aussie Locker box and take out the Axle Gears and the Spacers.
|

|
Coat the Axle Gear teeth, center opening and back with medium to heavy axle grease. This will help hold the parts together during assembly.
|

|
Take your existing thrust washers and install one on the back side of each of the two Axle Gears.
|

|
Install one Axle Gear with thrust washer into the carrier.
|

|
Now the other side.
|

|
Put a little grease on the back lip of the spacers and install one on each Axle Gear. The open end of the spacer goes toward the Axle Gear.
|

|
Now carefully install the pinion shaft (cross shaft). Always use a plastic or brass hammer to avoid damaging the shaft. As the shaft starts to engage the spacers be sure they are completely pushed to each side so the shaft can pass between them.
|

|
Tap the shaft completely into position. The ends of the shaft should be flush with the outside surface of the carrier.
DO NOT install the roll pin at this time. The pinion shaft is coming back out for the next step.
|
|
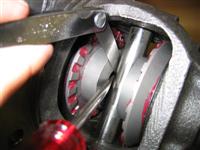
Using a screw driver pry one of the spacers away from the pinion shaft. Measure the gap (at the tightest spot) using a feeler guage. Repeat for the other side. The gap should be .006-.020". This is a critical measurement and will affect how the locker functions. If it's not within range you need to figure out why and correct it before proceeding.
If the gaps are within range you can go on to the next step. Slide the pinion shaft back out using a brass punch. Also remove the Spacers, but leave the Axle Gears and thrust washers in the carrier.
|
Preparing the Remainder of the Parts:
|

|
Now you're ready to assemble the rest of the locker into the carrier.
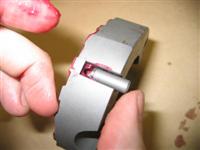
Grease the Cam Gear inner opening, pin slots and gear teeth. DO NOT put grease into the small pin holes. If you do the pins won't be able to slide all the way in.
|
|
Install each pin into the slots with the step of the pin toward the base of the slot as shown.
|

|
Insert a Spacer into each Cam Gear. Orient the Spacer as shown so the open end is toward the Axle Gear that you left in the carrier from the previous step.
|

|
Insert one assembled Cam Gear with Spacer into the carrier on the ring gear side (passenger side). Mesh the teeth with the teeth of the Axle Gear.
|

|
Reach a finger in and push the Spacer away from the center (toward the Axle Gear).
|

|
Insert the 2nd assembled Cam Gear with Spacer into the carrier. The flat sides of the Cam Gear allow it to clear the carrier housing. If you try to install the Cam Gears starting on the non-ring gear side you won't be able to fit the 2nd Cam Gear in because the carrier opening is smaller on the ring gear side.
|

|
Again, mesh the teeth against the Axle Gear. Rotate the Cam Gears until the pinion shaft holes line up and then push the Spacer away from the center.
|

|
Slide one of the pins across the center gap and into the hole in the opposite Cam Gear.
|
|
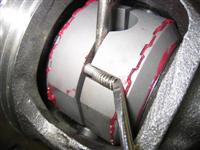
Insert one of the Springs in the slot where the pin used to be. It helps to use a screw driver to keep the 2 halfs apart. Use another screw driver or a pick to coax the spring in.
|

|
The Spring should slip over the stepped base of the pin and into the recess at the bottom of the pin slot. When the first one is done rotate the locker around to install each of the other 3 Pins and Springs.
|

|
Rotate the locker assembly so the pinion shaft hole lines up with the hole in the carrier. Tap the pinion shaft in. Be carefull no to damage the center Spacers.
|

|
When tapping in the pinion shaft be sure the shaft is installed completely so the hole for the roll pin lines up. But don't install the pin until you completed the next step.
|
|
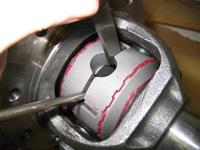
Measure the center gap. This is another critical step. The gap needs to be within range for the locker to work properly.
Use a feeler guage to check the gap between the two halfs. It should be between .145" and .170". (You'll need to stack several of the feelers together to get that measurement.) If you're not within spec you'll need to determine why not and fix it before you can proceed. If this gap isn't within specs, but the first gap you measured was then double check that everything was installed properly and that no debris made their way into the assembly.
|
|
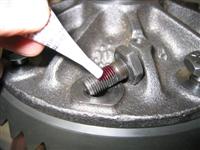
Install the ring gear on the case. Assuming you're re-using your old gear and case, make sure to line up the marks that you made when you disassembled. Use some red Loctite on each bolt. You don't want these coming loose.
|

|
Torque the ring gear bolts per your factory specs. (Should be 55 ft lbs)
|
Reassembly:
|

|
Now you're ready to put the assembled carrier back into the differential housing. (I recommend installing new inner axle seals since you're already in there.)
Again, assuming you haven't changed your ring & pinion gears you should be able to put everything back in they way it came out. Be sure you put the original side bearing races back on the side they came off. (DO NOT grease differential bearings. Only use gear oil.) While holding the races on from each side carefully lift the carrier into position in the housing. Depending on how tight your preload shims are it may take some effort to squeeze the carrier back in. Just be patient and don't drop it. Once it's started in you can use a plastic dead blow hammer to help it along.
|

|
Once the carrier is seated install the bearing caps. Remember that you marked them and that they need to go in the same way they came out. Torque the bolts down to 60 ft lbs.
For now leave the differential cover off. Reinstall both axle shafts, backing plates, brakes, hubs, etc. Put both tires back on also, but don't take the vehicle off the jack stands just yet.
Now it's time to do the "spin test" per the Aussie Locker instructions. You need a friend/spouse/kid to help with this. I figured I could do it single handed and only needlessly worried myself because I failed the test. Once I convinced my wife to help out it worked perfectly.
Put the transmission in gear and the t-case in 4WD. With both tires on, turn one until it stops against the locked driveshaft. Have your helper keep pressue on it.
Rotate the other tire in the opposite direction. It should unlock and spin. The clicking you hear is normal for the test.
Have your helper turn their tire in the opposite direction until it locks. Turn yours again in the opposite direction. Again, it should unlock and spin/click.
Switch tires with your helper and repeat the same process on the other side.
If you passed you're ready to go. Install the cover and fill the oil to the bottom of the drain plug hole. Double check all your connections, lug nuts, etc and then you're ready to test it on the road!
|
What if I have a Factory Limited Slip?
|

|
The Aussie Locker is designed to be installed in an open differential. So what if your Bronco has a factory limited slip? It's not a big deal, but you'll need to gather some additional parts as shown in the photo:
- Open carrier
- Pinion shaft (cross shaft)
- 2 thrust washers
|

|
 These photos compare a factory limited slip carrier with an open carrier.
|
|


