


Tech article by Chris (taipeichris)
I’ve owned my 66 Bronco since August 2004 and my wipers never did a good job. I live in Los Angeles it really doesn’t rain much but almost every morning the entire car is covered in dew, often covering both the inside and outside of the windshield.
After researching all the options out on the market I wanted my wipers on the bottom of the windshield frame but either the options were too expensive or would place big moving linkage at eye level on the dash.
Then in 2006 I saw the FJ Cruiser, it had 3 wipers, did a great job, and had a cool factor.
The one option I did like was a kit offered by Specialty Power Windows located in Georgia. I called their tech department, they were extremely helpful and did mention that one customer in Australia was purchasing extra transmissions for their kit so maybe someone somewhere is doing a 3 wiper setup.
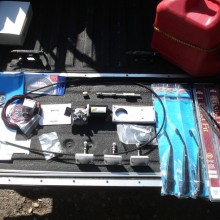
Basically the Specialty Power Windows Kit is designed with an electric motor driving a cable inside of a metal tube. Where the tube connects to the wiper transmissions the tube is cut, single flared, cable exposed, run though the transmission past a drive gear, and the tube is run to the next transmission assembly.
I’m not going to explain the installation instructions from Specialty Power Windows, I will simply write this with the understanding that YOU read THEIR installation instructions completely. Also, Specialty Power Windows provides an installation DVD with their kits.
Pros:
2 wiper kit with intermittent wiper switch $285.00 shipped
1 female/female 3/8 brake line fitting $3.00
1 3 foot long 3/8 hard brake line $4.00
3 1999 Jeep TJ wiper arms, part #42591 $12.99 each
3 13 inch wiper blades, part #13-1 $6.99 each
3 splined shaft adapters, [not supplied in the kit to fit the TJ arms but SPW has them.]
1 spray bottle of water $0.00
1 medium size of sheet aluminum $9.00
10 self-taping sheet metal screws $0.00
4 nuts, bolts, and washers $0.00
12 pop rivets $0.00
1 roll blue masking tape $3.99
1 box weather strip glue $6.99
1 can white lithium grease $3.99
1 can black spray paint $2.89
Tools:
http://stores.ebay.com/JPL-Street-Rods
(724) 375-3940
Also, the guys at Specialty Power Windows were a huge help!
http://www.specialtypowerwindows.com/main.php
(800) 634-9801
Getting Ready:
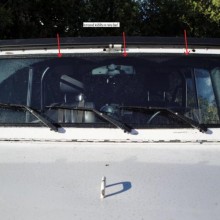
First I removed the old wipers, the stock switch, the 2 chrome windshield knobs, disconnected the upper windshield braces, and folded down my front windshield down.
Time to Measure, Drill, and Cut:
I wanted to get as much sweep with the wiper blade as possible so I mocked it up and tried to see what would work.
First I drilled out the rivet on 1 wiper arm, disconnected the spring and loosened the crimp on the arm holding the end length into place. I mocked up 1 wiper arm and 1 wiper blade to find where the best location of the park position would be. The key is to find a spot below the glass but as high as possible above the windshield hinge.
Here is a tech article by “Wyflyer” on how to shorten a Jeep wiper arm. You will need to shorten all 3 wiper arms if you decide to use the Jeep TJ wiper arms. When you complete the set up I suggest you spray paint the wiper arms at this time, mine from Kragen faded.
https://classicbroncos.com/forums/threads/cherokee-wiper-arm-swap.130212/
OR, if you want you can buy the adjustable stainless steel wiper arms from Specialty Power Windows. This will save you time and you will not need to purchase the larger splined shaft adapter from SPW either. The kit provides you with the correct splined shaft adapters for their adjustable wiper arms.
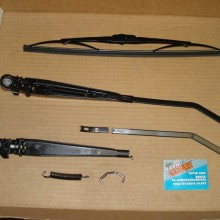
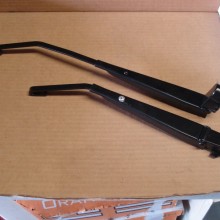
Here’s two pictures to compare their wiper arms to the TJ wiper arms.
NOTE: DO NOT REMOVE THE TAPE UNTIL THE PROJECT IS COMPLETE.
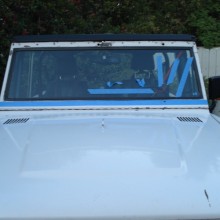
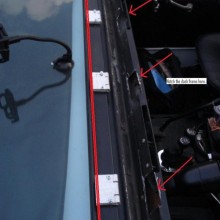
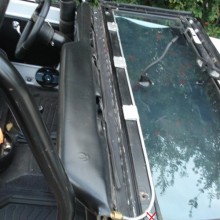
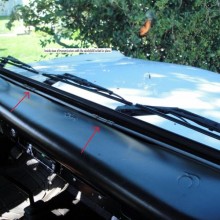
Next I took blue masking tape and taped two strips the width of the windshield then I took blue masking tape to mock up the wiper sweep arch. I tried it with an 11, 12, and 13 inch wiper blade. I liked the 13 inch the best, it covers the most amount of glass when completed. I marked where to drill for the wiper transmissions and used the protractor to measure the sweep. I like 120 degrees. This is explained clearly in the SPW instructions and on their DVD.
After I found the optimal location to install the drivers side wiper arm I then measured for the middle and passenger side wiper arm.
I took the total measurement of the remaining space, subtracted 26 inches, and dived the remaining amount for the distance between the wiper blades in their park position. This will vary depending on the length of your wiper blade.
NOTE: Depending on your wiper arms and your wiper blades the locations of the transmissions will vary. Measure according to your application.
Drilling:
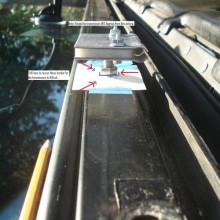
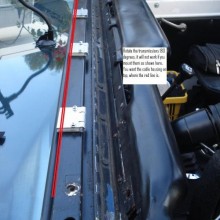
I first made a paper template with note cards showing where the holes would be drilled. I drilled from the front of the windshield frame though the rear to make certain the holes lined up. I then taped my template to the inside edge of my windshield frame and drilled ONE transmission at a time. The hole on the front will be the diameter of the transmission shaft. This same hole will be made larger on the rear of the frame to recess the large locking nut. Two more holes will be drilled on the rear to recess the bolts keeping the transmissions together.

After drilling I needed to remove enough metal from the frame to recess the transmission into the frame.
NOTE: Originally I attempted to mount the wiper transmissions with the tube housing down, closer the to the windshield hinge. After attempting it, too much cutting was needed, and the frame wouldn’t close flush so I opted to mount the wiper transmissions with the tube housing up.
At this time I mocked up my first wiper transmission, measured the required length according to SPW instructions, and trimmed the length of the transmission shaft. Measure twice, cut once.
NOTE: In retrospect I should have cut the transmission shaft longer for the wiper arm to clear with the spring installed.
After drilling and trimming for all 3 wiper transmissions, [remember drill, cut, install one at a time] I then marked on the dash pad and frame as to where to cut. It was necessary to trim the dash pad and dash frame in order to recess the wiper transmissions and to have my windshield frame sit in its original position.
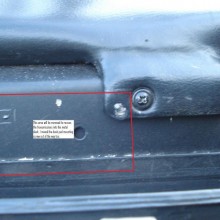
Mounting the wiper motor assembly.
According to SPW instructions, it’s best to have the cover of the motor assembly facing out for adjustment. After mocking up the motor assembly, the most logical place was exactly where the passenger cold air box was located. With the motor assembly fitting recessed between the kick panel and fender I would be able to route the wiper cable tube directly into the motor assembly.
On my 66 I haven’t used a passenger side cold air box for years but on your Bronco you will need to remove the passenger side air box.
Fabricating An Aluminum Box While Watching TV:
Next you will need a metal enclosure or housing to protect and water proof the back side of the motor assembly. I searched all over for a prefab solution to this but ended up just making my own aluminum box. I like aluminum since it will not rust.
I measured and drew a template with a paper shopping bag. I wanted to make sure I had enough space to get my fingers inside the box. Also I didn’t want the box to be too deep and hit the fender.
After successfully test fitting my motor assembly into the paper bag box, I unfolded the paper template and traced it onto a piece of sheet aluminum. I chose a thin grade for the ease of making multiple 90 degree bends with my vice grips.


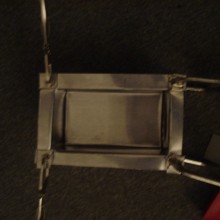
After making all of my 90 degree bends in the aluminum box I then drilled, and riveted it together. Upon completion I sealed the seams to make to box water proof.
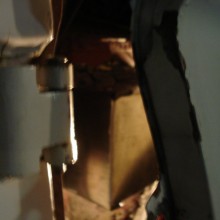
Again I made a note card template for installing the new aluminum box. A surprisingly small amount of metal was needed to be removed from the kick panel to install the aluminum box. I marked off where to cut and trimmed with my grinder and cut off wheel.


Next I cut the mounting bracket supplied in the kit from SPW in half. The rear bracket I bent 90 degrees and the front I didn’t bend. On the rear bracket I had to notch the bracket to match the contour of the motor. I measured and drilled 2 holes per bracket. The box I installed with self taping sheet metal screws to the cowl. Next I mounted the motor assembly nuts and bolts, drilling 4 holes as needed.
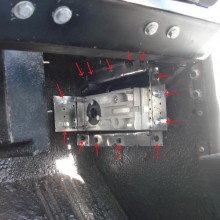
Routing & Bending The Cable Housing:
I started from driver’s side wiper transmission installing the cable tubes according to SPW instructions and got to the 3rd transmission closest to the passenger side. At the “tricky bend” I actually kinked the tube supplied by SPW and got a heavier brake line to use here.
NOTE: Do not attach the cable housing to the windshield frame, it didn’t work.
Next I had to notch the corner of my dash frame and dash pad near the passenger side for the cable housing to pass below the dash. This took several attempts before I removed enough metal for it to work.
I used a female/female brake ling union to join the cable housing from the passenger side transmission to the cable housing coming from the motor assembly with a male brake line connectors on each of the cable housing tubes to join them.
Note: Make sure the inside of this connection is perfectly smooth.


Next, it’s time to run the cable into the housing. Again, refer to the SPW instructions here. Remember, use a lot of lithium grease here. With the windshield folded up, make 100% sure that the cable does NOT bind at all. Install the drive wheel and connect the cable to the drive wheel.
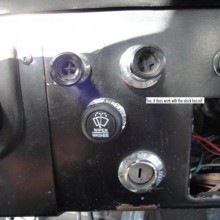
Installing the Intermittent Wiper Switch:
SPW provides a great new intermittent wiper switch, I chose to use the switch provided with their kit. Since no two Broncos are alike, you can mount the switch where ever you like. Next wire it up according to the SPW instructions. Since I am planning on installing a rear wiper, I installed two of their switches at the same time.

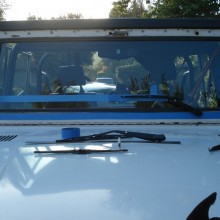
Now it’s time to test run the system without the wiper arms installed. After a successful test run, install one wiper arm at a time. I started with the driver’s side. DO NOT push it all the way down on the splined shaft adapter.
Note: Before you turn it on, use your spray bottle and soak the windshield so the wiper can move freely.
If you are satisfied with the park and sweep of the first arm, install the passenger side wiper arm next, again soak the windshield with your spray bottle, and test it. It will take several attempts to get all 3 arms to line up in the park position.
After you are 100% certain that nothing is binding up, the wiper arms park correctly, and everything is working smoothly gently tap the wiper arms onto the splined shaft adapters. I used a rubber mallet to tap the arms into place. I also used thread lock on the splined shaft adapter set screws and let it set to dry overnight.
Note: If you decide to fold down your windshield frame in the future you will need to remove the wiper arm, remove the cable, and disconnect the cable housing joint at the passenger side. I never plan on driving with the windshield down but if you do you will need to disconnect your wipers.
If you have any questions feel free to email me.
Good luck!
Chris
taipeichris13@yahoo.com
PS Now you have two more holes to weld shut on the top of your windshield frame.
I’ve owned my 66 Bronco since August 2004 and my wipers never did a good job. I live in Los Angeles it really doesn’t rain much but almost every morning the entire car is covered in dew, often covering both the inside and outside of the windshield.
After researching all the options out on the market I wanted my wipers on the bottom of the windshield frame but either the options were too expensive or would place big moving linkage at eye level on the dash.
Then in 2006 I saw the FJ Cruiser, it had 3 wipers, did a great job, and had a cool factor.
The one option I did like was a kit offered by Specialty Power Windows located in Georgia. I called their tech department, they were extremely helpful and did mention that one customer in Australia was purchasing extra transmissions for their kit so maybe someone somewhere is doing a 3 wiper setup.
Basically the Specialty Power Windows Kit is designed with an electric motor driving a cable inside of a metal tube. Where the tube connects to the wiper transmissions the tube is cut, single flared, cable exposed, run though the transmission past a drive gear, and the tube is run to the next transmission assembly.
I’m not going to explain the installation instructions from Specialty Power Windows, I will simply write this with the understanding that YOU read THEIR installation instructions completely. Also, Specialty Power Windows provides an installation DVD with their kits.
Pros:
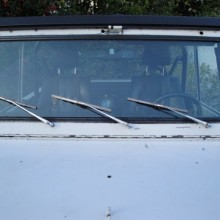
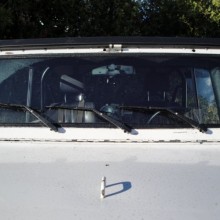
- Improved visibility on rainy days, the entire windshield will be clear.
- No more linkage in your face.
- No more clearance issues for your roll bar.
- In theory, this will push snow off better. [I haven’t been to the snow yet]
- Intermittent wipers.
- It’s easier to clean your windshield at the gas station.
- You will need to “disconnect” this to fold down your windshield.
- You will need to remove your passenger side fresh air box.
- It’s not a cheap mod nor does it just “bolt-in.”
2 wiper kit with intermittent wiper switch $285.00 shipped
1 female/female 3/8 brake line fitting $3.00
1 3 foot long 3/8 hard brake line $4.00
3 1999 Jeep TJ wiper arms, part #42591 $12.99 each
3 13 inch wiper blades, part #13-1 $6.99 each
3 splined shaft adapters, [not supplied in the kit to fit the TJ arms but SPW has them.]
1 spray bottle of water $0.00
1 medium size of sheet aluminum $9.00
10 self-taping sheet metal screws $0.00
4 nuts, bolts, and washers $0.00
12 pop rivets $0.00
1 roll blue masking tape $3.99
1 box weather strip glue $6.99
1 can white lithium grease $3.99
1 can black spray paint $2.89
Tools:
- 1 sharpie black marker
- 1 tape measure
- 1 metal straight ruler
- 1 protractor
- 1 drill
- 1 box drill bits
- 1 grinder with cut-off wheel
- 1 extension cord
- 1 wire cutter-crimper
- 1 socket set with nut driver
- 1 vise
- 1 phillips screwdriver
- 1 flat head screwdriver
- 4 welding style vise grips
- 1 pair of tin snips
- 1 brake line flaring set
- 1 brake line cutting tool
- 1 rubber mallet
http://stores.ebay.com/JPL-Street-Rods
(724) 375-3940
Also, the guys at Specialty Power Windows were a huge help!
http://www.specialtypowerwindows.com/main.php
(800) 634-9801
Getting Ready:
First I removed the old wipers, the stock switch, the 2 chrome windshield knobs, disconnected the upper windshield braces, and folded down my front windshield down.
Time to Measure, Drill, and Cut:
I wanted to get as much sweep with the wiper blade as possible so I mocked it up and tried to see what would work.
First I drilled out the rivet on 1 wiper arm, disconnected the spring and loosened the crimp on the arm holding the end length into place. I mocked up 1 wiper arm and 1 wiper blade to find where the best location of the park position would be. The key is to find a spot below the glass but as high as possible above the windshield hinge.
Here is a tech article by “Wyflyer” on how to shorten a Jeep wiper arm. You will need to shorten all 3 wiper arms if you decide to use the Jeep TJ wiper arms. When you complete the set up I suggest you spray paint the wiper arms at this time, mine from Kragen faded.
https://classicbroncos.com/forums/threads/cherokee-wiper-arm-swap.130212/
OR, if you want you can buy the adjustable stainless steel wiper arms from Specialty Power Windows. This will save you time and you will not need to purchase the larger splined shaft adapter from SPW either. The kit provides you with the correct splined shaft adapters for their adjustable wiper arms.
Here’s two pictures to compare their wiper arms to the TJ wiper arms.
NOTE: DO NOT REMOVE THE TAPE UNTIL THE PROJECT IS COMPLETE.
Next I took blue masking tape and taped two strips the width of the windshield then I took blue masking tape to mock up the wiper sweep arch. I tried it with an 11, 12, and 13 inch wiper blade. I liked the 13 inch the best, it covers the most amount of glass when completed. I marked where to drill for the wiper transmissions and used the protractor to measure the sweep. I like 120 degrees. This is explained clearly in the SPW instructions and on their DVD.
After I found the optimal location to install the drivers side wiper arm I then measured for the middle and passenger side wiper arm.
I took the total measurement of the remaining space, subtracted 26 inches, and dived the remaining amount for the distance between the wiper blades in their park position. This will vary depending on the length of your wiper blade.
NOTE: Depending on your wiper arms and your wiper blades the locations of the transmissions will vary. Measure according to your application.
Drilling:
I first made a paper template with note cards showing where the holes would be drilled. I drilled from the front of the windshield frame though the rear to make certain the holes lined up. I then taped my template to the inside edge of my windshield frame and drilled ONE transmission at a time. The hole on the front will be the diameter of the transmission shaft. This same hole will be made larger on the rear of the frame to recess the large locking nut. Two more holes will be drilled on the rear to recess the bolts keeping the transmissions together.
After drilling I needed to remove enough metal from the frame to recess the transmission into the frame.
NOTE: Originally I attempted to mount the wiper transmissions with the tube housing down, closer the to the windshield hinge. After attempting it, too much cutting was needed, and the frame wouldn’t close flush so I opted to mount the wiper transmissions with the tube housing up.
At this time I mocked up my first wiper transmission, measured the required length according to SPW instructions, and trimmed the length of the transmission shaft. Measure twice, cut once.
NOTE: In retrospect I should have cut the transmission shaft longer for the wiper arm to clear with the spring installed.
After drilling and trimming for all 3 wiper transmissions, [remember drill, cut, install one at a time] I then marked on the dash pad and frame as to where to cut. It was necessary to trim the dash pad and dash frame in order to recess the wiper transmissions and to have my windshield frame sit in its original position.
Mounting the wiper motor assembly.
According to SPW instructions, it’s best to have the cover of the motor assembly facing out for adjustment. After mocking up the motor assembly, the most logical place was exactly where the passenger cold air box was located. With the motor assembly fitting recessed between the kick panel and fender I would be able to route the wiper cable tube directly into the motor assembly.
On my 66 I haven’t used a passenger side cold air box for years but on your Bronco you will need to remove the passenger side air box.
Fabricating An Aluminum Box While Watching TV:
Next you will need a metal enclosure or housing to protect and water proof the back side of the motor assembly. I searched all over for a prefab solution to this but ended up just making my own aluminum box. I like aluminum since it will not rust.
I measured and drew a template with a paper shopping bag. I wanted to make sure I had enough space to get my fingers inside the box. Also I didn’t want the box to be too deep and hit the fender.
After successfully test fitting my motor assembly into the paper bag box, I unfolded the paper template and traced it onto a piece of sheet aluminum. I chose a thin grade for the ease of making multiple 90 degree bends with my vice grips.
After making all of my 90 degree bends in the aluminum box I then drilled, and riveted it together. Upon completion I sealed the seams to make to box water proof.
Again I made a note card template for installing the new aluminum box. A surprisingly small amount of metal was needed to be removed from the kick panel to install the aluminum box. I marked off where to cut and trimmed with my grinder and cut off wheel.
Next I cut the mounting bracket supplied in the kit from SPW in half. The rear bracket I bent 90 degrees and the front I didn’t bend. On the rear bracket I had to notch the bracket to match the contour of the motor. I measured and drilled 2 holes per bracket. The box I installed with self taping sheet metal screws to the cowl. Next I mounted the motor assembly nuts and bolts, drilling 4 holes as needed.
Routing & Bending The Cable Housing:
I started from driver’s side wiper transmission installing the cable tubes according to SPW instructions and got to the 3rd transmission closest to the passenger side. At the “tricky bend” I actually kinked the tube supplied by SPW and got a heavier brake line to use here.
NOTE: Do not attach the cable housing to the windshield frame, it didn’t work.
Next I had to notch the corner of my dash frame and dash pad near the passenger side for the cable housing to pass below the dash. This took several attempts before I removed enough metal for it to work.
I used a female/female brake ling union to join the cable housing from the passenger side transmission to the cable housing coming from the motor assembly with a male brake line connectors on each of the cable housing tubes to join them.
Note: Make sure the inside of this connection is perfectly smooth.
Next, it’s time to run the cable into the housing. Again, refer to the SPW instructions here. Remember, use a lot of lithium grease here. With the windshield folded up, make 100% sure that the cable does NOT bind at all. Install the drive wheel and connect the cable to the drive wheel.
Installing the Intermittent Wiper Switch:
SPW provides a great new intermittent wiper switch, I chose to use the switch provided with their kit. Since no two Broncos are alike, you can mount the switch where ever you like. Next wire it up according to the SPW instructions. Since I am planning on installing a rear wiper, I installed two of their switches at the same time.
Now it’s time to test run the system without the wiper arms installed. After a successful test run, install one wiper arm at a time. I started with the driver’s side. DO NOT push it all the way down on the splined shaft adapter.
Note: Before you turn it on, use your spray bottle and soak the windshield so the wiper can move freely.
If you are satisfied with the park and sweep of the first arm, install the passenger side wiper arm next, again soak the windshield with your spray bottle, and test it. It will take several attempts to get all 3 arms to line up in the park position.
After you are 100% certain that nothing is binding up, the wiper arms park correctly, and everything is working smoothly gently tap the wiper arms onto the splined shaft adapters. I used a rubber mallet to tap the arms into place. I also used thread lock on the splined shaft adapter set screws and let it set to dry overnight.
Note: If you decide to fold down your windshield frame in the future you will need to remove the wiper arm, remove the cable, and disconnect the cable housing joint at the passenger side. I never plan on driving with the windshield down but if you do you will need to disconnect your wipers.
If you have any questions feel free to email me.
Good luck!
Chris
taipeichris13@yahoo.com
PS Now you have two more holes to weld shut on the top of your windshield frame.