• Welcome to ClassicBroncos! - You are currently viewing the forums as a GUEST. To take advantage of all the site features, please take a moment to register. It's fast, simple and absolutely free. So please join our community today!
    If you have problems registering or can't log into your account, please contact Admin.

The Ultimate Bronco

dieselbronco

Full Member
Joined
Jan 18, 2009
Messages
151
Loc.
Tolland CT
This is going to be my first build thread so bear with me.

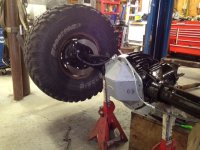
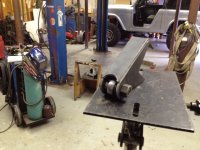
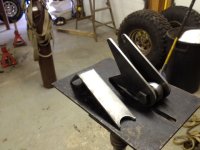
about three years ago i put a 4BT cummins 3.9 into my rusted out 1969 bronco. its running an NV4500 and a dana20. It was the best thing I've ever done. Sorry i don't have a ton of pics for that swap right now. i have to find them and try to get them on the computer. the next part of the build is going to be the axles. I've been debating on what to do with them. Do i bullet proof them with lots of money or swap in some 60's. well here is some pics of what i have started
 

Attachments

  • photo-8.JPG
    photo-8.JPG
    126.5 KB · Views: 267
  • photo-9.JPG
    photo-9.JPG
    111.5 KB · Views: 259
  • photo-24.JPG
    photo-24.JPG
    139.3 KB · Views: 261
OP
OP
D

dieselbronco

Full Member
Joined
Jan 18, 2009
Messages
151
Loc.
Tolland CT
heres a couple of pics i took last month when i redid the front clip and installed the intercooler.
 

Attachments

  • photo-17.JPG
    photo-17.JPG
    119 KB · Views: 230
  • photo-16.JPG
    photo-16.JPG
    130.3 KB · Views: 239
  • photo-15.JPG
    photo-15.JPG
    107.5 KB · Views: 249
  • photo-14.JPG
    photo-14.JPG
    141.3 KB · Views: 274
  • photo-13.JPG
    photo-13.JPG
    132.1 KB · Views: 295
  • photo-1.JPG
    photo-1.JPG
    144.3 KB · Views: 261
OP
OP
D

dieselbronco

Full Member
Joined
Jan 18, 2009
Messages
151
Loc.
Tolland CT
I've started building the front and rear shock hoops, and some killer spring pads
 

Attachments

  • photo-21.JPG
    photo-21.JPG
    112.3 KB · Views: 118
  • photo-10.JPG
    photo-10.JPG
    125.3 KB · Views: 124
  • photo-7.JPG
    photo-7.JPG
    100.9 KB · Views: 100
  • photo-11.JPG
    photo-11.JPG
    154.7 KB · Views: 91
OP
OP
D

dieselbronco

Full Member
Joined
Jan 18, 2009
Messages
151
Loc.
Tolland CT
i've started the narrowing process. first i cut the old c's off a junk front axle. then i welded them together the same distance apart as if they were still installed. next i chucked them up in the drill press and cut them to fit the dana 60 axle tube. after some clean up and some narrowing i moved to the axle.
 

Attachments

  • photo-22.JPG
    photo-22.JPG
    115.1 KB · Views: 138
  • photo-4.JPG
    photo-4.JPG
    111.3 KB · Views: 146
OP
OP
D

dieselbronco

Full Member
Joined
Jan 18, 2009
Messages
151
Loc.
Tolland CT
since the axle is from a newer truck i had little room to fit the c's. (but more room to clear the oil pan) i had to trim the spring pad area of the housing. i took as little off as i could witch ended up being around 3/4 of an inch. they just fit now.
 

Attachments

  • photo-27.JPG
    photo-27.JPG
    136.9 KB · Views: 111
  • photo-26.JPG
    photo-26.JPG
    112.6 KB · Views: 103
  • photo-25.JPG
    photo-25.JPG
    105.8 KB · Views: 94
OP
OP
D

dieselbronco

Full Member
Joined
Jan 18, 2009
Messages
151
Loc.
Tolland CT
next it was time to narrow the tube. I'm looking to get the final width around 64 inches, so i lopped the knuckle off and cleaned up the tube. after cutting into the weld i was able to push out the slug and clean it up. i set the knuckle on the grill and warmed it up so i could slip it on and set the caster to match the driver side. tomorrow i will weld it up and start pulling the old 44 out to mock up the 60.
 

Attachments

  • photo-20.JPG
    photo-20.JPG
    134.4 KB · Views: 102
  • photo-18.JPG
    photo-18.JPG
    120 KB · Views: 115
OP
OP
D

dieselbronco

Full Member
Joined
Jan 18, 2009
Messages
151
Loc.
Tolland CT
sorry to jump around but i found a couple more pics of the turbo install.

i took an hy35 and made my own exhaust housing end plate, with a blow off eliminator. then i took the two roll pins out that hold the housings from spinning so i could clock it where i needed it to be. there is also a pic of the intercooler from a first gen dodge that i used. i had to take a couple inches off the bottom to clear the steering box.
 

Attachments

  • photo-28.JPG
    photo-28.JPG
    134.5 KB · Views: 86
  • photo-31.JPG
    photo-31.JPG
    141.7 KB · Views: 102
  • photo-32.JPG
    photo-32.JPG
    125.4 KB · Views: 88
  • photo-30.JPG
    photo-30.JPG
    135.9 KB · Views: 88
  • photo-29.JPG
    photo-29.JPG
    135.6 KB · Views: 97

Devin

Bronco Kineticist
Joined
Apr 29, 2004
Messages
3,956
Holy fab work, batman! That is awesome. Nice shop, too. Wish I had one like that.

Keep the pics coming....
 
OP
OP
D

dieselbronco

Full Member
Joined
Jan 18, 2009
Messages
151
Loc.
Tolland CT
I've got some more pics of the past weekends progress. the 60 is in and fits better than i could have dreamed!i welded up the knuckle then set the caster by first take measurements off the dana 44. i installed stock radius arms on the 44 with the ball joints set level. then i checked the degree that the arms were with a friends digital level. after i had all the measurements i installed the arms the same way on the 60 and matched every thing up. then welded her solid and slapped some paint on it:)
 

Attachments

  • photo-40.JPG
    photo-40.JPG
    132.8 KB · Views: 142
  • photo-39.JPG
    photo-39.JPG
    135.7 KB · Views: 119
  • photo-41.JPG
    photo-41.JPG
    118.1 KB · Views: 126
  • photo-42.JPG
    photo-42.JPG
    141.8 KB · Views: 128

AnthonyJ124

New Member
Joined
Mar 12, 2012
Messages
7
I registered to verify how LEGIT this build is. The swap and fab work are great. Great guy too!

Thanks for the wheels!

-A
 
OP
OP
D

dieselbronco

Full Member
Joined
Jan 18, 2009
Messages
151
Loc.
Tolland CT
Thanks. I hope to have it done before BYOB.

Progress has slowed some but i did get the front shock hoops mocked up. Just need to decide if i like them, then weld them solid.
 
OP
OP
D

dieselbronco

Full Member
Joined
Jan 18, 2009
Messages
151
Loc.
Tolland CT
a couple more pics of the rear end all painted up with the spring pads, shock mounts, and brake brackets welded on.
 

Attachments

  • photo-47.JPG
    photo-47.JPG
    127.5 KB · Views: 64
  • photo-48.JPG
    photo-48.JPG
    143.2 KB · Views: 58
  • photo-49.JPG
    photo-49.JPG
    134.4 KB · Views: 61
OP
OP
D

dieselbronco

Full Member
Joined
Jan 18, 2009
Messages
151
Loc.
Tolland CT
I've moved back to the front this weekend. removed the factory trace bar mount and fabed up a new one. i had to move the mount 2" down and 2" out due to the higher position of the tie rod on the new axle. plus i wanted to beef it up a bit. i'm using 7/8 rod ends and 1 1/2 x 1/4 wall dom for the trace bar.
 

Attachments

  • photo-53.JPG
    photo-53.JPG
    101.1 KB · Views: 46
  • photo-57.JPG
    photo-57.JPG
    134.2 KB · Views: 39
  • photo-58.JPG
    photo-58.JPG
    95.8 KB · Views: 43
  • photo-60.JPG
    photo-60.JPG
    101.1 KB · Views: 40
  • photo-59.JPG
    photo-59.JPG
    122.6 KB · Views: 39
Last edited:
OP
OP
D

dieselbronco

Full Member
Joined
Jan 18, 2009
Messages
151
Loc.
Tolland CT
here is the axle side of the mount, and my new toy.
 

Attachments

  • photo-45.JPG
    photo-45.JPG
    130.8 KB · Views: 52
  • photo-50.JPG
    photo-50.JPG
    123.6 KB · Views: 58
  • photo-51.JPG
    photo-51.JPG
    113.6 KB · Views: 58
  • photo-52.JPG
    photo-52.JPG
    127.5 KB · Views: 61
  • photo-56.JPG
    photo-56.JPG
    134.4 KB · Views: 53
  • photo-55.JPG
    photo-55.JPG
    80.5 KB · Views: 52
  • photo-54.JPG
    photo-54.JPG
    111.5 KB · Views: 53
  • photo-46.JPG
    photo-46.JPG
    119.6 KB · Views: 59
Top