


Community
Message Forum
Photo Gallery
Event Calendar
Book Reviews
Bronco Wallpaper
Bronco FAQ
Link Back to CB!
Photo Gallery
Event Calendar
Book Reviews
Bronco Wallpaper
Bronco FAQ
Link Back to CB!

Buy / Sell


Bronco Tech
3 Arm Wiper Setup
Fix Motor Mount
Roll Cage Braces
Throttle Body 65mm
Wheel Alignment
Heat Riser Replacement
Vent Window Repair
Center Console Mount
Straighten Bumper
Ford 6R80 6 spd
More Tech...
Fix Motor Mount
Roll Cage Braces
Throttle Body 65mm
Wheel Alignment
Heat Riser Replacement
Vent Window Repair
Center Console Mount
Straighten Bumper
Ford 6R80 6 spd
More Tech...

Install the app
-
Welcome to ClassicBroncos! - You are currently viewing the forums as a GUEST. To take advantage of all the site features, please take a moment to register. It's fast, simple and absolutely free. So please join our community today!If you have problems registering or can't log into your account, please contact Admin.
You are using an out of date browser. It may not display this or other websites correctly.
You should upgrade or use an alternative browser.
You should upgrade or use an alternative browser.
My latest Bronco rebuild project has begun
- Thread starter LSUpete
- Start date
BRONCOchild
Bronco Guru
- Joined
- Sep 4, 2005
- Messages
- 2,029
OMG...did I read that right. You are going to do a frame off. Seems like it's fine the way it is, especially since you found no rust. But to each their own. Good luck in your build and I can't wait to see what you change up in the EB.
PS. Sweet deal, too! I picked my EB here in Southern Calif for $6500 and it wasn't in that condition your's is in.
PS. Sweet deal, too! I picked my EB here in Southern Calif for $6500 and it wasn't in that condition your's is in.
OP
OP
- Joined
- Jul 11, 2001
- Messages
- 2,063
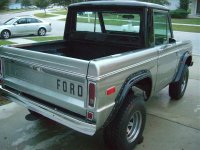
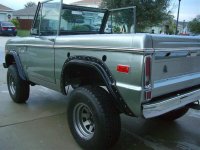
The build is still in progress.....but is closing in on the finish line. This one will be my best one yet.
I've been underneath it, doing the fuel and brake plumbing with all new stainless lines and frame rail connections. I also installed the NWMP fuel tanks...after I had them powder coated. Another project completed was the complete rebuild of the door internals and windows. Those little vent windows are a ton of work if you want to be thorough.
My next project is the wiring harness and I've decided to break away from the usual Centech and try the new Painless harness. The Painlss instructions and photos BLOW AWAY anything that Centech has ever produced....so I'm excited to get started. I have a ton of custom stereo/amp/speaker and lighting modifications planned that will need to coordinate with the wiring install.....so this could take a while.
Attachments


Very, Very nice!
wwgx90
Jr. Member
Looking very nice! Did you stay with the 2 1/2" lift? wwgx90
OP
OP
- Joined
- Jul 11, 2001
- Messages
- 2,063
Looking very nice! Did you stay with the 2 1/2" lift? wwgx90
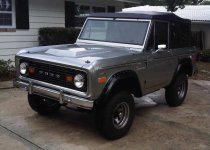
Yep, that's a 2.5 suspension lift from Wild Horses. Obviously, those tires and wheels are simply place holders. I'll install 33x12.5x15's on American Racing 15x8.5 wheels when everything else has been done.
ken75ranger
Bronco Guru
It's coming along nicely Pete. Are you building this for a specific buyer?
OP
OP
- Joined
- Jul 11, 2001
- Messages
- 2,063
It's coming along nicely Pete. Are you building this for a specific buyer?
Nope. This one will be all mine and a family heirloom.
broncojames
Full Member
real nice find and job man any updates ??
THE_74BEAST
Jr. Member
"BUMP"
Pete, how's the build going? Would love to see some of that custom wiring...
Pete, how's the build going? Would love to see some of that custom wiring...
OP
OP
- Joined
- Jul 11, 2001
- Messages
- 2,063
Well, I have a ton of wiring photos to post....but not on THIS computer. I'll post a wiring follow-up soon though.
For now, I have a few shots of some custom audio ideas that I implemented.
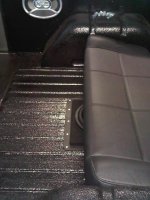
I removed all the defrost ducts, heater cables and switches from my dash because I live in Florida and I will never need a heater....ever. That decision enabled me to use all that unoccupied space directly behind the dash. This is where I mounted my 5-channel digital amp. I fabricated a bracket (powder coated of course) and mounted it to the firewall. Then I added a ledge for the amp to be mounted on. This should provide a nice, dry spot and it will be completely invisible to anyone thinking about stealling anything.
For now, I have a few shots of some custom audio ideas that I implemented.
I removed all the defrost ducts, heater cables and switches from my dash because I live in Florida and I will never need a heater....ever. That decision enabled me to use all that unoccupied space directly behind the dash. This is where I mounted my 5-channel digital amp. I fabricated a bracket (powder coated of course) and mounted it to the firewall. Then I added a ledge for the amp to be mounted on. This should provide a nice, dry spot and it will be completely invisible to anyone thinking about stealling anything.
Attachments


OP
OP
- Joined
- Jul 11, 2001
- Messages
- 2,063
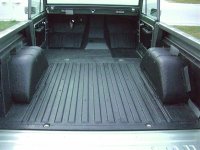
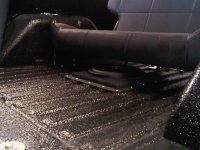
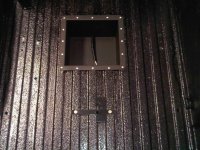
I also wanted to create a sturdy and unobtrusive location for my subwoofer. So I cut a hole out of the truck bed, welded in some 1 1/2"x1 1/2" steel angle perimeter bracing underneath and built a 16 gauge steel box (powder coated of course) for the subwoofer enclosure. Then I riveted the steel box onto the ridges of the truck bed....and just for fun I spay-lined the box on the underside of the bed. The sub mounts into the enclosure and the enclosure simply sits in the recessed metal box. The entire assembly is located under my rear seat and I have a protective cover that can be used when I'm hauling something in the bed.
Attachments
-
 IMG00337-20100530-1004.jpg97.3 KB · Views: 99
 -
 IMG00339-20100530-1005.jpg107.1 KB · Views: 102
 -
 IMG00342-20100530-1024.jpg89 KB · Views: 121
 -
 IMG00336-20100530-1004.jpg103.9 KB · Views: 122
 -
 IMG00334-20100530-0958.jpg134.1 KB · Views: 116
 -
 IMG00331-20100530-0958.jpg187.5 KB · Views: 127
 -
 IMG00327-20100530-0954.jpg152.1 KB · Views: 123
 -
 IMG00324-20100530-0953.jpg118.8 KB · Views: 120
THE_74BEAST
Jr. Member
Looking really good Pete! I can't wait to see some of your other modifications. This forum is saturated with great ideas!!!
Is your firewall insulation/cover from Tom's Bronco Parts? It gives the ride a really clean look. I like it!
Is your firewall insulation/cover from Tom's Bronco Parts? It gives the ride a really clean look. I like it!
THE_74BEAST
Jr. Member
That insulation was purchased at Jeff's. It's a "must have" if you live in Florida .....and especially if you run a 351w. By the way.....what town are you living in?
Winter Haven. Moved to S.C. for three years, recently came back to FL.
OP
OP
- Joined
- Jul 11, 2001
- Messages
- 2,063
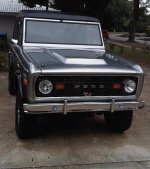
Thought I would post a few photos, because it is getting very close to being finished.
Here's a list of what I have to do:
1. Install Painless wiring harness.
2. Install carpet
3. Install Tuffy Console
4. Install seats
5. Install dashboard
6. Install wiper system
7. Install serp. system (brackets, pulleys, PS pump and alt.)
8. Install carb and Distributor
9. Install radiator and hoses.
10. Bleed the brakes.
Oh, and those wheels and tires will be replaced with some 33's on American Racing wheels as soon as I can drive it to the shop.
I'll be off work from December 23 until January 4th.
If anyone wants to come over to Winter Park for some wrench time, I'll have all the pizza and beer that you can stick in your face!
Attachments


stupidboy
My wifes porn star.
Lookin good man, Hope your driving it soon.
ken75ranger
Bronco Guru
Very nice Pete.
Sent from my DROID2 using Tapatalk
Sent from my DROID2 using Tapatalk
Similar threads
- Replies
- 10
- Views
- 2K
- Replies
- 8
- Views
- 1K