• Just a reminder that you won't be able to start new posts or reply to existings posts in the Archive forum.

    This is where all the old posts go so they can still be used for reference and searched.
  • Welcome to ClassicBroncos! - You are currently viewing the forums as a GUEST. To take advantage of all the site features, please take a moment to register. It's fast, simple and absolutely free. So please join our community today!
    If you have problems registering or can't log into your account, please contact Admin.

Build thread U13FL773644

tk1218

Bronco Guru
Joined
Nov 23, 2008
Messages
1,067
Loc.
Flower Mound
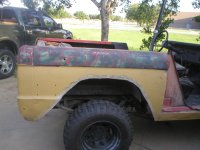
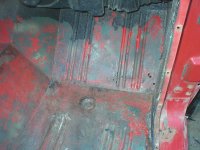
Started the tear down today and rhino liner removal. Everything came off easy.
* Windshield - only 3 bolts:-*
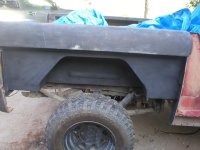
* Tailgate
* Inserts - did not damage them
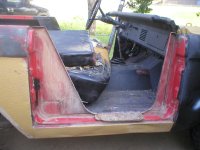
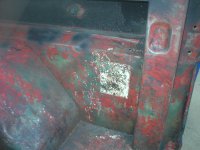
* The striker posts and door jams looked really good.

Rhino liner comes off somewhat easy with a razor blade and some long needle nose pliers.

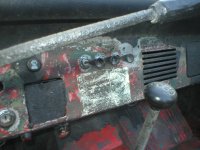
1 weird thing, under the DS insert, there was a piece of wood that looks like it was there to support the bottom of the insert.
 

Attachments

  • P1011135.jpg
    P1011135.jpg
    99.4 KB · Views: 327
  • P1011136.jpg
    P1011136.jpg
    102.3 KB · Views: 292
  • P1011137.jpg
    P1011137.jpg
    81.1 KB · Views: 294
  • P1011138.jpg
    P1011138.jpg
    95.5 KB · Views: 274
  • P1011139.jpg
    P1011139.jpg
    101.6 KB · Views: 256
OP
OP
tk1218

tk1218

Bronco Guru
Joined
Nov 23, 2008
Messages
1,067
Loc.
Flower Mound
Liner off

Ok, the best way to remove the rhino liner is to buy a $8 paint scaper at Lowes and work it under the liner and pop it off. Check of the pics, the liner is all gone and the tub is in really good shape aside from some dents.

The good news, the liner really protected the tub, I do not need to replace the original floor pans and only have minor sheet metal repairs. Well minor if you are not counting the quarter panels and the passanger side outer rocker.

I will remove the quarters and rocker over the 4th of July weekend and sand the rest down and prime it.
 

Attachments

  • P1011145.jpg
    P1011145.jpg
    106 KB · Views: 151
  • P1011144.jpg
    P1011144.jpg
    116 KB · Views: 175
  • P1011143.jpg
    P1011143.jpg
    101.5 KB · Views: 197
  • P1011142.jpg
    P1011142.jpg
    122.9 KB · Views: 179
  • P1011141.jpg
    P1011141.jpg
    98.7 KB · Views: 166
  • P1011140.jpg
    P1011140.jpg
    102.4 KB · Views: 172

Gas Pig

Contributor
Bronco Guru
Joined
Oct 19, 2005
Messages
2,690
keep plugging away!

Yes, those floors are very workable! Keep up the good work. Just remember it's a marathon and not a sprint! So, when the hard and dirty work gets old (believe me it will) go and look at pics of other guy's restored U13s to get you through the the grind. It worked for me with over my 2 1/2 yr. 3000+ hr. restoration of a U13. The end result is worth ever bit of seemingly endless time in the garage!

Keep us posted on your progress, Jeff
 

Gas Pig

Contributor
Bronco Guru
Joined
Oct 19, 2005
Messages
2,690
Hey the wood insert piece I"m sure was added by one of the former owners of the Bronco. Not stock for sure but it was a common thing for the glass door insert to collapse from being stepped on time after time again. So the idea has some merit but I would used a dense piece of rubber but shaped to fit the door sill. But seeing your restoring it just be very careful not to step on the glass insert and you'll be good to go.
 
OP
OP
tk1218

tk1218

Bronco Guru
Joined
Nov 23, 2008
Messages
1,067
Loc.
Flower Mound
Taking it back to uncut. Going to get all the metal and mechanics good and then maybe pass her onto someone else to finish it.
 

Izzy

Bronco Guru
Joined
Sep 5, 2009
Messages
2,418
Loc.
Texas
Wow, I can't believe all that liner came off that easy. I gotta admit that when I saw that thing, I had alot of doubts.

Great job Tom.
 
OP
OP
tk1218

tk1218

Bronco Guru
Joined
Nov 23, 2008
Messages
1,067
Loc.
Flower Mound
Ready for new sheet metal

Had a good weekend, even though it is way too hot to be working on the bronco. Removed both rear quarters, the PS outer rocker and pulled the gas tank. Also removed some of the rear "custom" suspense parts added by the PO.

The quarters came off without issues and no rust issues found. The PS rocker was really beat up bad, so I thought it best to go with new metal.

The bottom of both taillght buckets are toast, so I got some slightly used 1's from Jim Holy to weld in.

The gas tank was rusted inside and not saveable, maybe that is why it will not run.

Time to order the sheet metal
 

Attachments

  • P1011151.jpg
    P1011151.jpg
    98.8 KB · Views: 192
  • P1011150.jpg
    P1011150.jpg
    90.5 KB · Views: 189
  • P1011149.jpg
    P1011149.jpg
    112.1 KB · Views: 184
  • P1011148.jpg
    P1011148.jpg
    105 KB · Views: 207
  • P1011147.jpg
    P1011147.jpg
    86.7 KB · Views: 181
  • P1011146.jpg
    P1011146.jpg
    85.4 KB · Views: 201

mp

Bronco Guru
Joined
Dec 22, 2001
Messages
2,914
Loc.
Austin, TX
Since you are going that far, I would replace the entire rocker with a one piece instead of just the outer. Looking good!
 
OP
OP
tk1218

tk1218

Bronco Guru
Joined
Nov 23, 2008
Messages
1,067
Loc.
Flower Mound
Uncut

Been so hot have not wanted to work on it, but got out today. I think we had a cold front so it was only 105.

Got the quarters installed, it is uncut now.
 

Attachments

  • P1011152.jpg
    P1011152.jpg
    109.8 KB · Views: 230

Viperwolf1

Contributor
electron whisperer
Joined
Aug 23, 2007
Messages
24,326
Was that a bullet hole in the right rear upper quarter?
 
Top