


DanWheeler
Bronco Guru
I have replaced page one (what you see directly below) of this thread with a summary of roughly 25 pages of questions and answers and 3 months of work. Many thanks to everyone who helped me with this project - I could never have done this without your help. This summary is not complete but its a pretty good capture of everything I ran into and whenever possibe, I'll add explanation of why I did the things I did.
Enjoy!
Dan
Basic Parts List:
- 96 Explorer 5.0/V8- $750
- - - 96 has GT-40 heads which match 302 exhaust manifold pattern
- - - 97+ has GT-40P heads which will require different headers
- RJM unwrapped harness - $450
- - - Because I flipped the intake and would need to do lots of customizing
- A9P ECU from EBay - $??? (A9P for auto / A9L for manual - or research your own)
- New distributor (http://www.summitracing.com/parts/SUM-850411/) - $200
- New coil (http://www.summitracing.com/parts/SUM-853011/) - $35
- BP sensor from junkyard
- ACT sensor from junkyard
- A/C delete serpentine belt Gates K060825 (or Goodyear 4060832)
- Hedman Headers 88400
- 96 Ford Explorer XLT 4.0 2-core Radiator (www.discountautoradiator.com)
Miscellaneous Notes:
- Flywheel for Explorer 5.0 is 50oz internal balance
- firing order is H.O. 1-3-7-2-6-5-4-8 counter clockwise looking down on the distributor
- Cut/Bend/Pound front crossmember where lower idler pulley hits on passenger side
- Ground cable on back of Explorer motor goes to firewall
- Ground cable from battery to block on passenger side
- only green wire is needed for TPS/Baumannator-ECU connectvity
Other Resources:
MUST READ
http://oldfuelinjection.com/?p=62
EFI Sensors Overview
http://oldfuelinjection.com/?p=10
ECU Self Test
http://oldfuelinjection.com/?p=13
EFI "No Start" guide
http://sbftech.com/index.php?topic=588.0
How to set timing Ford EFI
http://sbftech.com/index.php?topic=7114.0
Western Union wire splicing method
http://www.mmxpress.com/technical/connections.htm
Dan Wheeler's Explorer 4.0 Radiator / Taurus Fan thread:
http://classicbroncos.com/forums/showthread.php?t=152260
Explorer 5.0 Serpentine Accessory Drive Belt Conversion
http://classicbroncos.com/tech/explorer-5-0-serpentine-accessory-drive-belt-conversion
Here we go...
Remove old engine and prepare new Explorer 5.0 for installation

Replace water pump (replace timing chain if you feel inclined)

Remove A/C unit. It will do you no good as an air compressor. It has been proven unfit for OBA.
Remove serpentine belt. Re-install an A/C delete belt later
Remove oil cooler. You will need the threaded tube that goes into the place where the oil cooler was. I found mine at a junkyard and I remember it being difficult to find the right size to thread into the block

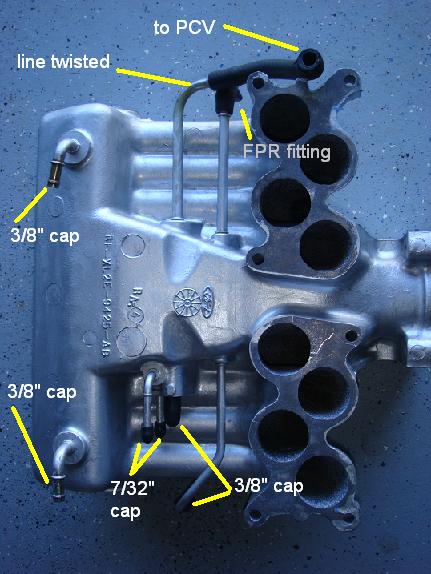
*** EGR / Upper Manifold ***
- Remove upper intake
- shove paper towels into upper intake below EGR port
- tap EGR port with 1/2" NPT tap from Harbor Freight
- plug with 1/2" NPT plug from Home Dept


- I decided to flip my intake for several reasons. I'm glad I did it but I don't recommend it.
- Plug almost all vacuum lines
http://www.norcalbroncos.com/forum/s...xplorer&page=3
Remove old harness, coil packs, and all other stuff you don't need or things that could be damaged by your hoisting chains and equipment
Transfer headers or exhaust manifolds to new engine
Put engine in truck

Clearance/cut/bend/pound front passenger side crossmember for idler pulley

*** Distributor ***
Install distributor
http://sbftech.com/index.php?topic=7114.0
*** BP Sensor ***
- Find a BP (Barometric Pressure) sensor in the junkyard. Do not use a MAP sensor.
- Mount BP on firewall
- A true BP sensor will have a little grey cap on it and will not be connected to vacuum when you find it

*** ACT (Air Charge Temperatur) / Airbox ***
- Your ACT can go anywhere. Airbox, dragging behind the truck, intake tube, etc
- I got mine from a V6 Explorer. It has a twist-lock design
- I got my fresh air box from a Thunderbird/Cougar (I think)


*** Throttle Body ***
- Explorer throttle body is 65mm.
- Felpro #61082 for EGR housing (elbow) to throttle body
- Felpro #61081 for the EGR housing (elbow) to intake manifold
- Adjustment screw on Explorer TB is not an idle adjust.
- I chopped and machined my elbow to clear the h-boost with flipped intake


*** Lower Intake ***
- Use port on driver's side lower intake for ECT (stock location at heater core send/return may conflict with distributor)
*** Water Pump / Neck ***
- Drill/tap water neck for temp gauge

*** Throttle cable ***
- I combined the stock Explorer throttle cable with a BC Broncos throttle cable
- The internal wire and outer sheat are the same between the two

*** Fuel Rail ***
- For flipped intake, need driver's side, rear regulator
- Explorer fuel pressure regulator is on passenger side which conflicts with flipped intake
- F-series 351 truck is driver/rear regulator
- replace fuel rail interconnect on 351 rail with shorter EFI hose and EFI clamps
- clearance intake front and rear where needed to clear 351 fuel rail

*** Injectors ***
- Injector refresh kit from Mr. Injector on Ebay
- Use a injector plug from old harness and a momentary switch to make an injector tester (pic)

*** Fuel Tank ***
BC Broncos EFI tank
*** Fuel Lines ***
- I used 3/8ths feed and 5/16ths return
- I Should have used 5/16ths feed AND return because BC Broncos springlock barb connectors are both 5/16th
- BC Broncos springlock barb connectors
- 5/16ths OK up to 400+hp
- Use 92 Mustang w/ 5.0 inline fuel filter in front of high pressure inlet on fuel rail
- Stock nylon fuel return line is OK to use for return
*** Power Steering ***
Contact Lee Power steering for Explorer pump fitting
http://lee-powersteering.com/

Enjoy!
Dan
Basic Parts List:
- 96 Explorer 5.0/V8- $750
- - - 96 has GT-40 heads which match 302 exhaust manifold pattern
- - - 97+ has GT-40P heads which will require different headers
- RJM unwrapped harness - $450
- - - Because I flipped the intake and would need to do lots of customizing
- A9P ECU from EBay - $??? (A9P for auto / A9L for manual - or research your own)
- New distributor (http://www.summitracing.com/parts/SUM-850411/) - $200
- New coil (http://www.summitracing.com/parts/SUM-853011/) - $35
- BP sensor from junkyard
- ACT sensor from junkyard
- A/C delete serpentine belt Gates K060825 (or Goodyear 4060832)
- Hedman Headers 88400
- 96 Ford Explorer XLT 4.0 2-core Radiator (www.discountautoradiator.com)
Miscellaneous Notes:
- Flywheel for Explorer 5.0 is 50oz internal balance
- firing order is H.O. 1-3-7-2-6-5-4-8 counter clockwise looking down on the distributor
- Cut/Bend/Pound front crossmember where lower idler pulley hits on passenger side
- Ground cable on back of Explorer motor goes to firewall
- Ground cable from battery to block on passenger side
- only green wire is needed for TPS/Baumannator-ECU connectvity
Other Resources:
MUST READ
http://oldfuelinjection.com/?p=62
EFI Sensors Overview
http://oldfuelinjection.com/?p=10
ECU Self Test
http://oldfuelinjection.com/?p=13
EFI "No Start" guide
http://sbftech.com/index.php?topic=588.0
How to set timing Ford EFI
http://sbftech.com/index.php?topic=7114.0
Western Union wire splicing method
http://www.mmxpress.com/technical/connections.htm
Dan Wheeler's Explorer 4.0 Radiator / Taurus Fan thread:
http://classicbroncos.com/forums/showthread.php?t=152260
Explorer 5.0 Serpentine Accessory Drive Belt Conversion
http://classicbroncos.com/tech/explorer-5-0-serpentine-accessory-drive-belt-conversion
Here we go...
Remove old engine and prepare new Explorer 5.0 for installation
Replace water pump (replace timing chain if you feel inclined)
Remove A/C unit. It will do you no good as an air compressor. It has been proven unfit for OBA.
Remove serpentine belt. Re-install an A/C delete belt later
Remove oil cooler. You will need the threaded tube that goes into the place where the oil cooler was. I found mine at a junkyard and I remember it being difficult to find the right size to thread into the block
*** EGR / Upper Manifold ***
- Remove upper intake
- shove paper towels into upper intake below EGR port
- tap EGR port with 1/2" NPT tap from Harbor Freight
- plug with 1/2" NPT plug from Home Dept
- I decided to flip my intake for several reasons. I'm glad I did it but I don't recommend it.
- Plug almost all vacuum lines
http://www.norcalbroncos.com/forum/s...xplorer&page=3
Remove old harness, coil packs, and all other stuff you don't need or things that could be damaged by your hoisting chains and equipment
Transfer headers or exhaust manifolds to new engine
Put engine in truck
Clearance/cut/bend/pound front passenger side crossmember for idler pulley
*** Distributor ***
Install distributor
http://sbftech.com/index.php?topic=7114.0
*** BP Sensor ***
- Find a BP (Barometric Pressure) sensor in the junkyard. Do not use a MAP sensor.
- Mount BP on firewall
- A true BP sensor will have a little grey cap on it and will not be connected to vacuum when you find it
*** ACT (Air Charge Temperatur) / Airbox ***
- Your ACT can go anywhere. Airbox, dragging behind the truck, intake tube, etc
- I got mine from a V6 Explorer. It has a twist-lock design
- I got my fresh air box from a Thunderbird/Cougar (I think)
*** Throttle Body ***
- Explorer throttle body is 65mm.
- Felpro #61082 for EGR housing (elbow) to throttle body
- Felpro #61081 for the EGR housing (elbow) to intake manifold
- Adjustment screw on Explorer TB is not an idle adjust.
- I chopped and machined my elbow to clear the h-boost with flipped intake
*** Lower Intake ***
- Use port on driver's side lower intake for ECT (stock location at heater core send/return may conflict with distributor)
*** Water Pump / Neck ***
- Drill/tap water neck for temp gauge
*** Throttle cable ***
- I combined the stock Explorer throttle cable with a BC Broncos throttle cable
- The internal wire and outer sheat are the same between the two
*** Fuel Rail ***
- For flipped intake, need driver's side, rear regulator
- Explorer fuel pressure regulator is on passenger side which conflicts with flipped intake
- F-series 351 truck is driver/rear regulator
- replace fuel rail interconnect on 351 rail with shorter EFI hose and EFI clamps
- clearance intake front and rear where needed to clear 351 fuel rail
*** Injectors ***
- Injector refresh kit from Mr. Injector on Ebay
- Use a injector plug from old harness and a momentary switch to make an injector tester (pic)
*** Fuel Tank ***
BC Broncos EFI tank
*** Fuel Lines ***
- I used 3/8ths feed and 5/16ths return
- I Should have used 5/16ths feed AND return because BC Broncos springlock barb connectors are both 5/16th
- BC Broncos springlock barb connectors
- 5/16ths OK up to 400+hp
- Use 92 Mustang w/ 5.0 inline fuel filter in front of high pressure inlet on fuel rail
- Stock nylon fuel return line is OK to use for return
*** Power Steering ***
Contact Lee Power steering for Explorer pump fitting
http://lee-powersteering.com/
Last edited:


")