Fireball05
Bronco Guru
- Joined
- Oct 7, 2012
- Messages
- 1,822
Guys,
Today we rebuilt my original 3 speed column in my '76. I had done a fair few numbers of searches, and there isn't a ton of info out there. The rebuild is fairly straightforward. I'm by no means a master mechanic, my friend helping me is pretty darn good with these things, but that being said, take this advice at your own caution!
I bought the rebuild kit from JBG: http://broncograveyard.com/bronco/i-17011-column-rebuild-kit-man-76-77.html
1. Disassembly is pretty well documented. Note that the rebuild kit did not include the upper column snap ring or the curved washer that goes b/w the column and the shift sleeve, so make sure you take caution when removing those items. Picture below has all the old parts on top, new stuff on the bottom. I circled the parts that didn't come with the rebuild kit. The pin that goes through the shift lever and secures the lever to the sleeve wasn't included in my kit, but that was an oversight by JBG and they are sending me a new one.

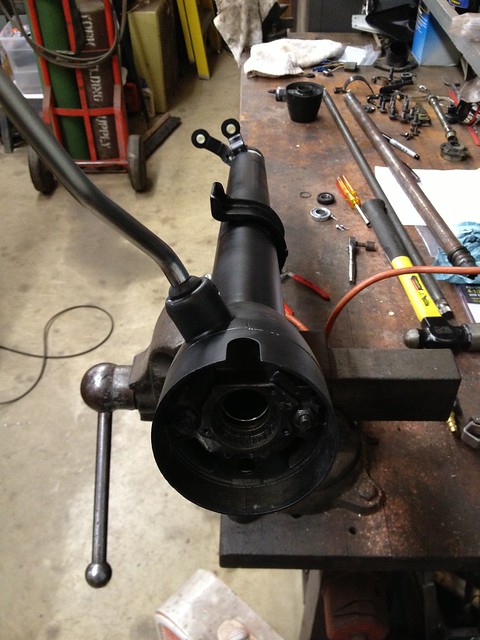
2. Reassemby begins with the lower bearing. You can screw or weld it in place. We didn't see a need for welding. Use caution when planning out the location of the 3 screws. We put them a little too close to the end, and broke 2 taps trying to go through the welds on the underside. 2 of the 3 screws used to secure the bearing to the column are seen in this photo.

3. Install the column to firewall seal now. The photo below shows it installed, but I forgot to the first time around and had to disassemble the whole thing because once the shift arms are in place you won't be able to put this on. NOTE!!!! The photo below shows the seal installed the wrong way! It should be flipped, with the portion that firmly wraps the column almost touching the shifter arms. See Post #12 below for more info

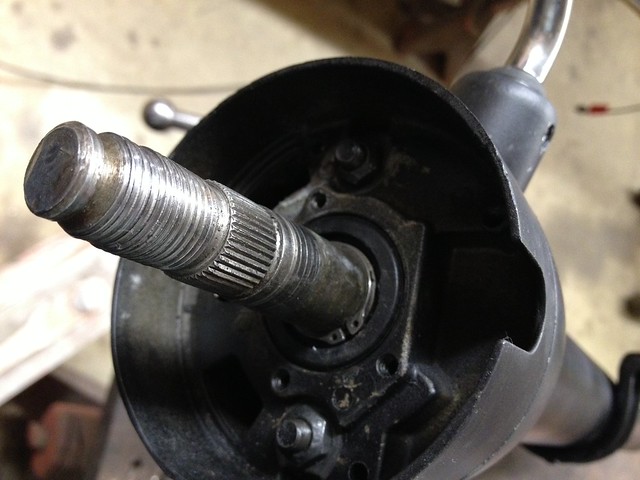
4. Align the shift arms and spacers into the hole, then put the new shift tube into the column and push down into place. No troubles here. (The lower bearing is removed in this picture, I thought taking it out would be helpful to allow a finger in there to help line everything up, but that is not necessary.

NOTE: Although you can't tell from the photo, the spring on the end of the new shift tube wasn't wound as tightly as the original. So we removed it from the shift tube, and gave each end a few tugs with a set of long pliers to tighten up the ends of the springs. Put it back together and it's much nicer. No chance of it sliding over the ends now.

5. Install the shift sleeve, then the turn signal assembly housing which gets bolted to the column and secured the shift sleeve.

Once this is done, you can put the shift lever into place and bench test everything.
6. This is where we had the biggest issue. The new shift tube was about 1/32" shorter than the original. This meant that when I pulled the lever forward to shift b/w R and 1st, the tube didn't push down enough and was still engaged the 2/3rd shift arm. Had to use a file and remove some material from the inside of the new shift sleeve so that the shift arm could be pulled back further toward driver. A few minutes with the file and 1 or 2 test fits later and we had things where they needed to be.

7. Once the bench test is succesful and shifting seems to work well, you can insert the steering shaft and install the upper bearing and snapring.
8. Now install the turn signal switch. You'll have to tape and fish the wires through the column. Be careful how you do this, staggering the metal pins that go into the connector. It's a tight fit going through there, and I had everything taped too tightly the first time. Took it out, undid it out, then taped it all back up and then everything snaked through just fine.

9. The TS switch is secured with 3 screws. Be mindful of the wiring, we had to push things around slightly and add another zip tie to keep the wiring out of the way of the turn signal cancel switch white plastic cam thing. It's a tight squeeze in there!

10. With all the wires through, you can put them back into the factory connector. That's shown in the photo at Step#3 above.
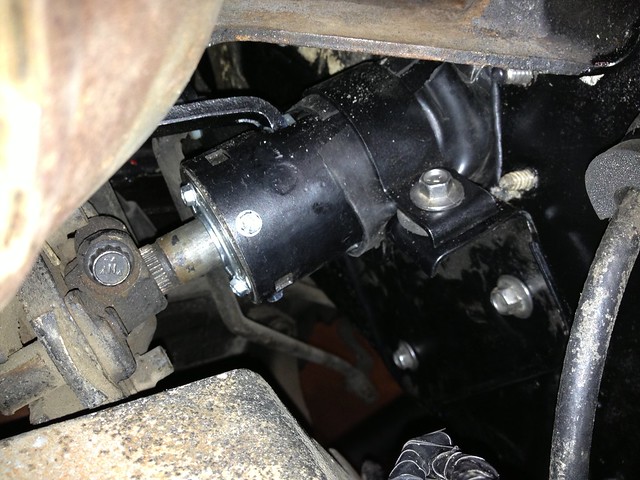
Now you should be ready to put it all back into the Bronco! I had to do some touch up painting to mine, so it's still sitting on the bench awaiting install hopefully on Wednesday.
I really like the column shifter, both because it is unique and original to the car. There are a lot of naysayers out there, and if I had $2.5-3k to drop on the NV3550 transplant I certainly would. But I'm hopeful that this rebuilt will give me a nicely working setup for at least a few years.
Hopefully this will help someone out! It is fairly simple and straightforward once you have done it, but a few of the tips above would've saved me a good bit of time today. It took most of the morning to do this, and most of the time was from filing down the shift sleeve and testing and refitting it 2 or 3 times.
Thanks!
Ben
Today we rebuilt my original 3 speed column in my '76. I had done a fair few numbers of searches, and there isn't a ton of info out there. The rebuild is fairly straightforward. I'm by no means a master mechanic, my friend helping me is pretty darn good with these things, but that being said, take this advice at your own caution!
I bought the rebuild kit from JBG: http://broncograveyard.com/bronco/i-17011-column-rebuild-kit-man-76-77.html
1. Disassembly is pretty well documented. Note that the rebuild kit did not include the upper column snap ring or the curved washer that goes b/w the column and the shift sleeve, so make sure you take caution when removing those items. Picture below has all the old parts on top, new stuff on the bottom. I circled the parts that didn't come with the rebuild kit. The pin that goes through the shift lever and secures the lever to the sleeve wasn't included in my kit, but that was an oversight by JBG and they are sending me a new one.
2. Reassemby begins with the lower bearing. You can screw or weld it in place. We didn't see a need for welding. Use caution when planning out the location of the 3 screws. We put them a little too close to the end, and broke 2 taps trying to go through the welds on the underside. 2 of the 3 screws used to secure the bearing to the column are seen in this photo.
3. Install the column to firewall seal now. The photo below shows it installed, but I forgot to the first time around and had to disassemble the whole thing because once the shift arms are in place you won't be able to put this on. NOTE!!!! The photo below shows the seal installed the wrong way! It should be flipped, with the portion that firmly wraps the column almost touching the shifter arms. See Post #12 below for more info
4. Align the shift arms and spacers into the hole, then put the new shift tube into the column and push down into place. No troubles here. (The lower bearing is removed in this picture, I thought taking it out would be helpful to allow a finger in there to help line everything up, but that is not necessary.
NOTE: Although you can't tell from the photo, the spring on the end of the new shift tube wasn't wound as tightly as the original. So we removed it from the shift tube, and gave each end a few tugs with a set of long pliers to tighten up the ends of the springs. Put it back together and it's much nicer. No chance of it sliding over the ends now.
5. Install the shift sleeve, then the turn signal assembly housing which gets bolted to the column and secured the shift sleeve.
Once this is done, you can put the shift lever into place and bench test everything.
6. This is where we had the biggest issue. The new shift tube was about 1/32" shorter than the original. This meant that when I pulled the lever forward to shift b/w R and 1st, the tube didn't push down enough and was still engaged the 2/3rd shift arm. Had to use a file and remove some material from the inside of the new shift sleeve so that the shift arm could be pulled back further toward driver. A few minutes with the file and 1 or 2 test fits later and we had things where they needed to be.
7. Once the bench test is succesful and shifting seems to work well, you can insert the steering shaft and install the upper bearing and snapring.
8. Now install the turn signal switch. You'll have to tape and fish the wires through the column. Be careful how you do this, staggering the metal pins that go into the connector. It's a tight fit going through there, and I had everything taped too tightly the first time. Took it out, undid it out, then taped it all back up and then everything snaked through just fine.
9. The TS switch is secured with 3 screws. Be mindful of the wiring, we had to push things around slightly and add another zip tie to keep the wiring out of the way of the turn signal cancel switch white plastic cam thing. It's a tight squeeze in there!
10. With all the wires through, you can put them back into the factory connector. That's shown in the photo at Step#3 above.
Now you should be ready to put it all back into the Bronco! I had to do some touch up painting to mine, so it's still sitting on the bench awaiting install hopefully on Wednesday.
I really like the column shifter, both because it is unique and original to the car. There are a lot of naysayers out there, and if I had $2.5-3k to drop on the NV3550 transplant I certainly would. But I'm hopeful that this rebuilt will give me a nicely working setup for at least a few years.
Hopefully this will help someone out! It is fairly simple and straightforward once you have done it, but a few of the tips above would've saved me a good bit of time today. It took most of the morning to do this, and most of the time was from filing down the shift sleeve and testing and refitting it 2 or 3 times.
Thanks!
Ben
Last edited:

")