• Just a reminder that you won't be able to start new posts or reply to existings posts in the Archive forum.

    This is where all the old posts go so they can still be used for reference and searched.
  • Welcome to ClassicBroncos! - You are currently viewing the forums as a GUEST. To take advantage of all the site features, please take a moment to register. It's fast, simple and absolutely free. So please join our community today!
    If you have problems registering or can't log into your account, please contact Admin.

A4x4Junkys 1970 build

A4x4Junky

Sr. Member
Joined
Jan 9, 2007
Messages
550
Loc.
South Jersey
Had to sell my 67 a while ago and hated not having a Bronco ever since.
Finally found the means and picked up a 70.

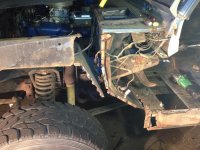
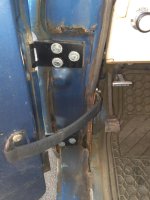
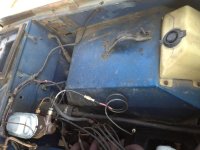
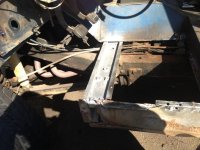
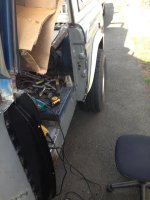
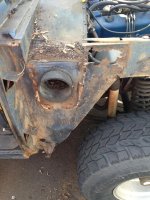
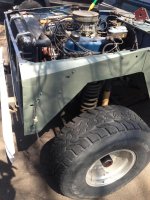
The first few pics show the condition I found the truck in.
Stockish 302, 3 speed on column, 2ish inch lift with some 33s and lots of rust.

Drove to Virginia from Jersey and bought the truck.
Jumped in on a nice rainy 40 degree day and drove home with no doors.
Nice cold day.

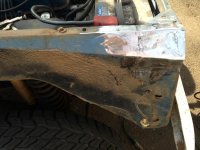
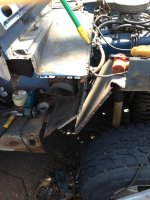
Did enough to support the doors and cleaned up the body and have used it as a daily driver ever since.

Not sure exactly what I plan for this truck...but I do know that I have to get rid of the evil rust monster.

Anthony
 

Attachments

  • IMG_0430.JPG
    IMG_0430.JPG
    95.9 KB · Views: 128
  • IMG_0431.JPG
    IMG_0431.JPG
    67.5 KB · Views: 111
  • IMG_0432.JPG
    IMG_0432.JPG
    29.7 KB · Views: 122
  • IMG_0433.JPG
    IMG_0433.JPG
    51.9 KB · Views: 101
  • IMG_0434.JPG
    IMG_0434.JPG
    75.9 KB · Views: 111
  • IMG_0530.jpg
    IMG_0530.jpg
    120 KB · Views: 97
  • IMG_0527.jpg
    IMG_0527.jpg
    153.4 KB · Views: 101
OP
OP
A4x4Junky

A4x4Junky

Sr. Member
Joined
Jan 9, 2007
Messages
550
Loc.
South Jersey
Metal work begins

Ordered up a bunch of body parts...started working on rot removal tonight.

Didnt do too badly for the couple hours I had to work on it.
Driver side opened up nicely...now to patch some holes and start fitting new panels.

I took a week off work...hope to have most of the repairs done and make this drivable again by then.

Anthony
 

Attachments

  • IMG_1244.jpg
    IMG_1244.jpg
    119.4 KB · Views: 89
  • IMG_1246.jpg
    IMG_1246.jpg
    107.8 KB · Views: 88
  • IMG_1243.jpg
    IMG_1243.jpg
    121.7 KB · Views: 93
  • IMG_1238.jpg
    IMG_1238.jpg
    96.1 KB · Views: 89
  • IMG_1237.jpg
    IMG_1237.jpg
    110 KB · Views: 84
  • IMG_1221.jpg
    IMG_1221.jpg
    84.9 KB · Views: 86
  • IMG_1219.jpg
    IMG_1219.jpg
    96.6 KB · Views: 86
  • IMG_1217.jpg
    IMG_1217.jpg
    93.9 KB · Views: 88

Stutsmo

Contributor
Bronco Guru
Joined
Jan 24, 2009
Messages
2,549
1 week? I bet I could stretch it out for a few months ;D good luck!!
 
OP
OP
A4x4Junky

A4x4Junky

Sr. Member
Joined
Jan 9, 2007
Messages
550
Loc.
South Jersey
Started trying to cut out and patch rot in the driver side front today.

The inner fenders had holes front and rear and a few seams between inner fender and wheel well needed help.

Cut out the badness and bent up some metal...almost the right size and shape :p

Opened up the cowl a little to cut out some rust and prepped the driver floor pan for install.

Think Im gonna have to speed up a little to get done this rust removal before I go back to work.

Anthony
 

Attachments

  • IMG_1266.jpg
    IMG_1266.jpg
    121.3 KB · Views: 68
  • IMG_1264.jpg
    IMG_1264.jpg
    112.3 KB · Views: 66
  • IMG_1262.jpg
    IMG_1262.jpg
    126.6 KB · Views: 63
  • IMG_1259.jpg
    IMG_1259.jpg
    105.6 KB · Views: 61
  • IMG_1255.jpg
    IMG_1255.jpg
    102.8 KB · Views: 64
  • IMG_1252.jpg
    IMG_1252.jpg
    128.3 KB · Views: 65
  • IMG_1249.jpg
    IMG_1249.jpg
    90.1 KB · Views: 63
  • IMG_1248.jpg
    IMG_1248.jpg
    121.8 KB · Views: 66
OP
OP
A4x4Junky

A4x4Junky

Sr. Member
Joined
Jan 9, 2007
Messages
550
Loc.
South Jersey
Removed what was left of the floor and patched a couple seams that the new pan wouldnt cover.
Got the new pan ing. Took a bit of trimming, but not too horrible.
Once welded in I patched the inner rocker.
I worked on kick panel alignment...was a pain in the ass and Im still not thrilled with it...
Kick panel was a LOT better than the crap fitment of the new hinge post.
There are gaps at the top and overall the new piece of metal just felt ... wrong.

Got it all screwed together and all measurements are back to what they were before I took it apart.

Getting closer.

Anthony
 

Attachments

  • IMG_1282.jpg
    IMG_1282.jpg
    88.3 KB · Views: 76
  • IMG_1281.jpg
    IMG_1281.jpg
    75 KB · Views: 74
  • IMG_1279.jpg
    IMG_1279.jpg
    100.1 KB · Views: 76
  • IMG_1278.jpg
    IMG_1278.jpg
    102.6 KB · Views: 72
  • IMG_1277.jpg
    IMG_1277.jpg
    104.1 KB · Views: 62
  • IMG_1273.jpg
    IMG_1273.jpg
    90.4 KB · Views: 69
  • IMG_1272.jpg
    IMG_1272.jpg
    112.9 KB · Views: 59
  • IMG_1269.jpg
    IMG_1269.jpg
    107.6 KB · Views: 59

Stutsmo

Contributor
Bronco Guru
Joined
Jan 24, 2009
Messages
2,549
Wow you have got a ton of work done on this! Keep at it you might just make it in a week!
 
OP
OP
A4x4Junky

A4x4Junky

Sr. Member
Joined
Jan 9, 2007
Messages
550
Loc.
South Jersey
Wow you have got a ton of work done on this! Keep at it you might just make it in a week!

Thanks for the vote of confidence...not sure I am as far along as I had hoped.

Spent the better part of today working on the truck again.
I was finally able to weld up the kick panel and work on the horrible fit of the top of the hinge posts.
Not too disappointed with the outcome. They will clean up fine when I get to it.
The hinge post is welded on now. Lots of measuring and double-checking. I like how it turned out.
Put in a patch for the rotten piece of cowl. Again, it will clean up well and disappear when I get around to cleaning up the weld.
I pulled the driver striker post. What a pain in the ass.
It is out and the new one fitted. Not horrible, but took a bit more work than I liked to get everything aligned.
Clamped it in place and test fit the rocker. Yup...rocker panel sucks as bad as when I did them on my 67. Nothing fits and matches. The curves and lines are very different than the hinge post and striker post.

Walked away from it for a bit and instead started working on the passenger side. Began by cutting out the rot at the front of the inner fender.

More fun tomorrow.
Anthony
 

Attachments

  • IMG_1305.jpg
    IMG_1305.jpg
    109.7 KB · Views: 58
  • IMG_1304.jpg
    IMG_1304.jpg
    102.7 KB · Views: 71
  • IMG_1298.jpg
    IMG_1298.jpg
    82.3 KB · Views: 65
  • IMG_1303.jpg
    IMG_1303.jpg
    95.7 KB · Views: 60
  • IMG_1301.jpg
    IMG_1301.jpg
    113.1 KB · Views: 62
  • IMG_1302.jpg
    IMG_1302.jpg
    133.1 KB · Views: 52
  • IMG_1294.jpg
    IMG_1294.jpg
    104.9 KB · Views: 53
  • IMG_1292.jpg
    IMG_1292.jpg
    137.1 KB · Views: 55
OP
OP
A4x4Junky

A4x4Junky

Sr. Member
Joined
Jan 9, 2007
Messages
550
Loc.
South Jersey
Another day done.

Finished the patch on the passenger inner fender.

Really didnt feel like working on the driver side yet, so I moved onto a little demo on the passenger side. Most of the rocker and a few welds out.

Around lunch time I decided to get back to the driver side instead.
Started with the striker post. I had this fit last night, so was an easy weld in.

Cleaned up some welds on the driver inner fender, cowl, hinge post, striker, and kick panels.

Rocker panel was next. I hate how this thing fits. Made a few "updates" and it went in much better. Started welding it in and ran out of time.

Looking forward to getting this rust removal stage done...more tomorrow.

Anthony
 

Attachments

  • IMG_1325.jpg
    IMG_1325.jpg
    103.7 KB · Views: 56
  • IMG_1324.jpg
    IMG_1324.jpg
    102.1 KB · Views: 60
  • IMG_1321.jpg
    IMG_1321.jpg
    117 KB · Views: 56
  • IMG_1318.jpg
    IMG_1318.jpg
    135 KB · Views: 57
  • IMG_1319.jpg
    IMG_1319.jpg
    93.9 KB · Views: 57
  • IMG_1316.jpg
    IMG_1316.jpg
    138.5 KB · Views: 56
  • IMG_1315.jpg
    IMG_1315.jpg
    114 KB · Views: 52
  • IMG_1313.jpg
    IMG_1313.jpg
    133.6 KB · Views: 51
OP
OP
A4x4Junky

A4x4Junky

Sr. Member
Joined
Jan 9, 2007
Messages
550
Loc.
South Jersey
Good progress today.

Finished fitting and welding the driver rocker. Ground most of the welds down and put a quick coat of primer on the driver side to stop possibleflash rust. Feels REAL good to have one side close to done.

Started working on the passenger side. Cut off the hinge post and kick panel and had to patch the inner fender by the fresh air intake as well as the wheel well at that same point. Turned out ok after I ground down the weld.

Fitted up the kick panel and it looks to fit very nicely.

Pulled out the floor pan and found a nice bit of rot on one of the floor braces.
Cut out the ugly and welded in some new metal...not going anywhere ;D

Trimmed and test fit the new floor pan. Still have a patch or two before I can put it in, but feels good to be that much closer.

Anthony
 

Attachments

  • IMG_1345.jpg
    IMG_1345.jpg
    113 KB · Views: 54
  • IMG_1347.jpg
    IMG_1347.jpg
    95.7 KB · Views: 56
  • IMG_1337.jpg
    IMG_1337.jpg
    111.9 KB · Views: 55
  • IMG_1326.jpg
    IMG_1326.jpg
    143.1 KB · Views: 54
  • IMG_1328.jpg
    IMG_1328.jpg
    109.9 KB · Views: 53
  • IMG_1327.jpg
    IMG_1327.jpg
    126.5 KB · Views: 54
  • IMG_1330.jpg
    IMG_1330.jpg
    119.9 KB · Views: 54
  • IMG_1331.jpg
    IMG_1331.jpg
    105.7 KB · Views: 57
OP
OP
A4x4Junky

A4x4Junky

Sr. Member
Joined
Jan 9, 2007
Messages
550
Loc.
South Jersey
Rest of tonights pics
 

Attachments

  • IMG_1354.jpg
    IMG_1354.jpg
    109.3 KB · Views: 59
  • IMG_1355.jpg
    IMG_1355.jpg
    107.5 KB · Views: 61
  • IMG_1353.jpg
    IMG_1353.jpg
    130.8 KB · Views: 57
  • IMG_1352.jpg
    IMG_1352.jpg
    136.2 KB · Views: 56
  • IMG_1350.jpg
    IMG_1350.jpg
    153 KB · Views: 53
  • IMG_1346.jpg
    IMG_1346.jpg
    99.9 KB · Views: 52
  • IMG_1348.jpg
    IMG_1348.jpg
    130 KB · Views: 50
OP
OP
A4x4Junky

A4x4Junky

Sr. Member
Joined
Jan 9, 2007
Messages
550
Loc.
South Jersey
Another full day working on passenger side.

Started off working on some small patches where rust had crept too high for the new floor pans.
Got the floor pan in. Damn is that a lot of holes, weld, and grinding...but got it in there.

Spent the next few hours measureing the kick panel location and hinge post. Adjust and start over...again and again.

Finally happy with the measurements and pulled them apart to prep for weld. Got the kick in tonight...more tomorrow.

Anthony
 

Attachments

  • IMG_1356.jpg
    IMG_1356.jpg
    116.6 KB · Views: 50
  • IMG_1357.jpg
    IMG_1357.jpg
    121.9 KB · Views: 50
  • IMG_1358.jpg
    IMG_1358.jpg
    126.1 KB · Views: 46
  • IMG_1359.jpg
    IMG_1359.jpg
    114 KB · Views: 46
  • IMG_1360.jpg
    IMG_1360.jpg
    128.2 KB · Views: 44
  • IMG_1361.jpg
    IMG_1361.jpg
    110.2 KB · Views: 50
Top