• Just a reminder that you won't be able to start new posts or reply to existings posts in the Archive forum.

    This is where all the old posts go so they can still be used for reference and searched.
  • Welcome to ClassicBroncos! - You are currently viewing the forums as a GUEST. To take advantage of all the site features, please take a moment to register. It's fast, simple and absolutely free. So please join our community today!
    If you have problems registering or can't log into your account, please contact Admin.

1971 Frame Off Luber Build

Numberfool

Full Member
Joined
Sep 8, 2012
Messages
173
Build thread for my 1971 Bronco

Finished my 1975 Bronco frame off (see build thread... I was stupid enough to track and post up costs) and thought it was time to start documenting the build on the 71. For those who followed my 75', you can see I got a bit of a head start on this second build. Thought I would put in a few of the slower months, then start the build thread to give it a head start.

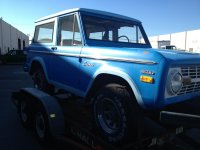
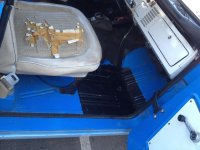
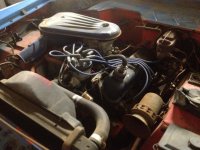
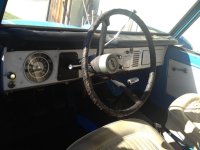
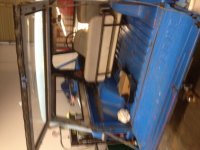
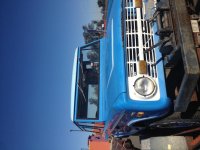
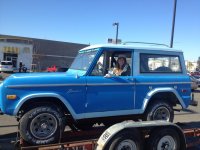
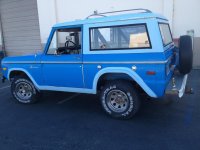
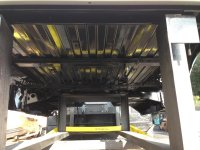
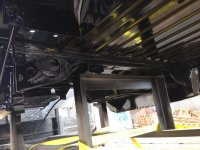
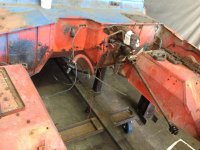
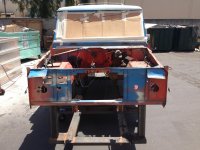
Halfway through the build on the 75', my daughter and I found a 71 sitting in a barn. Was there for 12 years... hadnt been registered since. We found her when we were on vacation skiing last Christmas and of course, headed for the local uhaul, put it on a trailer and brought her home. Perfectly normal behavoir, right? I was far along enough on the 75, dealing with rust and previous owner fun to realize pretty quickly once I got the 71 home that it was special. Found red paint underneath, a siren under the hood and a winch so big on the front it ruined the suspension. Decent chance the rig did double duty for the forest service or local sheriff. Body is extremely straight and initial impressions are very little rust. Vehicle shows signs of decently lower miles on the drivetrain/running gear.

Plan was to turn her into a driver for a few years while my daughter is at school, then someday restore her. Changed my mind... gave the 75' to her, finished it up, now the 71' is mine and I hope to take my lessons learned and make this build better than the first. Felt like a learned a ton and as with anything, lots I wanted to do different.

Plans are to build a very driveable, but very capable rig. Would like it to be comfortable here in town, but just as comfortable hunting in the bush. Unlike my first build, I want to stay flexible as I progress to changing directions. In my first build, in looking back I was too driven by the calendar and getting it back on the road. I dont want to rush the build and to be honest, I seem to enjoy the build sometimes as much as the drive. Initial plans:

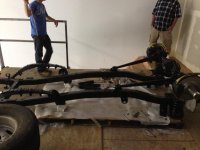
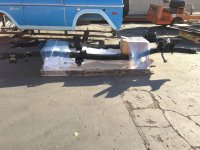
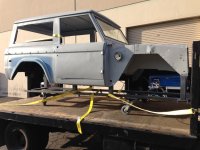
- Body off rebuild - Powdercoat frame / bring back to new
- Front is uncut, rear cut. Will be taking her back to uncut all around. I think the lifted uncut look is just awesome
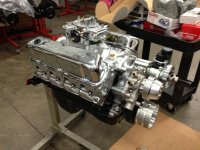
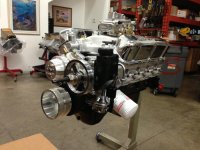
- Ford X302 Racing crate motor
- NV3550 5 speed conversion
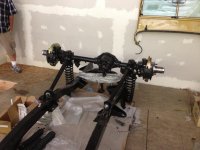
- Sticking with the Dana TC
- Shorty headers
- Wild horses 2.5" lift
- On the fence with the body lift. Will allow tires, feedback here and such drive that one
- Twin sticks
- Thinking 30-31's sitting on steel wheels with original hubcaps. Love that look on an uncut, lifted bronco
- Full family cage
- Will be going with some type of modern seats for comfort and safety... decision to come later
- Custom bumpers
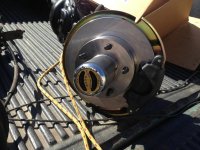
- Disc brake conversion

I am sure I will change, add and continue. Been stockpiling parts, time to get rolling.
Feedback and constructive opinions are always welcome. That is what is great about this forum. Huge appreciation to the fantastic posts and advice dispensed here by our bronco brothers. Thanks for reading.

Pictures attached of the 71' in her original condition.
 

Attachments

  • photo 333.jpg
    photo 333.jpg
    72.7 KB · Views: 416
  • IMG_2225.jpg
    IMG_2225.jpg
    97.1 KB · Views: 422
  • IMG_1937.jpg
    IMG_1937.jpg
    106.1 KB · Views: 446
  • photo 22.jpg
    photo 22.jpg
    76.3 KB · Views: 418
  • IMG_1923.jpg
    IMG_1923.jpg
    80.9 KB · Views: 401
  • IMG_2243.jpg
    IMG_2243.jpg
    88.5 KB · Views: 380
  • IMG_2244.jpg
    IMG_2244.jpg
    98.2 KB · Views: 475
  • photo 2.jpg
    photo 2.jpg
    91.7 KB · Views: 445
Last edited:

slim811

Contributor
Sr. Member
Joined
Mar 6, 2013
Messages
709
Great find!

Yeah I have a 68 also, but I would not have passed her up either. I am not sure did you mention if Dana 44? Good thing about the 1971 you should not be dealing with pollution issues. Did you figure out if that is original color yet? Good luck!
 

Scoop

Contributor
Have Bronco, Will Travel
Joined
Feb 1, 2006
Messages
10,604
Loc.
Cuchara, CO
Very nice platform to start your build with. I'd try and look into its history a bit more. Sounds like it might have started out as a a small fire dept's brush truck.
 
OP
OP
N

Numberfool

Full Member
Joined
Sep 8, 2012
Messages
173
Slim811: she does have the Dana44 up front. Was glad to see it and saved me the swap

Scoop: I think you are probably right. Based on where she came from, I am guessing a very small remote fire post or a volunteer department. I agree it would be cool to have some of the history. I have a way to get in touch with the family. The grandfather that owned her passed away, which prompted the storage clean out and sale. His son I guess thought about doing a resto and then either changed his mind or realized the time and dollars ahead. They have asked for pictures when it is done.
 
OP
OP
N

Numberfool

Full Member
Joined
Sep 8, 2012
Messages
173
Next up was to divorce the body from the frame. Oh, how easy and fast they come apart. Our eyes full of hope and speed as the parts come flying off.

For those that may wonder, yes that is the same uhaul trailer in the last pictures with the rolling chassis... I pulled the body off the next day before the trailer was returned. Last photo shows me tucking the body up safe in my shop. Won't need that for a bit as the frame and drivetrain gets all the love.

b71a330ee35623f06fa6c1f85d06477e.jpg

yha4u9ej.jpg
 
Last edited:
OP
OP
N

Numberfool

Full Member
Joined
Sep 8, 2012
Messages
173
Next up was getting the chassis stripped down, engine and front and rear ends out.

Savings parts and doing a careful disassembly, but very little will get put back on. Mostly just adding the parts to the growing pile I have going. She will get a fresh drivetrain.

Frame loaded up and off to the blaster and Powdercoating. Had to clean up the front and back of the frame. PO thought welding the bumpers on was the way to go.

Tranny put aside, only the bell housing and Dana TC will be part of the new build.

muta9e6u.jpg

agudysyt.jpg

e4agevas.jpg

2amujuhy.jpg

bypu6uma.jpg
 
OP
OP
N

Numberfool

Full Member
Joined
Sep 8, 2012
Messages
173
While the frame was off getting loved on, I sent the front and rear end to Mike's 3 Point in Ventura. He did a complete disassembly and rebuilt both units. Everything was well past its time.

While we were at it, drum brakes in the rear were completely overhauled and all the worn out parts replaced with new.
Front disk conversion was bought from Toms Bronco Parts and installed, as well as new Warn hubs.
Photos show them both coming back to my shop, ready to install on the frame.
Powdercoated frame came back.

Frame was flipped on its back and the suspension and front and rear ends installed. While the frame was out, the Wildhorses 2.5" suspension lift came in.
Arms were powder coated and installed, new rubber.
I thought I was so smart doing it like this with the frame upside down... easy installing everything. Stupid decision. I did this part of the build up on my shop mezzanine for space. Very difficult flipping it over and bringing it down without hurting anything or anyone.

In the background of one of the pictures, you can see I brought the body back down from her perch and installed onto a jig with casters. I made this during the build of the 75' and boy is it handy being able to roll the body around and transport.
 

Attachments

  • IMG_3670.jpg
    IMG_3670.jpg
    76.9 KB · Views: 448
  • IMG_3669.jpg
    IMG_3669.jpg
    85.9 KB · Views: 426
  • Photo Feb 14, 3 49 39 PM.jpg
    Photo Feb 14, 3 49 39 PM.jpg
    137.5 KB · Views: 421
  • Photo Feb 14, 3 49 50 PM.jpg
    Photo Feb 14, 3 49 50 PM.jpg
    109.4 KB · Views: 409
  • Photo Feb 11, 10 36 57 AM.jpg
    Photo Feb 11, 10 36 57 AM.jpg
    129.2 KB · Views: 396
  • Photo Feb 11, 10 36 52 AM.jpg
    Photo Feb 11, 10 36 52 AM.jpg
    116.9 KB · Views: 395

LoneRanger

Contributor
Sr. Member
Joined
Jun 13, 2007
Messages
560
Loc.
Gunshine State
looked like a good idea to me (building it upside down) couldn't ya just strap the front and rear axles down so the axles wouldn't droop out when you flipped it over? how did you flip it over anyway?

L.R.
 
OP
OP
N

Numberfool

Full Member
Joined
Sep 8, 2012
Messages
173
Body prep

Finally got the body disassembled and started to sand blast. Setup a make ship booth and went to town. Quickly found out it takes a ton of air to do this right. Called it after a few days and decided to send it to Oxnard and have it soda blasted.
First pictures show my home grown attempt.
Completely soda blasted everything, went light on the top. Seen other builds here where guys regretted that and warped the top. Youll notice from the photos I skipped the rear quarters... those are getting replaced.
After is was blasted, we quickly primed all exterior, interior and engine bay surfaces to protect the metal.
As far as what the blasting showed hiding underneath (my 75' turned into a horror show of bondo and previous repairs), I am thrilled. I knew I had rust on both drivers and passenger side floor boards. Also the small piece next to the windshield. The blasting showed no other rust, zero repairs done over the years.

Underneath I shot POR-15. I will be doing POR underneath, plus some type of underbody treatment to knock down the noise. My last build I thought Linex on every under surface or engine area was the way to go. I am not so hot on that anymore. It has its place, but my humble opinion is it can be overdone.
I will probably only Linex the interior of the Bronco, as it has a practical purpose there to be usable and make it spray out. I have been pretty impressed with the POR-15, as long as you give it a top coat to protect it from UV's.
On to the pictures. Engine and tranny should be done soon. Hope to post that up next.
 

Attachments

  • Photo Oct 02, 5 10 48 PM.jpg
    Photo Oct 02, 5 10 48 PM.jpg
    105.2 KB · Views: 480
  • Photo Oct 02, 5 10 58 PM.jpg
    Photo Oct 02, 5 10 58 PM.jpg
    110.1 KB · Views: 484
  • Photo Oct 02, 5 10 23 PM.jpg
    Photo Oct 02, 5 10 23 PM.jpg
    99.6 KB · Views: 536
  • Photo Oct 02, 5 10 27 PM.jpg
    Photo Oct 02, 5 10 27 PM.jpg
    70.1 KB · Views: 452
  • IMG_3702.jpg
    IMG_3702.jpg
    107.7 KB · Views: 453
  • IMG_3738.jpg
    IMG_3738.jpg
    111.2 KB · Views: 453

gritz

Sr. Member
Joined
Jun 27, 2007
Messages
473
Looks good I am just starting a frame off and just got my frame painted pretty excited.
 

dave67fd

Contributor
Bronco Guru
Joined
Sep 24, 2010
Messages
2,863
Looks all too familiar (the teardown anyway);D

Nice progress. Keep goin.
 
OP
OP
N

Numberfool

Full Member
Joined
Sep 8, 2012
Messages
173
Time for an engine.
Now that the body is back and I can start the body work, I figured it was time to finish out the chassis.

Picked up my new engine, pictures below.

Ford Racing crate motor.

-302, 340HP, Ford racing aluminum heads, roller rockers, roller cam, Holly carb

Valve covers shown are not final. Learned my lesson on that one.

Transmission is next on my to do list. Going to run the engine out and test it at the speed shop... ill figure out how to post up video again for that.
 

Attachments

  • IMG_3655.jpg
    IMG_3655.jpg
    105.9 KB · Views: 447
  • IMG_3656.jpg
    IMG_3656.jpg
    102.2 KB · Views: 347
OP
OP
N

Numberfool

Full Member
Joined
Sep 8, 2012
Messages
173
Continuing to make some progress on the chassis. Speed shop ran the engine out and tuned her, got to bring her home. Will marry it to the transmission when the NV3550 stuff is all laid out and assembled to the transfer case. Hope to have it all mounted onto the frame next week and move on to steering. Lots of other details I now need to engage... struggling with which type of headers to go with and the oversized gas tank for the rear. Thinking of going with Wildhorses since it is adjustable and doesn't have the straps. Cant bring myself to get rid of the aux tank. Seems silly not to have and I love the look of the two filler caps.


Video attached for those that want a little saturday viewing.

[youtube]_e4lGCB7Fz0[/youtube]
 

Fireball05

Bronco Guru
Joined
Oct 7, 2012
Messages
1,822
Very nice work so far! Will enjoy watching this progress.

FYI, I have two caps and only one tank :) Went with the BCB 23 gal rear tank and never found a need to put the aux tank back in, but love the look of the 2 caps. Guess I'm just another poser!
 

ccbronco

Full Member
Joined
Apr 16, 2008
Messages
214
This thread started on 10/12/13 with pics of a vehicle on a trailer. On 10/14/13 you said "Finally got the body disassembled and started to sand blast." FINALLY! REALLY! My 67 has been in pieces (well it is FINALLY going back together) for 4 years.
 
Top