• Just a reminder that you won't be able to start new posts or reply to existings posts in the Archive forum.

    This is where all the old posts go so they can still be used for reference and searched.
  • Welcome to ClassicBroncos! - You are currently viewing the forums as a GUEST. To take advantage of all the site features, please take a moment to register. It's fast, simple and absolutely free. So please join our community today!
    If you have problems registering or can't log into your account, please contact Admin.

My '69 Build

Devin

Bronco Kineticist
Joined
Apr 29, 2004
Messages
3,956
My '69 Build - test

I thought I would share some pictures of my ever-so-slow progress. If you would like to see some before pics, go here:

http://www.classicbroncos.com/forums/showthread.php?t=57217

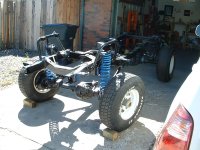
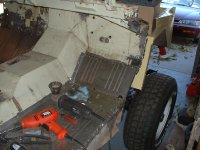
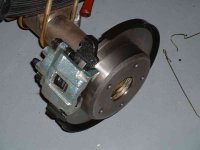
Anyway, I recently received an extra heavy duty rear axle housing from currie along with their performance axle package. I also ordered the explorer disc brake kit from them. Great people to work with :) . I went ahead and hung it on under my new Duff leaf springs so that I could figure out how I was going keep the dual rear shocks. I think I have that figured out, but I won't have pics on that for a while. I am going to wait on that design until I have the body on the frame. I am in the process of taking it back off so that I can coat it with some POR15.

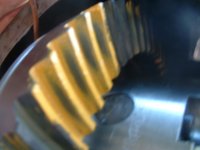
Since my last update post, I also finished the NP435 rebuild (still have to get the adapter plate), the Dana 20 rebuild, and I painted the frame.
 

Attachments

  • paintedframe.jpg
    paintedframe.jpg
    71.6 KB · Views: 474
  • tranny.jpg
    tranny.jpg
    56.6 KB · Views: 446
  • tcase.jpg
    tcase.jpg
    56.8 KB · Views: 554
  • brake.jpg
    brake.jpg
    34 KB · Views: 445
  • enginemounts.jpg
    enginemounts.jpg
    68.9 KB · Views: 347
  • housing3.jpg
    housing3.jpg
    47 KB · Views: 414
  • housing2.jpg
    housing2.jpg
    71.1 KB · Views: 374
  • housing1.jpg
    housing1.jpg
    76.8 KB · Views: 483
Last edited:

Hazegray

Sr. Member
Joined
Aug 10, 2004
Messages
795
Hey, by chance you might know my brother, Shawn McWhorter. He went wheeling (tube buggy) up in your area with a guy in a Bronco. Was that you?
 
OP
OP
Devin

Devin

Bronco Kineticist
Joined
Apr 29, 2004
Messages
3,956
Not me - must have been one of the other Broncs running around here.
 
OP
OP
Devin

Devin

Bronco Kineticist
Joined
Apr 29, 2004
Messages
3,956
The Bronco saw some sunlight for the first time in over 2 years yesterday!!!

Since the last update, I coated the rear axle housing with POR 15. I went ahead and installed the rear axles and brakes, even though I don't have the third member done. I did this so that I could pick up the front of the frame and kind of roll it around to create more garage space.

Anyway, recently, with the advice of several members on this board, I installed an ARB locker and a new set of Yukon 4.56 gears in a DANA 44 housing (from a 1973) that I purchased up in Denver. You can see the final gear pattern below.

I wanted front discs, so I purchased some knuckles and brake components from a '76. Over the past couple of weeks, I installed Yukon axles, Yukon super joints, new ball joints, new spindles, new wheel bearings and seals, new hub and rotor assemblies, and Warn premium locking hubs.

I hung it all under the frame and put some tires on her to get it a bit more mobile. It was nice to see it up on four wheels again! ;D ;D
 

Attachments

  • rollin2.jpg
    rollin2.jpg
    194.1 KB · Views: 413
  • rollin1.jpg
    rollin1.jpg
    206.2 KB · Views: 565
  • drive8.JPG
    drive8.JPG
    117.3 KB · Views: 195
  • coast8.JPG
    coast8.JPG
    119.5 KB · Views: 185
OP
OP
Devin

Devin

Bronco Kineticist
Joined
Apr 29, 2004
Messages
3,956
Ok, so the funds have come to a halt for quite a while on my snails-pace build up. As much as I would like to dive into the rear end and the engine, I can't right now. But, I did get the body back on it (mainly to get the body out of the weather. The back end of the tub is in great shape, except for the driver's side quarter, thanks to the PO. So, I removed it. But, as one of the pictures show - I have extensive cancer up towards the front of the tub. Got lots to do.

In the meantime, I am doing what I can. My son helped me rebuild my speedo cluster ;D . I saw someone else on this site (can't remember who it was) who did this and I really liked the way it looked. Plus I got to put the odometer back to the start. ;D

p.s. And before you hang me for my "Chebby" picture in the background - I have wanted a '57 Chebby since I was a kid. Something about the way those cars look has always made me want one. ;D %)
 

Attachments

  • body_on.JPG
    body_on.JPG
    114.6 KB · Views: 556
  • cancer1.JPG
    cancer1.JPG
    121.2 KB · Views: 354
  • workinwDad2.JPG
    workinwDad2.JPG
    73.5 KB · Views: 633
  • new_speedo.JPG
    new_speedo.JPG
    120.2 KB · Views: 729
Last edited:

thesnake

Bronco Guru
Joined
Jun 20, 2001
Messages
3,503
Nice job so far, real nice job on the speedo!!! I know how slow can be...

Thanks for the pics!!!

John
 
OP
OP
Devin

Devin

Bronco Kineticist
Joined
Apr 29, 2004
Messages
3,956
Making some progress finally. Our family car is paid off, so I have been able to free up some funds for the Bronco. I just finished the setup of my new 9" third member. It is a Currie 9+ Nodular carrier housing, daytona pinion support, ARB locker, and Yukon 4.56 gears. I am real happy with how the pattern looks. I am going to bench test the locker and then drop it in the housing.

I have also included a couple of shots of what I was working on during the funding shortage. The beginnings of my "custom" dash. I still have quite a bit of work left to do on it, but it is turning out ok for my first sheet-metal welding experience.
 

Attachments

  • DSCF0061.JPG
    DSCF0061.JPG
    154.9 KB · Views: 205
  • DSCF0060.JPG
    DSCF0060.JPG
    172.3 KB · Views: 351
  • DSCF0058.JPG
    DSCF0058.JPG
    228 KB · Views: 185
  • DSCF0057.JPG
    DSCF0057.JPG
    220.6 KB · Views: 200
  • DSCF0013.JPG
    DSCF0013.JPG
    122.6 KB · Views: 151
  • DSCF0059.JPG
    DSCF0059.JPG
    240 KB · Views: 216
Last edited:
OP
OP
Devin

Devin

Bronco Kineticist
Joined
Apr 29, 2004
Messages
3,956
Got the chunk stuffed in the housing. Looks pretty good. Almost don't want to paint it, but I will do that next. ;D
 

Attachments

  • DSCF0049.JPG
    DSCF0049.JPG
    220.9 KB · Views: 296
  • DSCF0050.JPG
    DSCF0050.JPG
    178.8 KB · Views: 189

Dan's73

Bronco Guru
Joined
Oct 17, 2006
Messages
1,116
just throw some clear coat on that bad boy! looks great, nice parts...going to be one heckuva nice EB & with a helper like that (your son) you can't lose!
 
OP
OP
Devin

Devin

Bronco Kineticist
Joined
Apr 29, 2004
Messages
3,956
Well, I continue my slow progress of saving money, working for a bit, saving money....you know the drill.

For the past few months, I have been saving up for body replacement panels. I have been very lucky finding new pieces on ebay. I scored new floorboards, door posts, and a new floor support channel off of ebay. I saved almost $250 on that stuff. Yesterday, I also scored some used upper rocker panels for cheap, too.

After all of that, I went ahead and ordered the remainder of what I need (drivers rear quarter - lower, kick panels, windshield hinge). I finally get to start putting this body back together so that it will look like a Bronco again! Yeehaaw!!! ;D ;D

Pics will be coming in the weeks/months ahead!
 

deltarat

Bronco Guru
Joined
Jul 12, 2006
Messages
3,371
Loc.
Drew,Ms
My son helped me rebuild my speedo cluster
You should be through in 1/2 the time, since you have 2 more arms than the rest of us...lol. Nice picture. You can never start them too young.
 
OP
OP
Devin

Devin

Bronco Kineticist
Joined
Apr 29, 2004
Messages
3,956
When I first started tearing apart my Bronco, I got a bit "over-eager" at ripping out the severely rusted parts. I didn't measure, brace, or anything. So, I have my work cut out for me. Luckily, I have an assembled EB nearby to measure off of. Also, I searched this site and dug up an old picture that Mnkybiz and a few others developed. I have attached that picture for those that need it.

I have the drivers side floor cut out and I prepped and POR'ed the floor support channel. I did a brief test fit of the new floor pan, and it is going to take a little encouragement to get it to fit. It doesn't look like it will be too bad.
 

Attachments

  • DSCF0045.jpg
    DSCF0045.jpg
    97.5 KB · Views: 445
  • DSCF0044.jpg
    DSCF0044.jpg
    100.1 KB · Views: 543
  • measurements.jpg
    measurements.jpg
    81 KB · Views: 900
OP
OP
Devin

Devin

Bronco Kineticist
Joined
Apr 29, 2004
Messages
3,956
Well, I got my floor pans screwed in place. They required some minor trimming and elbow grease to get in place. I couldn't quite get the passenger side to line up perfectly, but it is good enough for me. I am leaving everything screwed together for now until I get the doors hung. I have a feeling that things have sagged quite a bit and I am going to have to get "creative" when I go to install the door posts. %)

I also cleaned up under the cowl. That was a nasty job. That 40 year old insulation was pretty gnarly. Plus, the guys at the factory went nuts with the seam sealer in places. For some reason, my "before" picture of this area didn't come out. But, I have an "intermediate" pic of under the cowl. I still have some work to do under there, but it is light years better than it was.

I knew that this was going to be the longest part of the project. I keep finding more and more stuff that I have to repair. But, it was nice to look and see solid floors again! ;D
 

Attachments

  • DSCF0001.JPG
    DSCF0001.JPG
    207.9 KB · Views: 726
  • DSCF0002.JPG
    DSCF0002.JPG
    204.5 KB · Views: 610
  • DSCF0003.JPG
    DSCF0003.JPG
    223.9 KB · Views: 507

BigFord74

Full Member
Joined
Jun 17, 2006
Messages
273
Loc.
Nixa,Mo
Lookin good so far man, i'm getting ready to start stripping the wife's to see what i have to replace. Pretty sure the floor's are a given on her's.
 
OP
OP
Devin

Devin

Bronco Kineticist
Joined
Apr 29, 2004
Messages
3,956
I got the passenger side kick panel and door post temporarily screwed into place today. Then, I hung the passenger side door panel to see how things line up. It sits pretty straight, but the gap between the rear fender and the door is pretty darn small. I am going to do the other side to get some more support in there, and then see how things look. What do you guys think? Do I need some more space in there? Right now it is only about 1/4".
 

Attachments

  • DSCF0011.JPG
    DSCF0011.JPG
    114.1 KB · Views: 350
  • DSCF0010.JPG
    DSCF0010.JPG
    184 KB · Views: 307
  • DSCF0009.JPG
    DSCF0009.JPG
    151.2 KB · Views: 393
  • DSCF0008.JPG
    DSCF0008.JPG
    182.1 KB · Views: 371

Mark

Contributor
Bronco Klutz
Joined
Aug 29, 2003
Messages
5,414
Loc.
NW Indiana
That's good work Devin!
Satisfying isn't it?

As far as the hinge pillar to door gap, how does it compare to the striker to door gap?

FWIW, My doors are centered with with about 1/8" - 3/16" gap on either side. If your door is centered, I'd feel better about that gap - it looks fine (like mine), hard to see that it's as big as 1/4".
 
Last edited:
OP
OP
Devin

Devin

Bronco Kineticist
Joined
Apr 29, 2004
Messages
3,956
That's good work Devin!
Satisfying isn't it?

As far as the hinge pillar to door gap, how does it compare to the striker to door gap?

FWIW, My doors are centered with with about 1/8" - 3/16" gap on either side. If your door is centered, I'd feel better about that gap - it looks fine (like mine), hard to see that it's as big as 1/4".

Yeah, it was pretty satisfying to see the door hanging again. ;D

The gap between the door post and door is probably on the order of 1/2" or so. I worked on it some more today and got the front clip put up in place temporarily. I am going to try and get the drivers side screwed in place and hang that door. Then, I am going to try to hang the fenders to see how everything looks.

This is definitely the hardest part of this build so far. But, it is kind of fun, I must admit!
 
OP
OP
Devin

Devin

Bronco Kineticist
Joined
Apr 29, 2004
Messages
3,956
Well, yesterday, I said that this was the hardest part of my build so far. Little did I know that the fun was only beginning. Today, I prepped the front clip (one that I had purchased from a member here) and mounted it to the front body mounts. I also temporarily clamped it to the main body.

Then......I tackled the driver side door post. I had high hopes since yesterday went so well with the passenger side.

Well, the Bronco handed me my a$$ today. I don't even remember how many times I took the post off, the kick panel off, re-adjusted, and tried again. Well, at the end of the day, it is close. Close enough that I think I can get it good enough by adjusting the rear striker mechanism (too bad that thing is rusted solid.....I am letting it soak in Kroil tonight before getting after it with an impact driver tomorrow). I also hung the front fender to see how things line up. It is a pretty good match between the front fender and the door. But, the back fender and the door looks a bit uneven. I am hoping to be able to use the rear striker adjustment to pull it up.

Sorry, but no pictures tonight. Hopefully tomorrow I will have better success and can report with pictures!
 
Last edited:
OP
OP
Devin

Devin

Bronco Kineticist
Joined
Apr 29, 2004
Messages
3,956
Got back to work on the Bronco today. Before I started, I was looking at my door hinges, and they are pretty worn. So, I decided that before I continue my job of lining the doors up, I will rebuild the hinges. A rebuild kit is on the way. ;D

So, I started tackling other projects. First, I cleaned all of the wiper motor mechanisms off of my windshield frame and removed the windshield glass. Then, I got the drill out and removed the old, bent up windshield hinge that was on there. I temporarily put the new SS hinge on with some screws. Hopefully, I will weld it in place tomorrow.

My driver's side front fender had a couple of severely rusted spots on the inside. So, I cut those out in preparation for some patch welding to repair. There sure is something satisfying about taking a cutting wheel to nasty, rotted-out metal. Makes me smile every time!!! ;D

I also worked on getting the striker post loosened. Even after Kroil all night, heat, an impact driver, and some choice language %) , I finally just drilled out the old, rusty screws.

Finally, I started working on getting the remnants of the rear quarter panel drilled out. These spot welds are a bit difficult to find, and holding the drill at that angle is kind of a pain (literally).

It is pretty cool to be able to see it starting to resemble a Bronco again. This is getting pretty exciting.

Hopefully more tomorrow....
 

Attachments

  • DSCF0026.JPG
    DSCF0026.JPG
    184.2 KB · Views: 146
  • DSCF0027.JPG
    DSCF0027.JPG
    168.5 KB · Views: 151
  • DSCF0029.JPG
    DSCF0029.JPG
    199.5 KB · Views: 153
  • DSCF0030.jpg
    DSCF0030.jpg
    94.9 KB · Views: 164
  • DSCF0028.JPG
    DSCF0028.JPG
    186.4 KB · Views: 262
  • DSCF0032.JPG
    DSCF0032.JPG
    161.2 KB · Views: 237
  • DSCF0033.JPG
    DSCF0033.JPG
    138 KB · Views: 240
Last edited:
Top