


TheGanzman
Full Member
O.K. - I'll say up front that this mod is only gonna interest ~1 in a hundred of you guys; having said that, if your Bronco is only a "fair weather vehicle" like mine is, and/or you live where the weather is "sunny & mild" 340 days/year like it is here in SoCal, and/or you just don't CARE about having a heater with all its associated hoses, wiring, and a lot more "junque" under your dash, then take a look-see...
I've been into Early Broncos for only ~6 years now; having said that, I've built 23 vehicles from the ground up - mostly muscle cars, and almost all of 'em were "restomods", even before the term restomod existed. When I bought my current '69 Bronco (my 2nd), it was either a factory "no heater" vehicle, or the factory heater was removed; it was also missing the driver side fresh air vent assembly. Since it was so, and as it's starting to warm up 'round here, my first move was to call up WH and get the driver side fresh air vent box shipped to me; easy install, as there was just a blocking plate screwed over the horizontal hole in the firewall. That done, it got me thinking about installing the very same driver side air vent over on the passenger side, but as we all know, that section of "horizontal" sheet metal slopes down at a more severe angle, so it wasn't gonna be a simple R&R. I studied on it for a coupla weeks, then ordered the passenger side (heater) fresh air vent inlet assembly and another driver side fresh air assembly, then fired up the Dremel. I only took three pictures (sorry, I was too busy DOIN' to take a bunch of photos), but let me describe in detail what I did:
1). Summon the aid of Mssr. Jacques Daniels, a fine helper for a job like this one!
2). Take said driver side fresh air vent assembly and cut the entire "upper lip" off of it, leaving just the flat mounting area with its 8 associated mounting screw holes. I also cut off the bottommost rear "drain outlet" completely flush and plugged it with a plastic hole plug; you'll see why in a minute.
3). Now comes the tricky part in it all - you're gonna want to cut a hole in that sloped horizontal section on the passenger side that will allow you to drop your now-modified (and no longer returnable, LOL!) driver side vent into same. I simply took the sheet metal piece that a PO cut to cover the driver side hole; assuming you don't have that, you'll just have to pull a measurement off your air vent box and fire up your cutting tool. Keep in mind two things, as precise placement of said hole is obviously CRITICAL: It can't be too far forward, since the vent box will get VERY close to the break in the floorboard where it goes from vertical to the sloped (45 degree?) portion where your passenger puts his/her/its feet. I lucked out on this one; in retrospect, I should have cut the hole back further towards the glovebox assembly.
4). After you've said your Hail Mary's and cut your hole, test fit your now-modded driver side air box; it should drop right in the hole. Assuming success, take it back out and grab your nice new passenger heater fresh air assembly - you'll be putting the chainsaw to IT now! Assuming that you're working on an already-assembled Bronco, you're gonna have to cut off that plastic section that drops down at a 90 degree angle between the inner and outer fenders; the one that supplies fresh air to the heater via the ~4" round duct in the inner fender well. I cut mine off "horizontal to" the metal riveted-on metal section, so it will appear "stock" after mounting; then I measured a 1" thick block of black closed-cell foam to stuff up into this section - I sprayed some adhesive onto the edges so it would stay up in there. This will force ALL the air that's coming down through the hood grille into your vent box.
5). Lay your now non-returnable passenger side fresh air vent on the sloped section over the hole that you cut, then shut the hood to align the vent with the grille section of the hood. Once you're happy with that, pop your head up under the dash and trace out the open section of the firewall hole that you made onto the metal section of the fresh air vent - the one that's riveted onto the plastic grille; you'll be cutting this out next.
6). Assembly time! Set the now modded passenger fresh air assembly aside, grab the modded driver side fresh air box and drop it back into the hole. Drill 8 holes in the sloped firewall section and mount the box assembly to the firewall - I used #8 machine screws. Rather than using flat fender washers, I opted for 4 thin pieces of aluminum which I drilled for the machine screws - these pieces serve to secure the vent assembly to the firewall:

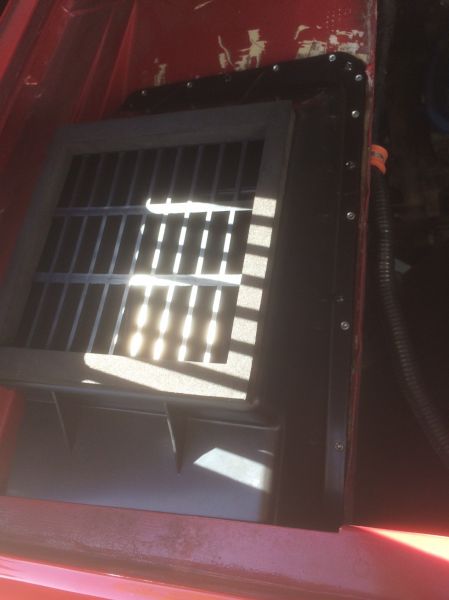
7). Now you're gonna mount your modded passenger side grille assembly right over the top of your vent box; again, I secured it to the sloped firewall section w/#8 machine screws - it lined up perfectly (sorry for the bad picture):
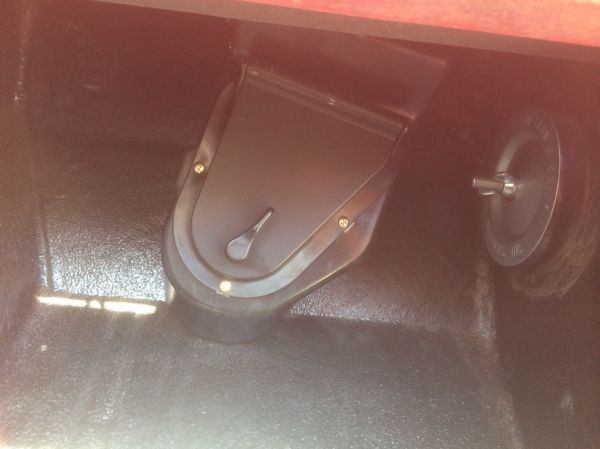
8). You're pretty much done at this point. You'll notice in this photo that the vent box is gonna sit at a slight "angle" due to the sloped firewall section that it's mounted to. This doesn't happen to bother ME; if it bothers YOU, then you'll have to go through the logistics of modding your driver side vent box further so that it mounts completely vertically. You'll also notice that I've inserted a metal and rubber hole plug in the now-vestigial heater vent; I sourced that from McMaster-Carr:
Again - I know this will pertain to a VERY small audience! Further plans on my end are to make that heater vent operational using a '56-'62 Corvette fresh air "door" and an associated Bowden cable - I guess I'm just a Fresh Air Freak! Rubber side down, Gents!;D
I've been into Early Broncos for only ~6 years now; having said that, I've built 23 vehicles from the ground up - mostly muscle cars, and almost all of 'em were "restomods", even before the term restomod existed. When I bought my current '69 Bronco (my 2nd), it was either a factory "no heater" vehicle, or the factory heater was removed; it was also missing the driver side fresh air vent assembly. Since it was so, and as it's starting to warm up 'round here, my first move was to call up WH and get the driver side fresh air vent box shipped to me; easy install, as there was just a blocking plate screwed over the horizontal hole in the firewall. That done, it got me thinking about installing the very same driver side air vent over on the passenger side, but as we all know, that section of "horizontal" sheet metal slopes down at a more severe angle, so it wasn't gonna be a simple R&R. I studied on it for a coupla weeks, then ordered the passenger side (heater) fresh air vent inlet assembly and another driver side fresh air assembly, then fired up the Dremel. I only took three pictures (sorry, I was too busy DOIN' to take a bunch of photos), but let me describe in detail what I did:
1). Summon the aid of Mssr. Jacques Daniels, a fine helper for a job like this one!
2). Take said driver side fresh air vent assembly and cut the entire "upper lip" off of it, leaving just the flat mounting area with its 8 associated mounting screw holes. I also cut off the bottommost rear "drain outlet" completely flush and plugged it with a plastic hole plug; you'll see why in a minute.
3). Now comes the tricky part in it all - you're gonna want to cut a hole in that sloped horizontal section on the passenger side that will allow you to drop your now-modified (and no longer returnable, LOL!) driver side vent into same. I simply took the sheet metal piece that a PO cut to cover the driver side hole; assuming you don't have that, you'll just have to pull a measurement off your air vent box and fire up your cutting tool. Keep in mind two things, as precise placement of said hole is obviously CRITICAL: It can't be too far forward, since the vent box will get VERY close to the break in the floorboard where it goes from vertical to the sloped (45 degree?) portion where your passenger puts his/her/its feet. I lucked out on this one; in retrospect, I should have cut the hole back further towards the glovebox assembly.
4). After you've said your Hail Mary's and cut your hole, test fit your now-modded driver side air box; it should drop right in the hole. Assuming success, take it back out and grab your nice new passenger heater fresh air assembly - you'll be putting the chainsaw to IT now! Assuming that you're working on an already-assembled Bronco, you're gonna have to cut off that plastic section that drops down at a 90 degree angle between the inner and outer fenders; the one that supplies fresh air to the heater via the ~4" round duct in the inner fender well. I cut mine off "horizontal to" the metal riveted-on metal section, so it will appear "stock" after mounting; then I measured a 1" thick block of black closed-cell foam to stuff up into this section - I sprayed some adhesive onto the edges so it would stay up in there. This will force ALL the air that's coming down through the hood grille into your vent box.
5). Lay your now non-returnable passenger side fresh air vent on the sloped section over the hole that you cut, then shut the hood to align the vent with the grille section of the hood. Once you're happy with that, pop your head up under the dash and trace out the open section of the firewall hole that you made onto the metal section of the fresh air vent - the one that's riveted onto the plastic grille; you'll be cutting this out next.
6). Assembly time! Set the now modded passenger fresh air assembly aside, grab the modded driver side fresh air box and drop it back into the hole. Drill 8 holes in the sloped firewall section and mount the box assembly to the firewall - I used #8 machine screws. Rather than using flat fender washers, I opted for 4 thin pieces of aluminum which I drilled for the machine screws - these pieces serve to secure the vent assembly to the firewall:
7). Now you're gonna mount your modded passenger side grille assembly right over the top of your vent box; again, I secured it to the sloped firewall section w/#8 machine screws - it lined up perfectly (sorry for the bad picture):
8). You're pretty much done at this point. You'll notice in this photo that the vent box is gonna sit at a slight "angle" due to the sloped firewall section that it's mounted to. This doesn't happen to bother ME; if it bothers YOU, then you'll have to go through the logistics of modding your driver side vent box further so that it mounts completely vertically. You'll also notice that I've inserted a metal and rubber hole plug in the now-vestigial heater vent; I sourced that from McMaster-Carr:
Again - I know this will pertain to a VERY small audience! Further plans on my end are to make that heater vent operational using a '56-'62 Corvette fresh air "door" and an associated Bowden cable - I guess I'm just a Fresh Air Freak! Rubber side down, Gents!;D