|
This article is about how to convert your stock mechanical linkage clutch to
a much
improved hydraulic set-up using readily available aftermarket parts. It is a
very simple
conversion all you will need is a slave cylinder, master cylinder, rod end,
a coupler nut or
female threaded rod, a brake line, and a weekend.
The reason behind this conversion for me was the installation of fenderwell
headers that
hit the stock clutch linkage, but it is a great advantage over the stock
clutch no matter the
reason you need/choose to do it.
These parts I used for this conversion came from Wilwood Engineering:
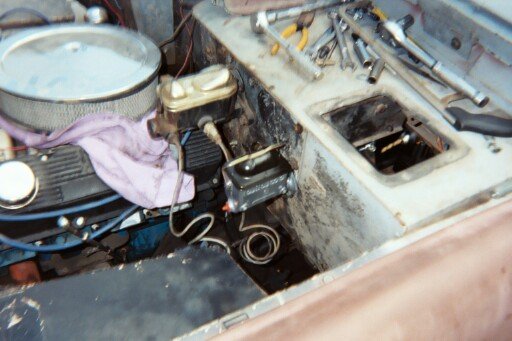
Master Cylinder- Here you have a few options, Wilwood offers several master
cylinders, the most common one for a clutch setup is the small aluminum
master cylinder with either a 3/4" or 5/8" bore. Either bore size will be adequate, I have
used the 3/4"
bore before in another project and it works great. The part numbers are;
260-1304 for the
3/4" and 260-2636 for the 5/8".
Or you can choose the large aluminum master cylinder. I personally prefer
this one just
for the looks. It comes in 3 different bore sizes, but 3/4" is the smallest
and I recommend
this as the biggest bore size you buy. I first attempted to use a 1" bore
and the pedal was
so stiff that I could hardly press in the clutch.
The part number is 260-6764 for the 3/4" aluminum master cylinder.
Slave Cylinder- P/N 260-1333 This is a very nice unit, it works by pulling
your clutch
fork.
Other parts you will need:
Male 5/16-24 Rod End- I ordered mine from Summit Racing, but you can find
them at
many other bolts and fasteners store.
Coupler Nut or Female threaded rod- I used a coupler nut (a hex nut about
2-3inches
long), but I could only find them in coarse thread so I had to tap it for
the 24tpi fine
thread. Both the rod end and the master cylinder plunger rod are 5/16-24
thread. I bought
mine from a local bolt store.
A 3/16" brake line about 3 1/2 feet long- I went to my local parts store. How
else are you
supposed to connect the slave and master cylinders?
A brake fitting- Again from the local parts store. This is needed because
the Wilwood
Master Cylinder does not come with any fitting to put the brake line into.
Brake Fluid- From a local parts store. Duh! How else is your new clutch
gonna work?
5/16" threaded rod- From local parts store. For the slave cylinder bracket.
To get started you need to remove the old linkage:
Remove the 2 bolts on the frame rail that hold the clutch arm mechanism.
Also remove
the clutch rod.
Next remove the bolts for the pivot arm bracket that bolts to the
bellhousing/engine
block.
This will leave your clutch fork hanging by the throw-out bearing, which is
fine just leave
it there for now.
Now you are going to need to mock up the new master cylinder. As in the Zf
5spd tranny
swap the new master cylinder is going to go in the speedometer cable hole,
it will need to
be enlarged a little, I used a die grinder and a metal cutting bit.
Once the master cylinder fits flush against the firewall, attach the coupler
nut and rod end
to the master cylinder plunger rod. Have a friend hold the master cylinder
in place while
you go under your dash.
Tech Tip: It is easiest to remove the fresh air vent box so you have access
to the pedal assembly.
With the plunger, coupler nut, and rod end as one piece; line it up so that
it is as straight
a shot as it can be when held against the clutch pedal. For myself it lined
up just above
where the clutch pedal bent upwards, see pictures.
Place a mark on the pedal where you will drill the hole to bolt the rod end
to.
Next you have a choice, you can either crawl under your dash and remove the
clutch rod
from the pedal, and drill the clutch pedal under your dash.
OR you can remove the whole pedal assembly ( I recommend this because it
will be
easier to drill the clutch pedal while its out). But of course the steering
column must
come out for this to happen. I am not sure if the pedal assembly will
maneuver around
the steering column, so I just removed mine.
To remove the steering column you will need to remove your steering wheel,
use a
steering wheel puller do to this(if you have the stock wheel). Remove the
column cover
and the mount located on the firewall. If you have the stock column shift
linkage, manual
or auto, it will need to be removed too. As well as any of the wiring
connected to the
column.
Next remove the steering box ujoint if you have the one piece shaft or the
upper steering
ujoint for those who have the two piece shafts. Now you can unbolt the
column from
under the dash, remove the two bolts that hold the column in place. These
will probably
be rusty and or hard to get out.
With this all done the column should just pull out from the dash, or with
some slight
maneuvering at least.
Now to remove the pedal assembly you will have to remove your brake master
cylinder
(and power booster for those who have power brakes) as well as unhook your
plunger rod
from the brake pedal. Leave all your lines connected and place the master
cylinder out of
the way (this saves time by not having to bleed it again.)
Then all you need to do is unbolt the 6 bolts that hold the pedal assembly
on the firewall
and the 2 under the dash. The whole assembly will basically fall down to the
floor board,
some persuasion may be necessary.
Remove the clutch rod from the pedal, they are held in by a cotter pin. Now
it is time to
drill a hole in the clutch pedal. I used a 5/16" drill bit, drill through the
pedal where you
made your mark from earlier. And that's it for the pedal assembly. I bet you
are glad that
you went through all that extra work to remove the assembly, instead of
acting as a
contortionist and bending your body in all odd shapes to unhook that clutch
rod and drill
that hole.
OK it is now time to start the actual installation:
Remount the pedal assembly and brake master cylinder. Place the new clutch
master
cylinder in place and mark where you will need to drill the holes to mount
it, I used a
sharpie marker. Drill the holes with a 5/16" drill bit. You will also have to
grind part of
the pedal assembly bracket to fit the upper bolt through to the master
cylinder. For the
upper hole the bolt will need to come from the inside out. Use some short
5/16" bolts with
flat washers to mount the master cylinder.


With the master cylinder mounted you can now adjust where the clutch pedal
will sit. I
placed my clutch pedal even with the brake pedal and adjusted the coupler
nut and rod
end to accommodate it. Use a long 5/16" bolt to bolt the rod end to the
pedal. Place the
bolt through the hole you drilled in the pedal and tighten a nut down on it,
the rod end
will fit on the rest of the boltshaft. You can adjust the length of the
plunger now by
threading in or out the coupler nut and the rod end, then use the lock nuts
to lock it all
together.
After you get the coupler nut and rod end properly adjusted, place the rod
end through the
bolt from your pedal. Then use a nut to secure it in place.
Now your master cylinder is all mounted!
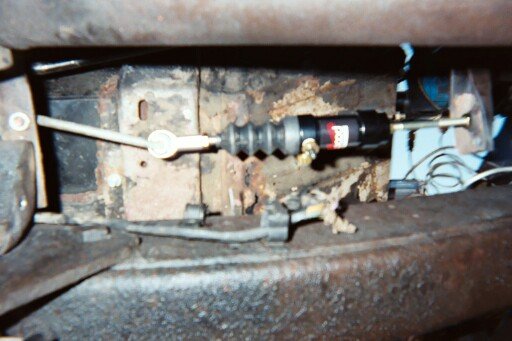
The next step is to mount the slave cylinder:
You will need to drill a 5/16" hole in your clutch fork, where the rounded
dimple part of
the fork is located. I had a hell of a time drilling my fork, I eventually
gave up and pulled
it out completely, then used a torch to blow a hole through it. It is a pain
in the butt to put
the fork back in, but that might be the only way you can do it.
With the hole in the fork (and the fork back in place) place the threaded
rod of the slave
cylinder through and use the supplied spacer and nuts to support it (don't
bother
tightening it now because you will need to make adjustments later).
The rod end of the slave cylinder should be somewhat close to the transfer
case
crossmember. You will need to fabricate a bracket to mount the rear of the
slave cylinder
to the transfer-case crossmember lip. I used a 5/16" threaded rod about 6
inches long, but
you can make your own bracket if you wish.
Line up the slave cylinder with the clutch fork, it will approximately be
about where the
crossmember mounts to the frame, I went a little farther over to the
passenger-side and
drilled my mounting hole because I didn't want to drill through the double
plate area of
the crossmember, see pictures.
Tech Tip: I have re-drilled my mounting hole through the double plated
crossmember on
account of some minor binding with the bracket at an angle.
I bent the 5/16" threaded rod in a 90degree angle at one end, leaving enough
room to
thread two nuts and the crossmember. Then I bent another 90 degree angle on
the other
side of the rod but in the opposite direction with enough room to thread two
nuts and the
rod end of the slave cylinder.
Next I mounted the 5/16" threaded rod to the crossmember by using two nuts
with the
crossmember between them to lock it together. Then I mounted the slave
cylinder to the
threaded rod by placing the slave cylinder rod end between two nuts and
locking them
together. You have lots of adjustment from both the front and rear of the
slave cylinder.
Tech Tip: I had to use a coupler nut to lengthen the bracket for the slave
cylinder. I cut
my threaded rod bracket in half and placed the coupler nut between them to
get more
adjustment for the clutch. Depending on the length of the bracket you make
you may or
may not have to do this.
You may think that the threaded rod is not strong enough to hold the slave
cylinder, but I
have been using the same type of mounting for the hydraulic clutch in my
1956 F100, for
several years now. I have had no problems with it.
OK we are almost done now!
Now you can run your brake line from the master cylinder down to the slave
cylinder,
remember to use the brake fitting for the master cylinder. It is a good idea
to use a
slightly longer brake line than you need so that when your body flexes it
doesn't stretch
out the brake line, just like the factory spiraled brake lines. You can run
your new line
anyway you wish, I chose to keep mine close to my firewall because of the
fenderwell
headers, leaving some attempted spirals for the slack.
Time for that brake fluid!
Fill your master cylinder and have a friend help you bleed the slave and
master cylinders.
Make any and all adjustments to get your new clutch to work properly, there
is a lot of
adjustments you can make so be patient. The front of the slave cylinder is
adjustable as
with the rear of the slave cylinder, and if you use a coupler nut like I had
to then you have
even more adjustment.
Now you can enjoy your new hydraulic clutch!
Price List:
|
Small Aluminum Master Cylinder |
| 260-1304 3/4" bore* | $45.95 |
| 260-2636 5/8" bore* | $45.95 |
|
Large Aluminum Master Cylinder |
| 260-1101 3/4" bore* | $49.99 |
|
Slave Cylinder |
| 260-1333 | $55.99 |
|
Summit Male Rod End 5/16-24 |
| SUM-MSM5 | $3.50 |
*You will need to choose one of the 3 master cylinders.
The above prices are from Summit Racing.
The remaining parts can be acquired from local parts stores.
Brakeline 3/16" SAE
Brake fitting
Brake fluid
5/16" coupler nuts; possibly 2 total
5/16" bolts; 2 short and 1 long
5/16" nuts; 8 total
5/16" flat washers; 2 total
5/16" threaded rod
by
Cory Walden
|