|
This Tech Article is written for those of us that just canÆt part with our stock seats. If you arenÆt into the stock look or donÆt enjoy the supreme comfort afforded by these marvelous seats J then read no further! I will document the re-upholstery of the driverÆs side front seat and the rear bench seat.
To begin with you need to remove the seats from the broncoģ.OK IÆll get serious now! I purchased my covers from Upholsterman on Ebay. The front seats come as a set, and the rear another set. I won the auctions on the same day, so I saved on shipping. The front seats foam I purchased from www.mustangmarket.com in PA, and received the foam in one day (a benefit of living in VA)! The foam for the rear seat I purchased from a local upholstery shop, and it is two-inches thick, 60 weight, marine grade foam that comes with a lifetime guarantee! For cleaning & refinishing of all the white plastic parts (seat back panels & rear arm rests) I used the SEM products sold by Eastwood Co. (Figure A).
NOTE: I did not purchase the Hog Ring pliers and am still regretting it. If you value your finger tips, go and get the proper tool! I used a pair of adjustable pliers and needle nosed pliers and they worked fine, once my fingers go out of the way!
Front Seats:
- Begin
the process by separating the top from the bottom of the seat.
- Remove
the hinge covers (plastic elbows covering the seat hinge) by taking out
the three Phillips head screws (two on outer edge, on inner). ĀSet these parts aside for cleaning
& reuse.
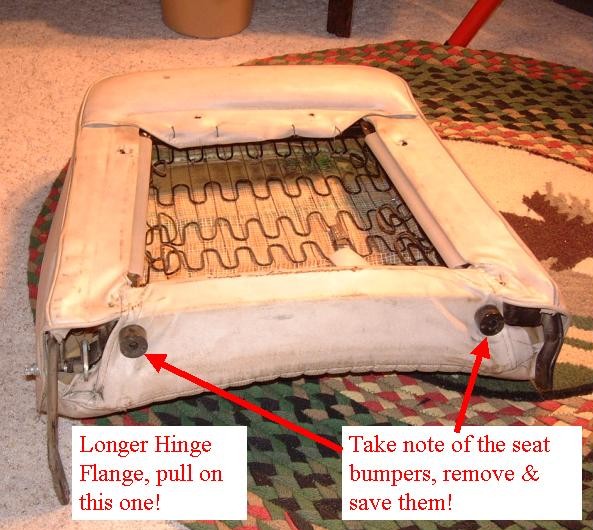
- The
seat halves are hinged together with two perforated flanges (extending
from the bottom of the seat back) that ride on two rods that extend
outward from the bottom of the seat.Ā
The flange that faces the door is slightly longer and can be
pulled on to slide over the rod on that side of the seat bottom (Figure
1).
You will need to use a lot of
elbow grease, so pull hard you can't hurt it!
- Set
aside the seat bottom for now.Ā
Take note of exactly how the seat back is assembled. Remove the seat back cover (plastic
cover with clips) and set aside for cleaning, SEM painting &
reuse. The seat back is relatively
easy compared to the seat bottom as it uses integral channels to hold the
cover to the frame. Take note as
to how you skin the old cover off, as you will reverse this process to
install the new cover (Figure 2).
- First
remove the channel that is closest to the bottom of the seat back
- Undo
the Hog Rings that hold the top flap on
- Unhook
the side channels.
- Skin
back the seat cover from the seat
Once the seat is "skinned" save the piece of rear
foam bolstering that is on the top portion of the back of the seat back.Ā Without this, your reassembly will never get
that "full" look of a stock seat cover.
- Take
your wire cutters & cut out all the hog rings that are holding the old
cover onto the seat, as well as the hog rings holding the foam to the seat
frame. Take the old seat cover
& remove the wire "U" from the cover.Ā
This wire resides in a channel sewn into the seat cover, and must
be saved for the new cover install. There should also be a corresponding
"U" shaped wire, between the foam and the frame, that was used to hold the
seat foam to the seat frame (Figure 3).
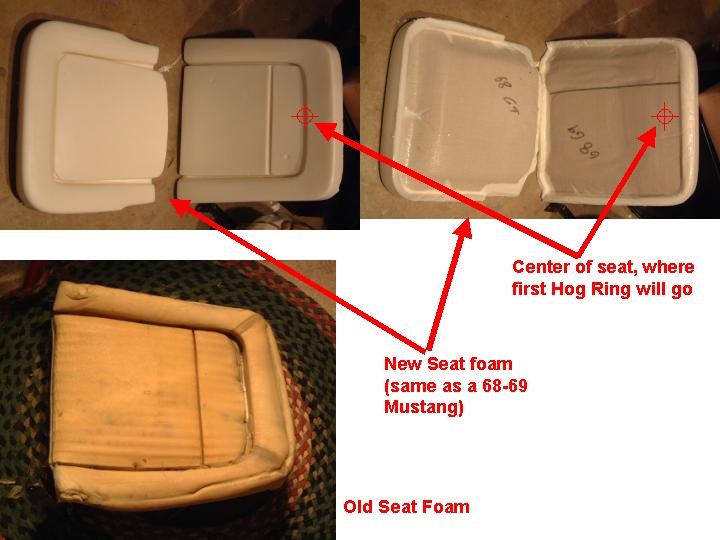
- With
the old seat foam and cover off of the seat, examine the frame. If your frame springs have rusted off,
or if there is any rust at all, now is the time to treat it. Examine your new foam. The foam should look exactly like the
old foam, just fuller & cleaner!!!!Ā
Test fit the new seat back foam several times, to get a "feel" for
how/where it should rest. Then
mark the back of the seat foam at dead center (right/left) where the foam
is grooved. This is where you will
place your first hog ring (Figure 4)!
- Take
your new seat cover, and feed the old "U" wire through the sewn pocket for
the wire. This will take a bit of
time, or you will poke the wire right through the material. It can be done, so patience is the key! Now mark the back of the seat cover, at
dead center, just above the pocket with the wire in it. This is the point you will marry to the
seat foam, and place your first hog ring!Ā
- Start
the process by pressing a hog ring through the back of the seat foam where
your center mark is, and push the wire "U" at the marked portion of the cover
into the foam's grove. Clamp down
on the hog ring until it closes and examine your work. If the seat cover doesn't look centered
on the foam NOW IS THE TIME TO FIX THAT!Ā Continue hog ringing the seat cover to the foam, following a
pattern of side to side (making sure you place one at approximately the
same distance from center on both sides).Ā
I believe that I ended up with some 7 rings used at this stage
(Figure 5).
- With
the seat cover connected to the foam you now need to hog ring the second
"U" to the seat foam.ĀĀ I simply
hog ringed to the hog rings used to connect the seat cover. Trust me, this foam is going no
where!!(Figure 6)
- Now
place the foam on the seat frame and flip it over so you are looking
through the seat frame at the back of the seat foam. Begin hog ringing the seat frame to the
foam, going through the second "U" wire installed in step 7 (Figure 7).
- With
the cover connected to the foam, and the foam connected to the frame, you
are now ready to begin pulling the cover over the back of the frame! I did my work in the evenings, so I
utilized twin standing halogen lamps (300Watts) to heat up the vinyl.ĀĀ The vinyl will be more supple if you
get it warm. I held the cover up
to the lamps until the vinyl was Hot to the touch. Don't forget to reuse the seat foam
back piece you saved from Step 2!!!.Ā
Begin on one side, and begin working the cover over the foam &
frame. Take your time, and you can
do it without ripping any seams
- Once
the seat cover is over the back, begin reassembling the seat in reverse
order from what you did in Step 2.Ā
The final product should look like this (Figure 8). You will need to cut holes for the
lever that controls the "flip-forward-ability" of the seat, but that
should be self explanatory!
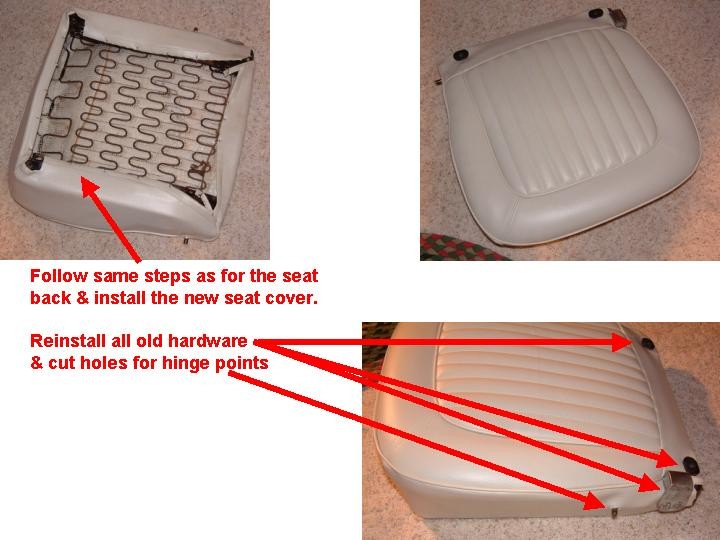
- Set
aside the now complete seat back (Figure 9), and begin on the seat
bottom. The steps for the bottom
are exactly the same as the top!
Ā
Here are the steps in photos! (Figures 10-12)
- With
the top & bottom reupholstered, reassemble the seat, again using the
longer flange as the point to pull & slip over the seat bottom's pivot
rod. Reinstall all the removed
hardware & plastic components (Figure 13).
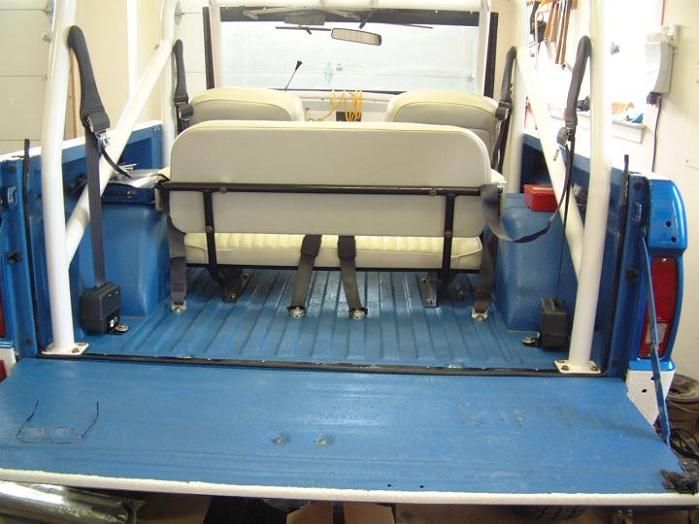
Rear Seat:
- The
bench seat is much much easier to reupholster!Ā Unbolt the seat back & bottom from the frame. I chose to clean & paint my frame
at this time (Figure 14).
- Examine
how your old seats were assembled.Ā
Yup not a lot here! 7 hogs
rings closing the top & a lot of staples on the bottom (Figure 15).
- Remove
the old seat covers from the plywood & foam.Ā The foam is glued to the plywood, so rip is off, then clean
the plywood with a wire brush to remove most if not all the old
glue/foam. Cut & glue new foam
onto the plywood. I chose to cut my
foam Į inch wider on all dimensions for the top & bottom. This allowed for a little "wrap" of the
foam over the wood.
- I
again used my stand lamps to warm the vinyl & then stretched it over
the foam/wood. I used less staples
than Ford, and more Hog rings, but that was personal choice (Figure 16)
- Finally
I cleaned & painted the old arm rests.Ā I used the SEM products shown in Figure A, purchased from www.eastwoodco.com
 . These products are fantastic, and easy
to use; . These products are fantastic, and easy
to use;
Vinyl Coat Paint
 ,
Vinyl Paint Sand Free Primer
,
Vinylcoat Plastic Prep ,
Vinyl Paint Sand Free Primer
,
Vinylcoat Plastic Prep
Here is a side by side
comparison of before/after photos (Figure 17)!
Ā The paint is flexible and designed for applications like
this, it gets a 100% satisfaction recommendation from me!
- Here is the finished product:
Tech article by Bill Criss (MnkyBiz)
|