|
|
Bronco Rotisserie
How to build a rotisserie for an early Bronco tub
Tech article by Malcolm Beattie (malcolmzilla)
|
This rotisserie will fit a early Bronco body (66-77, no frame), with the front clip (inner fenders, etc.) removed. It will allow for easier access to the underside of the tub for blasting, patching and painting. With the addition of casters, it also makes the tub very mobile. I highly recommend completely stripping the tub – top, interior, doors windshield, tailgate, dash, wiring, etc.) Makes it easier to lift, and if you don't, the center of gravity may be off and the rotisserie will not rotate smoothly. Mine is "one finger" easy, and fit perfect the 1st try! It's not that elegant, but it works.
The Bronco front clip is welded on from the factory, but in most cases will be 90% rusted off at the join between the kick panel and the inner fender anyhow, so break out the sawzall on them. The inner fender well also mounts to the upper floor pans, these spot welds can be drilled out. That said, if your front clip and inner fenders / tub are OK, you may want to leave it attached, but you will need to modify the rotisserie length and front arm to fit (not hard, but you're on you're own for those measurements). Additionally, I don't know if the front clip is rigid enough to support the tub weight without bending or being unstable, especially for a side load (i.e.: rotisserie rotated 90o).
|

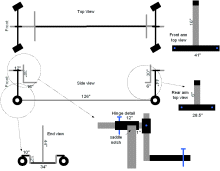
Rotisserie Plans

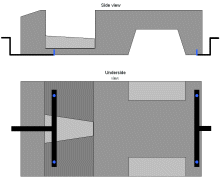
Connections to Bronco tub
|
|
Please be aware that a Bronco tub off the frame, especially those with rust, may bend or fold up in door area when lifted unless the door openings are reinforced across the top. Mine was quite solid, but I still bolted in some angle iron from the top of the kick panel to the lip on the inside top of the rear quarters just behind the door opening. No point risking folding it up. Mine had these holes already drilled, not sure if they're factory or not.
Check the height of your garage ceiling, mine is about 8' and I can rotate mine inside the garage with some clearance, if it's lower than about 7'6', you may not get it to 90o / 270 o inside.
Well, let's get to it!
Required Tools and Skills:
- Basic welding and torch skills and welder (arc or MIG, even TIG I suppose), capable of welding 0.188" wall mild steel
- Band or chop saw
- Cutting torch (Oxygen/Acetylene or Plasma)
- Grinder with metal pads / discs
- Drill press (optional, but very handy)
- Various steel working tools (clamps, large and small squares, center punch, chalk, files, metal marker, BFH , etc)
- Cold beer
- A helper (see beer above)
I have only ever welded like 2 booger beads before so I recruited my brother, a welder by trade, so I have to give him a lot of credit for assembly, but the design was a shared brainchild. But if you can get a decent "fish scale" weld, are able to square everything up when you do your tack welds, and run a torch OK, you should be able to complete this.
Estimated time to completion:
Varies, took me and my brother (welder) a full day or so. We stopped for beer quite regularly.
Materials:
- 36' of 3" OD, 0.188" wall square tubing (3 x 12')
- 16' of 2" OD, 0.188" wall square tubing (2 x 8')
- 2' of approx. 3" pipe, with an ID to fit 2" pipe below (in Canada Schedule 80 2" pipe is slightly more than 2 3/8' OD)
- 3' of 2" pipe, with an OD to snugly fit inside the 3" pipe above, check in advance.
- 8" of 2" ID "trailer hitch receiver" tubing (has no seam inside)
- 4 swivel mount casters rated for at least 250 lbs each, pneumatics with a ground to mounting flange height of >11" with wheel lock recommended, way better for "4 wheelin" the rotisserie on loose surfaces or over extension cords, air lines, onto a car hauler, etc. Note if you use smaller casters you will need to modify the leg design accordingly.
- 12' to 16' of about 1.5" square tubing for use as an alignment tool for the swivels, must be straight, can be salvaged after (will not be cut)
- Various hardware and fasteners (depends on application, these can be sourced after the rotisserie is assembled)
Assembly:
- Inventory your materials and equipment.
- Fire up the saw, cut list:
3" OD 0.188" wall square tubing:
- 1 x 126"
- 2 x 34"
- 4 x 12"
- 4 x 10"
- 2 x 44"
- At this point, you may want to drill the D pieces if you are bolting on the casters, the larger ones. Note that 3" tubing may not be large enough to bolt on the casters, you may need to weld angle iron or plate to make the mounting surface large enough to accommodate bolts. I chose the weld them on. At any rate, do not mount them yet.
- On a flat surface, lay out the following according to the diagram: 1 x B, 2 x C and 2 x D. Note that the B and D pieces are to be butt welded to C, flush with the ends of C. Mark, tack weld, square, and finish weld. Repeat for other end. You should have 2 funky legs now. Do not mount the casters yet.
- Most likely on the floor, lay out A with the funky legs on each end, center A on B, and orient correctly according to diagram. Note that A will be butt welded the end pieces. Mark, tack weld, square, and finish weld. You now have the main frame assembled.
- Center an E piece on A, upright. Mark, tack weld, square, and finish weld. Repeat for other end. You should now have the rotisserie taking shape, frame, leg ends, and uprights.
- Saw action. Cut list:
3" pipe (see materials list, this is the outside pipe):
- 2 x 12"
- Mark and drill 1/2" holes through the sides of both F pieces, on center. This will be used to secure the swivel by bolting through. You could also weld a nut onto these holes and use a pinch bolt inn the inner pipe (infinitely adjustable degree), but since mine is going to be on a car hauler, I elected to use a bolt through the inner and outer to guarantee a secure position at 0o. 90o, 180o, and 270o are also secured, good enough for me for now. Your call. Actually, you could do the nut and pinch bolt on one end, and the bolt through on the other, best of both worlds - that's my ticket!
- Mark the top end of an upright E using the pipe F for a saddle notch, on both sides, note the orientation of the pipe and thus the notch. Fire up the torch and cut carefully, the alignment between both ends here is key can be adjusted when tacking, to some degree, but a bad cut can booger it. Repeat on other upright. Clean notches up with grinder.
- Using the alignment tubing, place the pipe F in the saddle notches, such that 1" of F overhangs to the inside, the remainder to the outside (about 8"). Clamp the alignment tubing onto the pipe ends, double check measurements and alignment, tack weld, re-check and adjust alignment, then finish weld.
- Mount the casters (weld or bolt, see previous notes).
- Admire your handiwork so far, play with rotisserie frame, make zooming sounds and push it across floor, jump on it for a ride.
- Back to the saw for the swivels. Cut list:
2" pipe (see materials list, this is the inside pipe):
- 2 x 18"
2" ID "trailer hitch receiver" tubing
- 2 x 4"
- Mark and drill 1/2" holes through the sides of both H pieces, on center.
- Center the pipe G on the side of the tubing H. Tack, square, and finish weld. This piece will provide the swivel action and locate the arms for height.
- Insert inner swivel piece into rotisserie and swivel. Swivel, swivel, swivel. Yay!
- Onto the arms, more sawing. Cut list:
16' of 2" OD, 0.188" wall square tubing:
- 2 x 30"
- 1 x 41"
- 1 x 28.5"
- 1 x 16"
- 1 x 6"
- Drill J so that you have ½" holes through, 38.5" on centers, centered on the tubing. This will allow the front arm to bolt the floor pan body mounts holes. See diagrams.
- Drill K so that you have ½" holes through, 26.5" on centers, centered on the tubing. This will allow the rear arm to bolt the rear floor body mounts holes.
- Now, how adjustable do you want the arms to be for height? Depending on your tub, and what's in or on it, the center of gravity will vary, in addition to the front and rear body mounts not exactly being level to one another. As well, I was guessing where the CG was on mine, and wanted to use the rotisserie in the future on other projects. So I drilled the "I" pieces with ½" holes on 1.5" centers the whole length of them. Thank god for the drill press! If it's only gonna be for an EB, and the tub is bare, drill these holes only in the middle 10" portion. You decide. I would not recommend substituting a pinch bolt here, you want to bolt right through, don't want that tub falling.
- Assemble the front arm, butt weld L to J and I, see diagram. Tack, square, and finish weld.
- Assemble the rear arm, butt weld M to K and I, as above.
- Insert the arms in the swivels and test for fit.
- Get very excited, call over about 4 buddies to lift tub.
- Brace tub across door openings!
- Secure arms to the under side of the tub, front and rear, using bolts and washers, perhaps old body mounts between tub and arm, if you have 'em.
- Insert swivels in rotisserie, lift tub with arms attached into swivels, bolt in place when tub is mostly level, and/or lines up well with rotisserie center line.
- Center the tub between the uprights (using said buddies), then give the uprights a whack with the hammer to release any friction and deflection in the uprights. Check center again.
- Drill the inner swivel pipe for the bolts to secure @ various degrees, or secure pinch bolt.
- Swivel your EB! Roll the entire tub around the block! Whee!
- I later elected to build a spreader that goes across the top of the tub from arm to arm. The rotisserie has some degree of deflection in the arms due to the fit of the 2" tubing in the receiver tubing, and the pipe in pipe swivel clearances. I was worried about stressing the tub while on the car hauler (bouncing up and down). The spreader reduces this stress by adding some preload in the opposite direction. Not a problem if the rotisserie isn't traveling. Email me for details.
Tech article by Malcolm Beattie (malcolmzilla) |
This Early Bronco site created and maintained by
Jon
Hanna -
Copyright ©
1996- All rights reserved. Privacy Statement
ClassicBroncos.com is not affiliated or associated with Ford Motor Company. Ford Bronco and Ford Bronco logos are property, copyright, trademarks and/or service marks of Ford Motor Company.
|


