


Tech article by Garry Brown (77TexasBronc)
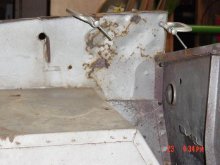
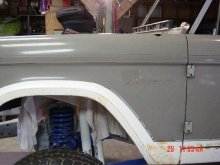
Has anyone ever seen this? RUST! The only thing holding my front clip on was the fender bolts and the body supports.
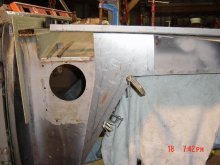
First off start by spraying some penetrating oil on the bolts holding the front grill and fenders on, preferably a couple of days before you start the project. These bolts can be very stubborn with 30+ years of service and most likely several of the clips will break when trying to remove them. Plan on replacing all bolts and clips with new. You will need to remove the battery and the battery tray to get to the bolts holding the front passenger side fender on, also remove the windshield washer fluid bottle on the driver side to gain access to those fender bolts.
Once your grill and fenders are off its time to put on VERY IMPORTANT reference lines. I did this with a 2' square and a can of cheap primer gray paint "neat tip here", spray a light colored paint on the general area where you will be laying out your reference marks and let it dry. Place the short end of the square against the doorpost flange and square with the bottom of the inner fender wheel well and mark along all edges of the square. You can also get several more reference points with your tape measure for added insurance (from the cowl flange on the firewall to the front core support). Now layout what rusty areas needed to be removed being sure to save the 3/4" flange on the firewall "this will be your bolting flange". I used this flange to make my cut line. I drilled 3 small holes from the inside so that I could use a straight edge on the outside by lining up on the holes insuring that my cut will match perfectly with the firewall flange. Add 3/4" from the cut line on the firewall side and 2" to the cut line on the inner fender side "or more or less depending on how much overlay you want when plug welding and bolting back together.
Now you have your cut line and the reference marks for the new piece where it will overlap. I made a pattern of this from poster board and cut it out and tested the fit "looking good". Once you have your pattern for both sides, drill out the spot welds so that the two pieces can be separated. Both inner fenders have brackets that are spot welded to the firewall that will need to have the spot welds drilled out.
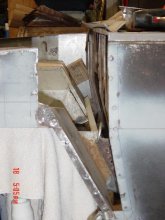
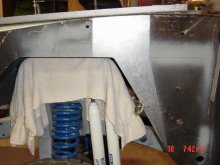
The passenger side inner fender was longer than the driver side and I decided to cut the inner fender so it would match the driver side and also have the same tire clearance on both sides. To do this I removed the two body mount bolts at the front radiator core support and lifted the front clip off the frame. The inner fender bracket that connected the inner fender to the firewall will be in the way of the cut and will need to be drilled off “ you may be able to reuse this bracket, mine was trash" Get the measurement from the driver side inner fender and marked the passenger inner fender and cut to match.
The front clip is cleaned up now and a little attention is needed on the firewall flange where the spot welds were drilled out when removing the rusty sheet metal. Clamp the firewall flange and the kicker panel tight and plug weld these spot weld holes however remember not to weld the three screw holes in the passenger side firewall flange because they hold the air box on and will be used later. Use a body dolly and hammer to straighten out the firewall flange so that you will have a nice smooth bolting surface.
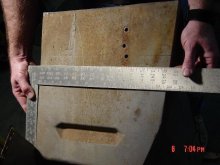
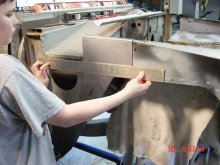
I measured my patterns that I had previously made and decided that a 24 X 30 piece of sheet metal would get both the piece so its off to the local sheet metal shop. I used 16-gauge sheet metal for added strength for the bolt up and also had them use their metal break to bend both of the 24" ends with a 1" lip. The final pieces I cut out at home with a fine metal blade in a jigsaw. I clamped the metal down on a worktable and also clamped a straight edge to the sheet metal to help make a straight cut. “Plasma would have been nice however “where there's a will there's a way”. Here is my son doing the QC inspecting and insuring the square marks still all line up. Looking good.
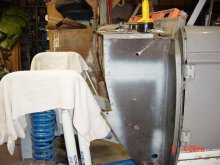
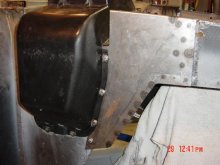
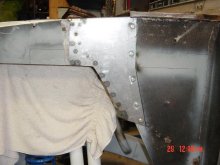
The QC inspection passed so its time to tack the new pieces to the clip. There's 1 butt weld on each piece and that's were the 1" lip of the new piece meets up with the top lip on the inner fender. The outside fender will need to set flat on this top lip to fit properly so I used a small piece of angle iron to help make a good straight fit. I tacked each piece in about 4 places and pulled the whole front clip back off to complete the weld up. I plug welded from the inside since the inner fender metal was thinner, " plus it helped hide the ugly welds from the QC inspector"
I decided to cut about 1' ½ off the existing kicker panel and shorten the length of my new piece to allow for more tire clearance. I then completed the welding and now its time to layout the boltholes. I drilled out the 3 screws holes where the air box mounted to the firewall flange for 1/4" bolt holes and used these holes as a bolt pattern for the drivers side firewall flange. I then put the inner clip back on and used a couple of clamps to hold in place once it was realign with the square marks and measurements. From the inside mark through the holes you drilled in the firewall flanges and firewall brackets then pull the inner clip back off enough to drill these holes out.
Both inner fender firewall brackets will need a couple of bolts as well.

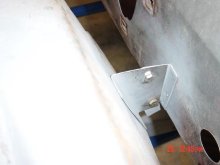
I did one last dry fit and insured all was well and everything bolted up so now its time to do some rust preventative. I am going to try the Rust Bullet however any preventative is much better than none.
Tools needed:
light mig welder, Jigsaw and/or Sawzall, 4 ½ grinder, Body dolly and/or Ball peen hammer, C-clamps and/or Vice grips, Spot-weld remover and/or drill
Materials needed:
Approximately one piece of 24” X 30” 16 gauge sheet metal from local sheet metal shop, price $5.00
New Grill and fender bolts and clips from Jeff's Bronco Graveyard, price $20.00
Stainless steel ¼” bolts, washers and nylon lock nuts to bolt the clip to the firewall flange. $5.00
Has anyone ever seen this? RUST! The only thing holding my front clip on was the fender bolts and the body supports.

First off start by spraying some penetrating oil on the bolts holding the front grill and fenders on, preferably a couple of days before you start the project. These bolts can be very stubborn with 30+ years of service and most likely several of the clips will break when trying to remove them. Plan on replacing all bolts and clips with new. You will need to remove the battery and the battery tray to get to the bolts holding the front passenger side fender on, also remove the windshield washer fluid bottle on the driver side to gain access to those fender bolts.
Once your grill and fenders are off its time to put on VERY IMPORTANT reference lines. I did this with a 2' square and a can of cheap primer gray paint "neat tip here", spray a light colored paint on the general area where you will be laying out your reference marks and let it dry. Place the short end of the square against the doorpost flange and square with the bottom of the inner fender wheel well and mark along all edges of the square. You can also get several more reference points with your tape measure for added insurance (from the cowl flange on the firewall to the front core support). Now layout what rusty areas needed to be removed being sure to save the 3/4" flange on the firewall "this will be your bolting flange". I used this flange to make my cut line. I drilled 3 small holes from the inside so that I could use a straight edge on the outside by lining up on the holes insuring that my cut will match perfectly with the firewall flange. Add 3/4" from the cut line on the firewall side and 2" to the cut line on the inner fender side "or more or less depending on how much overlay you want when plug welding and bolting back together.
Now you have your cut line and the reference marks for the new piece where it will overlap. I made a pattern of this from poster board and cut it out and tested the fit "looking good". Once you have your pattern for both sides, drill out the spot welds so that the two pieces can be separated. Both inner fenders have brackets that are spot welded to the firewall that will need to have the spot welds drilled out.

The passenger side inner fender was longer than the driver side and I decided to cut the inner fender so it would match the driver side and also have the same tire clearance on both sides. To do this I removed the two body mount bolts at the front radiator core support and lifted the front clip off the frame. The inner fender bracket that connected the inner fender to the firewall will be in the way of the cut and will need to be drilled off “ you may be able to reuse this bracket, mine was trash" Get the measurement from the driver side inner fender and marked the passenger inner fender and cut to match.

The front clip is cleaned up now and a little attention is needed on the firewall flange where the spot welds were drilled out when removing the rusty sheet metal. Clamp the firewall flange and the kicker panel tight and plug weld these spot weld holes however remember not to weld the three screw holes in the passenger side firewall flange because they hold the air box on and will be used later. Use a body dolly and hammer to straighten out the firewall flange so that you will have a nice smooth bolting surface.

I measured my patterns that I had previously made and decided that a 24 X 30 piece of sheet metal would get both the piece so its off to the local sheet metal shop. I used 16-gauge sheet metal for added strength for the bolt up and also had them use their metal break to bend both of the 24" ends with a 1" lip. The final pieces I cut out at home with a fine metal blade in a jigsaw. I clamped the metal down on a worktable and also clamped a straight edge to the sheet metal to help make a straight cut. “Plasma would have been nice however “where there's a will there's a way”. Here is my son doing the QC inspecting and insuring the square marks still all line up. Looking good.

The QC inspection passed so its time to tack the new pieces to the clip. There's 1 butt weld on each piece and that's were the 1" lip of the new piece meets up with the top lip on the inner fender. The outside fender will need to set flat on this top lip to fit properly so I used a small piece of angle iron to help make a good straight fit. I tacked each piece in about 4 places and pulled the whole front clip back off to complete the weld up. I plug welded from the inside since the inner fender metal was thinner, " plus it helped hide the ugly welds from the QC inspector"


I decided to cut about 1' ½ off the existing kicker panel and shorten the length of my new piece to allow for more tire clearance. I then completed the welding and now its time to layout the boltholes. I drilled out the 3 screws holes where the air box mounted to the firewall flange for 1/4" bolt holes and used these holes as a bolt pattern for the drivers side firewall flange. I then put the inner clip back on and used a couple of clamps to hold in place once it was realign with the square marks and measurements. From the inside mark through the holes you drilled in the firewall flanges and firewall brackets then pull the inner clip back off enough to drill these holes out.

Both inner fender firewall brackets will need a couple of bolts as well.


I did one last dry fit and insured all was well and everything bolted up so now its time to do some rust preventative. I am going to try the Rust Bullet however any preventative is much better than none.


Tools needed:
light mig welder, Jigsaw and/or Sawzall, 4 ½ grinder, Body dolly and/or Ball peen hammer, C-clamps and/or Vice grips, Spot-weld remover and/or drill
Materials needed:
Approximately one piece of 24” X 30” 16 gauge sheet metal from local sheet metal shop, price $5.00
New Grill and fender bolts and clips from Jeff's Bronco Graveyard, price $20.00
Stainless steel ¼” bolts, washers and nylon lock nuts to bolt the clip to the firewall flange. $5.00
