


Tech Article by Ted Howard (Tedster100)
As I worked on my build I have realized that bracing the windshield to the roll cage is a great idea. It offers support to the windshield when the top is off and keeps the angle of the windshield correct so the soft top fits snug without pulling the windshield back. I’ll be running fiberglass doors with removable soft top frames (from Bronco Design) so supporting the windshield is a must. When I got ready to add the braces I decided that the possible mounting points were limited and created odd angles that just weren’t very clean looking so I set out to create a better mount.
I used a couple specialty tools to make and install my braces and mounts but I tried to use as much backyard engineering as possible so just about anyone should be able to make these.
The tool list is as follows:


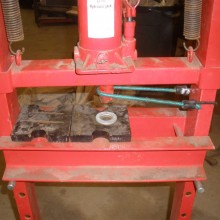
Next, set up the press so that the washers are under the press with the smaller washer on the bottom and the larger on the top. Run the press down and put the ½” carriage bolt under the press to get the proper alignment of the washers. (Notice the precision alignment bungee device on the press, cheap tools are cheap tools!)


Heat the aluminum. This step is critical, the aluminum has to be heated to normalize the metal and allow it to relax (fancy for make it malleable). You are just heating the metal up, not trying to get it glowing hot. Aluminum that is heated will bend far easier without cracking even after allowed to cool. I did bend mine while still hot.
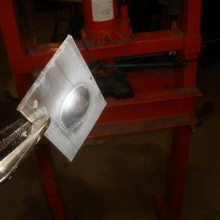
Once the aluminum is heated put it carefully on top of the washers centered on them and the press. Hold the ½” carriage bolt with pliers over the aluminum and bring the press down to form a dimple.

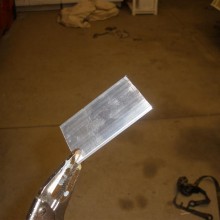
Below is what it looks like if you don’t heat the aluminum.

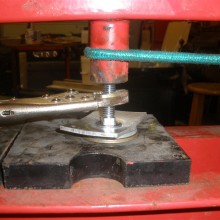
Now flip the piece over and put the larger ID washer on the aluminum over the dimple and then the smaller ID washer. Bring the press down on the washer to flatten the piece back out again. Now you have a formed dimple in the aluminum.


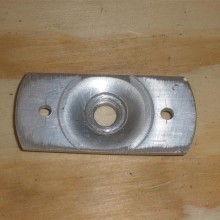
Next punch and drill a 5/16” hole in the top of the dimple and mark the pieces for cutting to size (see pictures) Cut them to the desired width with a band saw, hack saw or cut off wheel to fit on the windshield where you want them. Use a belt sander to clean up the cuts and radius the ends. Then drill two holes on either side to accept 10-24 pan head bolts (or self-taping screws)


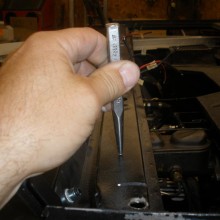
Now, take the two turnbuckles and remove the normally threaded ends (lefty loosie…). Drill these ends out with a #7 drill bit and tap with a ¼” x 20 tap.


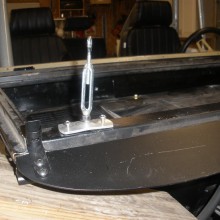
Put the oval head bolt in the bottom of the dimpled piece followed by a washer and nut on the top of the dimpled piece. Then thread the turnbuckle onto the oval head bold. The brace is now ready for mounting onto the windshield.


Locate the position that best works for you on the windshield frame. I will be running dual motor wipers with no cover so interference was not a problem, make sure the mounting location works with any other covers or equipment you might have on the windshield. Mark the mounting holes, punch and drill for the nutserts (or drill pilot hole for self-tapping screws).


Install the #10-24 nutserts into the windshield frame and 1/4"-20 nutserts to the roll cage to accept the mounting bolts.


To make a quiet bushing for the eye bolt mount take a piece of thin walled rubber or PVC tubing and cut a 1/4” piece off. Then cut across the tubing and trim enough off until you have a crescent shaped piece left that you can insert into the eye bolt. There should be enough material on either side of the eye bolt so that when it’s mounted the washer will squeeze the bushing against the frame so there is no slack or movement.


The brace is ready to mount. Install the base to the windshield frame with the turnbuckle loose. Adjust the turnbuckle by turning the eye bolt end only, keeping the base end of the turnbuckle close to the nut and washer. Once you have the proper distance and alignment tighten the nut down on the base and adjust the turnbuckle down to the nut. This will lock the oval head bolt tight and lock the turnbuckle. Then install the bolt through the eye bolt onto the roll cage and you are finished. Mine are shown here mounted up but I’ll be painting the Bronco in the near future and I plan on polishing the aluminum to finish it off.


Tech Article by Ted Howard (Tedster100)
As I worked on my build I have realized that bracing the windshield to the roll cage is a great idea. It offers support to the windshield when the top is off and keeps the angle of the windshield correct so the soft top fits snug without pulling the windshield back. I’ll be running fiberglass doors with removable soft top frames (from Bronco Design) so supporting the windshield is a must. When I got ready to add the braces I decided that the possible mounting points were limited and created odd angles that just weren’t very clean looking so I set out to create a better mount.
I used a couple specialty tools to make and install my braces and mounts but I tried to use as much backyard engineering as possible so just about anyone should be able to make these.
The tool list is as follows:
- Hydraulic Press or Arbor Press (maybe a 5lb hammer would work too?)
- Drill
- Propane Torch
- Metal Cutting Saw (saws all, jigsaw, hacksaw, etc..)
- Thread Setter (nutsert tool, not needed but way cool)
- Wrenches, Pliers, Screwdrivers, Tin Snips, Center Punch, Sharpie
- Grinder or Belt Sander
- ¼-20 Tap & Tap Handle
- #7 Drill Bit
- Bits for Nutserts (size determined by size of nutserts)
- 12” x 2.5” x 1/8” Thick Aluminum Plate (Lowe’s stock or an old road sign would do)
- 1 Each ½” x 3” Carriage Bolt
- 2 Each 7/24 Turnbuckles
- 2 Each ¼-20 x 1” Oval Head Bolts
- 2 Each ¼-20 x 1.5” Hex Head Bolts
- 4 Each ¼” Washers
- 2 Each ¼” Nuts
- 4 Each 10-24 Pan Head Bolts (or sheet metal screws)
- 4 Each 10-24 Thread Setters, AKA Nutserts (not needed if using sheet metal screws)
- 2 Each ¼-20 Thread Setters, AKA Nutserts (or a nut or boss to weld to roll cage)
- 1 Each ¾” ID Washer
- 1 Each 1-1/4” ID Washer
- Small section of thin wall rubber or pvc tubing (4” or less)
Next, set up the press so that the washers are under the press with the smaller washer on the bottom and the larger on the top. Run the press down and put the ½” carriage bolt under the press to get the proper alignment of the washers. (Notice the precision alignment bungee device on the press, cheap tools are cheap tools!)
Heat the aluminum. This step is critical, the aluminum has to be heated to normalize the metal and allow it to relax (fancy for make it malleable). You are just heating the metal up, not trying to get it glowing hot. Aluminum that is heated will bend far easier without cracking even after allowed to cool. I did bend mine while still hot.
Once the aluminum is heated put it carefully on top of the washers centered on them and the press. Hold the ½” carriage bolt with pliers over the aluminum and bring the press down to form a dimple.
Below is what it looks like if you don’t heat the aluminum.
Now flip the piece over and put the larger ID washer on the aluminum over the dimple and then the smaller ID washer. Bring the press down on the washer to flatten the piece back out again. Now you have a formed dimple in the aluminum.
Next punch and drill a 5/16” hole in the top of the dimple and mark the pieces for cutting to size (see pictures) Cut them to the desired width with a band saw, hack saw or cut off wheel to fit on the windshield where you want them. Use a belt sander to clean up the cuts and radius the ends. Then drill two holes on either side to accept 10-24 pan head bolts (or self-taping screws)
Now, take the two turnbuckles and remove the normally threaded ends (lefty loosie…). Drill these ends out with a #7 drill bit and tap with a ¼” x 20 tap.
Put the oval head bolt in the bottom of the dimpled piece followed by a washer and nut on the top of the dimpled piece. Then thread the turnbuckle onto the oval head bold. The brace is now ready for mounting onto the windshield.
Locate the position that best works for you on the windshield frame. I will be running dual motor wipers with no cover so interference was not a problem, make sure the mounting location works with any other covers or equipment you might have on the windshield. Mark the mounting holes, punch and drill for the nutserts (or drill pilot hole for self-tapping screws).
Install the #10-24 nutserts into the windshield frame and 1/4"-20 nutserts to the roll cage to accept the mounting bolts.
To make a quiet bushing for the eye bolt mount take a piece of thin walled rubber or PVC tubing and cut a 1/4” piece off. Then cut across the tubing and trim enough off until you have a crescent shaped piece left that you can insert into the eye bolt. There should be enough material on either side of the eye bolt so that when it’s mounted the washer will squeeze the bushing against the frame so there is no slack or movement.
The brace is ready to mount. Install the base to the windshield frame with the turnbuckle loose. Adjust the turnbuckle by turning the eye bolt end only, keeping the base end of the turnbuckle close to the nut and washer. Once you have the proper distance and alignment tighten the nut down on the base and adjust the turnbuckle down to the nut. This will lock the oval head bolt tight and lock the turnbuckle. Then install the bolt through the eye bolt onto the roll cage and you are finished. Mine are shown here mounted up but I’ll be painting the Bronco in the near future and I plan on polishing the aluminum to finish it off.
Tech Article by Ted Howard (Tedster100)