|
There are a couple of ways to get these old body bushings out of the frame. Remember you may have to use a combination of methods that I will be writing about to remove the original bushings.
If you can, soak the bushings and the bolt as best you can with some type of penetrating oil for a few days. It will help to get the bolts out. If you can get the bolts out I personally think it's easier for the four in the rear of your Bronco. I really had to work to get the bolts out.
At the time I did not own a Sawzall and still don't. It's on my wish list. To remove the original bushings I used a dremel or if you have a Sawzall it will make the job easier. You can use these tools for the very front bushing removal since they are easy to get to. For the other six I soaked the bolts and bottom bushing retainer with penetrating oil for a couple of days. I used a cheater bar on a socket wrench and pulled the bolts. It wasn't easy since my body mounts had been in there for 37 years.
Once I did this the two retainers top and bottom that hold the bushing together are usually rusted together. See diagram (A) for what the original mounts look like. I then screwed the bolts back in about half way and dropped a 45 lbs. weight on the bolt head which separated the two apart. See picture #(1) above. It actually took some really hard hits before they separated. It also bends the bottom plate down towards the frame. See picture of the old body bushing and what they look like after using the 45 lbs. weight. Picture #(2) above.
Option two is a combination of getting the bolts out if you can and just cutting them out by using a Sawzall or another type of cutting device. If you use a Sawzall cut the rubber bushing and the two steel bushing retainer plates in half. It's easy to get access to the front four. The ones behind the passenger and driver seats will take some time to get them cut in half. You will have to pull your rear bumper to gain access to the rear ones. Again you may not have to take the bolts out if you can take the Sawzall to the top original body bushing between the frame and body. This will work for the front four mounts since there is nothing underneath supporting the bushing retainers.

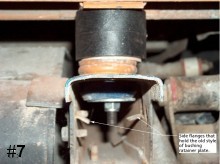
The back four you have two side flanges on the frame that hold the bottom bushing plate up. [see pic #(7)] So once you cut the top bushing in half it's just not going to fall out. You can always do what I did and insert another bolt and pound the bushing out of the flange. See picture #(2) what they look like after wards.
When you install the new bushings you will find it is easier to push the new bushing sleeve in the bottom bushing and push them up into the the top bushing in between the body and the frame. See picture #(2) you will see them in the back ground with blue polyurethane bushings. As you see in pictures #(3) & #(4) this is how they look installed ready for bottom washer and lock nut.
For examples of what a 2" body lift looks like installed see pictures #(5), #(6) & #(7). Picture #(5) is the front body mount near your grille, #(6) is body mount behind the passenger seat and #(7) is the rear body mount and bumper removed for this view.
I wrote this to help out anyone who has never replaced those old body bushings. I know I had never seen any write ups and I hope this is some useful information for you.
The CrackerJack.
Tech article by Waylon (blackjack)
The following tip and photos are from brian72
Before trying to replace the bushing in the middle of the bed. Put tape
over the hole in the frame below the perch. If not the metal sleeve and or
your nut might fall in.
Take the correct size boxed end wrench and tape the opening on one side. Now
you can place the nut in the boxed end and it will not fall out. No more
contorting your fingers to try and hold the nut. Slide the wrench between
the frame rail and the bottom bushing. Put the bolt in through the top and
line up nut and bolt and begin to thread the bolt. Once you have started
the nut, pull up on the bolt. This leaves room for you to remove the
wrench. Flip the wrench around to the open end and place on nut and begin
to tighten with socket on the bolt.
~Brian
|


