|
|
Electronic Fuel Injection
Installing an EFI into an Early Bronco
Tech article by John Edgecomb (edge4)
Click here for the parts list.
 One of the most important elements of any Early Bronco EFI conversion is the fuel system. Due to the high-pressure requirements of the fuel rails and injectors, the stock pump and fuel lines are completely inadequate. The last place you want to be is standing on the side of the road, watching your EB go up in smoke, due to a ruptured hose or worn hose clamp. Unlike lo-pressure carbureted systems, EFI uses a continuous fuel loop. It requires a hi-pressure pump and regulator to feed the injectors through an integrated fuel rail. Any unused fuel is routed back to the tank through a dedicated return line. This return line also aids in the cooling of the heated fuel. Most hi-pressure pumps have little or no pulling power; therefore if you are not using an in-tank pump you will probably need a supplemental low-pressure pusher pump. Plumbing for most EFI systems incorporate a 3/8” supply line and a 5/16” return line. Knowing that all the 25+ year-old plumbing needs to be replaced for EFI, the next question becomes what to replace it with. Here are a couple of items you should consider in making specific choices for your vehicle.
Do you want hard line or rubber hose, one fuel pump or two, in tank or external pump, hose clamp or AN fitting, electric switching or manual valve and finally location and routing of all the components. All of these choices depend on your vehicle, engine, horsepower, budget, and personal preference. This article will show the installation of a complete high performance EFI fuel system. Some might say that stainless braided hose and AN racing fittings are overkill for a daily driver, but I prefer the added degree of safety, and last but not least, the cool factor.
Let me begin by stating the obvious. Working with high-pressure fuel systems can be dangerous. Use caution when working on these systems. Work in a well-ventilated area, disconnect the battery, and use eye protection. If you are unsure of your ability, seek qualified help.
The system described below uses stainless steel jacketed hose and –6 AN fittings. For those of you that are not familiar with the terminology, -6AN means a 6/16” Army/Navy fitting developed by the aerospace industry. If you prefer a less expensive alternative, standard hi-pressure fuel hose and fuel clamps can be used. The 6-port electric switch, both recommended pumps, and the BC accumulator/filter all come standard with hose barb fittings.
In deciding on the stainless jacketed hose/ AN fittings design I, ran into numerous obstacles. First is the standard 3/8” main line and 5/16” return line that is found on the 6-port fuel switch, accumulator, and other connectors. In the racing industry 3/8” or –6AN is a very common size. 5/16” or –5AN is non-existent. I was able to find some 5/16” stainless jacketed hose at Summit Racing manufactured by Spectre for low-pressure use only. Since this would be used for the return line only, I was able to adapt it for my application. Earl's –6AN swivel fittings actually clamp well with the 5/16” Spectre hose. For the main fuel feed you must use a hi-pressure rated hose. The next problem was finding adaptors to attach the AN fittings to the Ford snaplock connectors found on the fuel rail. There is a large (in) and a small (return) snaplock fitting. I was able to locate a set of these along with every other AN adaptor at AN Plumbing .The “T” for the accumulator return line idea was discovered by accident while looking at a –6 to –6AN 1/8” port adaptor I was going to use for a fuel pressure gauge sending unit. The last hurdle was cutting the hose. I found the best solution was first taping the hose with paint masking tape, and then cutting it with a hack saw. You will discover while installing the fittings that your fingertips will become bloody pincushions. Now that we have covered the background it's time to put it all in.

1) The first item to install is the BC Bronco's 6-port fuel switch. The switch cannot be pressurized, therefore it must be placed first before any pumps. As you can see in the photo, I have mounted the switch in front of the main tank just above the rear differential. There are 4 ports on the right for the main and auxiliary tanks. The main ports are 3/8” hose barbs and the return ports are 5/16”. When this picture was taken, I had not run the auxiliary tank lines. The 2 ports on the left are the main and return lines. The 6-port switch uses a chassis ground, requiring you to sand the mounting area to bare metal. The solenoid no voltage position defaults to the main tank. The fuel switch requires a 12v 16ga positive lead running to the fuel gauge selector switch on the dash. A PDF wiring diagram can be found on the BC Bronco's site. Make sure to use fuel grade clamps.
2) In the next photo you will see the low-pressure pusher pump mounted to the passenger frame rail above the rear axle. I used an AC Delco # EP247 built by Carter. It's rated at 7psi with a 72 gph capacity. It comes with a vibration dampened mounting bracket, 3/8” barbed fittings to Ľ” npt thread, and insulated pigtails for the electrical connections. For added noise reduction, I inserted a rubber insulator between the bracket and frame. To use AN fittings with this pump you will need (2) –6AN to Ľ”npt straight adapters. The ground post wire connects to the chassis and the 12V 14ga positive lead is run to the fuel pump relay.
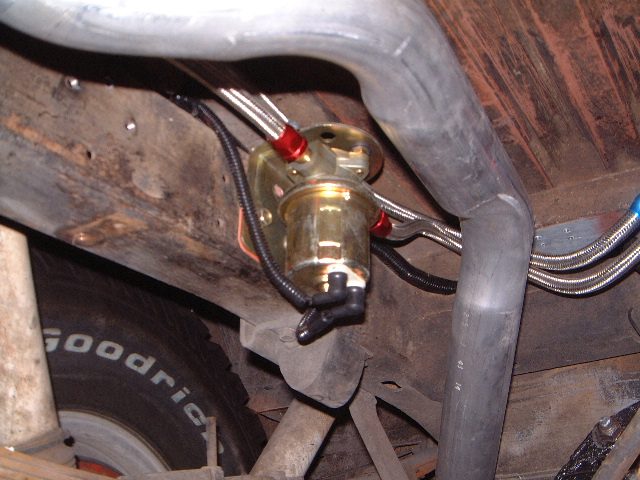
3) The hoses cross over to the outside frame rail at this point. Here you can see in the next shot I've installed the BC Broncos accumulator / filter. I chose this model over a standard inline unit due to the large filter capacity, ease of replacement and the accumulator feature for high angle rock climbing situations. I mounted it high on the frame rail, just in front of the leaf spring mount. I replaced the existing short barbs with –6AN male to ˝” npt male straight adapters and 120deg. –6AN swivel fittings. For the return line I used a –6 by –6 AN test port with a 1/8” npt tap as a “T” with a 1” long 1/8” npt brass pipe. The 5/16” return line connects to this “T” with (2) –6AN straight swivel fittings. This part must be attached first to the filter before the main ˝”npt adaptors.
4) Moving up the passenger side frame rail just below the door I have mounted the hi-pressure pump. It is a Borg Warner #EP7109 built by Walbro. It's rated at 40+psi with a 155lph capacity. It uses 10mm X 1.0 metric ports at each end and comes included with hardware and barbed fittings. I have installed –6AN to 10mm adaptors with –6AN straight fittings at both ends. I used the included rubber insulator along with standard D style clamps to attach it to the frame. The negative terminal was attached to the frame and the 12v 14ga positive lead is run to the fuel pump relay. For this pump I purchased rubber boot style connector covers since a ring terminal was the only supplied connector. As you can see in the picture, the return line runs above the pump.
5) From the hi-pressure pump I ran the lines up and along the inside fender well, crossing over to the fuel rail and connecting to the snaplock fittings seen in this next photo. The passenger fender is a good location to add the tap and sender module for the optional fuel pressure gauge.
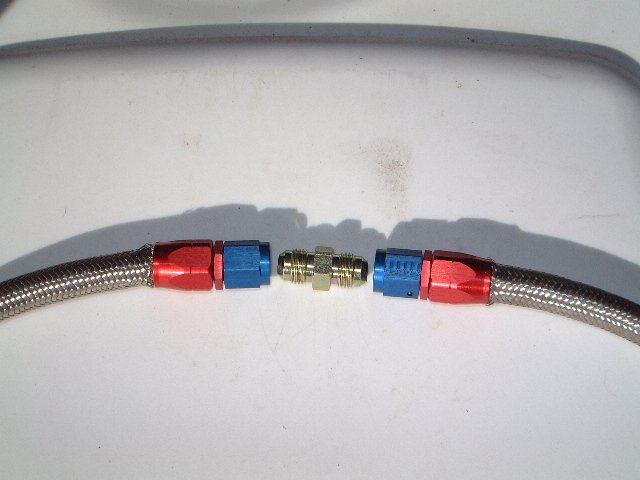
6) Now you are ready for final testing and hookup. To test the fuel pressure, check for leaks, and to clean and cycle the lines, interconnect the main line to the return line at the point where the AN fittings would connect to the snaplock fittings on the fuel rail using a –6AN male to male adaptor (#981506). This allows any particles to loop back to the tank without cycling through the fuel rail. I temporarily bypassed the fuel pump relay in order to cycle the pumps for more than two seconds. Fill the tanks with fuel, check fittings, and turn on the key. Run for 20 seconds and stop to check for leaks. If everything looks OK, run for a couple of minutes, stop, and check again. If the connections look good remove the –6AN coupler fitting carefully and connect both hoses to the correct ports on the fuel rail. Reconnect the pump relay, turn on the key, listen for the relay's 2-second prime and cutoff, then start the engine. Continue to carefully monitor all connections during normal operation for the next week.
7) On to the electrical, I ran the 16ga switch wire over to the passenger rail. It travels with the two 14ga. pump wires along the passenger frame rail, up the inner fender well to the firewall, and over to the drivers side. The switch lead is run into the cab to the dash mounted fuel switch. The two pump wires are connected to the inertia switch on the drivers' side fender. A 12ga lead runs from the inertia switch to the fuel pump relay located under the dash with the EEC-IV. (If you choose a rear mounted inertia switch, run a 12ga lead from the fuel pump relay back to the inertia switch. Then run (2) 14ga leads up the passenger rail to the pumps.) All electrical wires were covered, at all points, with black protective wire loom.
8) (Optional) For those of you who would like to have a fuel pressure gauge, (and who wouldn't want another gauge on their dash) I have included the part numbers and location to install an Autometer Ultralite 0-100psi electric fuel pressure gauge.
9) (Notes & Tips) I have attached all the hoses to the frame using ˝” insulated hose clamps. If you decide to use the decorative Spectre hose clamp/covers on the 6-port selector valve, make sure to change out the included worm clamps for solid fuel clamps. This is very important, especially when using stainless braded hose. AN fittings, like all flared fittings, must not be over tightened. Rule of thumb is hand tighten and then wrench tighten Ľ to ˝ turn. Do not run fuel lines too close to headers or other high heat sources. High heat will leave you with poor performance or vapor lock. Make sure to clean the inside of the hose with a q-tip after making a cut to remove any metal shavings.
10) (Safety features) I highly recommend that you don't bypass Ford's safety systems. First is the Fuel Pump Relay. With the Key to on it powers the pumps up for 2 seconds, then shuts them off if the engine is not started or dies. Second is the Inertia Switch. It kills the pumps in case of a car crash to prevent excess fuel spillage. For rock climbing and off road this can be a slight problem. Since the Inertia Switch is just a steel ball suspended between magnets and is fairly sensitive, it might require resetting on a hard impact.
Click here for the parts list.
by John Edgecomb |
This Early Bronco site created and maintained by
Jon
Hanna -
Copyright ©
1996- All rights reserved. Privacy Statement
ClassicBroncos.com is not affiliated or associated with Ford Motor Company. Ford Bronco and Ford Bronco logos are property, copyright, trademarks and/or service marks of Ford Motor Company.
|