• Welcome to ClassicBroncos! - You are currently viewing the forums as a GUEST. To take advantage of all the site features, please take a moment to register. It's fast, simple and absolutely free. So please join our community today!
    If you have problems registering or can't log into your account, please contact Admin.

7 Year Itch (Condensed)

klcornett

Contributor
New Member
Joined
Oct 21, 2012
Messages
25
My first order of business is a big thank you to all forum members. I have learned a tremendous amount and had the good fortune of reaping the benefits of lessons learned without the pain and expense of having to learn them myself. Thanks everyone!

This is the second Bronco I've owned. The first was a 1970 that I purchased in El Paso, TX in the mid 80s, implanted a 351 Cleveland and NP435, discovered Four Wheeler Magazine's treasure hunt, and drove it across country twice. I kept it until 1996 when I sold it before going overseas for three years. As many have bemoaned, I regret it to this day.

I purchased my current Bronco in October 2017. The tub was in rough condition with rust thru throughout, and other than the cowl area, needed replacement. My plan was to repair the metal, add disk brakes and complete a simple stock refurb. Not the way it turned out.

October 17 Pics of Bronco, body panels stripped, and body off the frame.

IMG_0472.JPG
IMG_0472.JPG
IMG_0482.JPG
IMG_0681.JPG
IMG_0682.JPG
 

Attachments

  • IMG_0482.JPG
    IMG_0482.JPG
    166.9 KB · Views: 24
OP
OP
klcornett

klcornett

Contributor
New Member
Joined
Oct 21, 2012
Messages
25
November 2017
Blasted the frame, painted it with rust encapsulator followed by chassis black. Added front disc brakes and a 2.5 inch lift (scope creep) and purchased the Bronco in a box option to replace the tub components.
IMG_0684.JPG
IMG_0758.JPG
 
OP
OP
klcornett

klcornett

Contributor
New Member
Joined
Oct 21, 2012
Messages
25
December 2017
Over the Christmas holidays and vacation accomplished most of the initial sheet metal work on the tub. The entire tub was assembled with sheet metal screws using measurements found on the forum and those taken from the original tub when possible. I was able to follow several build threads during the process. a tremendous help.
IMG_0759.JPG
IMG_0762.JPG
IMG_0765.JPG
IMG_0766.JPG
IMG_0775.JPG
IMG_0780.JPG
IMG_0784.JPG
IMG_0786.JPG
IMG_0775.JPG
 
OP
OP
klcornett

klcornett

Contributor
New Member
Joined
Oct 21, 2012
Messages
25
January 2018
Continued with sheet metal installation and begin fit up of body panels.
IMG_0787.JPG
IMG_0788.JPG
IMG_0790.JPG
IMG_0791.JPG
IMG_0792.JPG
IMG_0793.JPG
 
OP
OP
klcornett

klcornett

Contributor
New Member
Joined
Oct 21, 2012
Messages
25
The next five years, major scope creep! Countless iterations of installing and aligning body panels. Realizing I'm not a body person and decided to purchase new doors, fenders, hood, tailgate and windshield frame. Thinking it would be nice to have fuel injection and automatic transmission. Purchase a 2000 Explorer AWD drive as a donor. May as well throw in power steering. Couldn't find anyone interested in painting it for me, so finally made the plunge and on a rotisserie.
IMG_1216.JPG

IMG_1003.JPG
IMG_1007.JPG
 

Attachments

  • IMG_1003.JPG
    IMG_1003.JPG
    144.6 KB · Views: 16
OP
OP
klcornett

klcornett

Contributor
New Member
Joined
Oct 21, 2012
Messages
25
December 2023
Realized that I wanted to work on my Bronco more than I wanted to work. Pulled the cord, quit working and began life as a somewhat full time Bronco restorer.

Placed the top on for fitment and then on to grinding welds and stripping for primer and paint.
IMG_2781.jpeg
IMG_2806.jpg
IMG_2807.jpg
IMG_2808.jpg
IMG_2809.jpg
IMG_2810.jpg
 
OP
OP
klcornett

klcornett

Contributor
New Member
Joined
Oct 21, 2012
Messages
25
March
After sanding, second coat of epoxy and 2 coats of Boxwood Green color matched Raptor LIner
IMG_2834.jpg
IMG_2835.jpg
IMG_2840.jpg
IMG_2844.jpg
IMG_2846.jpg
 
OP
OP
klcornett

klcornett

Contributor
New Member
Joined
Oct 21, 2012
Messages
25
July
Painted the body panels. I wasn't able to get a match for Argent Silver so went with 2011 GMC Quicksilver metallic for the grill and rims. I spent most of my time removing and cleaning explorer parts to transition to the Bronco. Removed the wiring harness and sent to Garry Vance (EFI Guy for rework).
IMG_2919.jpg
IMG_2920.jpg
 

Tricky Dick

Contributor
Sr. Member
Joined
Jul 13, 2023
Messages
478
Realized that I wanted to work on my Bronco more than I wanted to work. Pulled the cord, quit working and began life as a somewhat full time Bronco restorer.
Teach me your ways! I've realized this for a very long time.
 
OP
OP
klcornett

klcornett

Contributor
New Member
Joined
Oct 21, 2012
Messages
25
August
Rebuilt the transmission to install the new output shaft required for the AA adapter and D20. Changed the rear end gearing from 3.50 to 4.11. Installed the Explorer engine and transmission into the Bronco frame, and finally the tub back on the frame.
IMG_2967.jpg
IMG_2969.jpg
IMG_2976.jpg
IMG_2978.jpg
IMG_2979.jpg
IMG_2981.jpg
IMG_2980.jpg
IMG_2983.jpg
IMG_2984.jpg
 

Attachments

  • IMG_2984.jpg
    IMG_2984.jpg
    187.3 KB · Views: 15
  • IMG_2983.jpg
    IMG_2983.jpg
    210.9 KB · Views: 17
  • IMG_2981.jpg
    IMG_2981.jpg
    229.7 KB · Views: 12
  • IMG_2980.jpg
    IMG_2980.jpg
    250.5 KB · Views: 13
OP
OP
klcornett

klcornett

Contributor
New Member
Joined
Oct 21, 2012
Messages
25
September
Making everything work together, maybe, hopefully?
I retained all of the Explorer emissions. I was able to keep the Explorer air box, purge and vent valves as well as the charcoal cannisters. I built a bracket and mounted the cannisters and vent valve underneath the driver's side tub between the frame and rocker. I mounted the purge valve between the driver's side inner fender and cowl. I modified the Explorer fuel tank pressure transducer to connect to a hose barb style and added a rollover valve to connect the tank to the vent valve.
Cut the Explorer cold air box and removed 1 inch, riveted and glued it back together and rotated it 90 degrees so I could use the original box.
Converted the fuel lines to braided hose and added AN6 fittings along with original EFI fittings in order to use the stock Explorer fuel filter.
Cut the metric connection off the power steering line and brazed it onto an SAE line to retain the Explorer pump.
Lowered the power steering pump and coil pack
Rotated the EGR elbow and used the Explorer accelerator cable and mount
Fabricated a spacer to move the fan shroud further onto the fan
Probably a lot of other things I'm not thinking of at the moment.
Started it for the first time. Side note it fired on the first crank. You may hear some lifter clattering on the video but it went away after a minute or so after they got pumped up from sitting so long.
IMG_2996.jpg
IMG_2998.jpg
IMG_3035.jpeg
 
OP
OP
klcornett

klcornett

Contributor
New Member
Joined
Oct 21, 2012
Messages
25
October
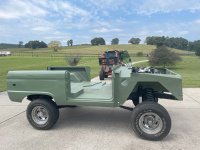
Got the wheels on and the top painted, continual tweaking, installing, filling, tightening of every component. Wired the Dakota Digital dash gauge. The best thing is that it moves in and out of the garage under its own power now.
IMG_2999.JPG
IMG_3012.JPG
 
OP
OP
klcornett

klcornett

Contributor
New Member
Joined
Oct 21, 2012
Messages
25
November
Began installing body panels and trim. All has gone well so far. Installed seats and roll bar. Cut and buffed the paint.

IMG_3031.JPG

Teach me your ways! I've realized this for a very long time.
They just sort of swelled up and boom!
 
Top