


Community
Message Forum
Photo Gallery
Event Calendar
Book Reviews
Bronco Wallpaper
Bronco FAQ
Link Back to CB!
Photo Gallery
Event Calendar
Book Reviews
Bronco Wallpaper
Bronco FAQ
Link Back to CB!
Buy / Sell


Bronco Tech
3 Arm Wiper Setup
Fix Motor Mount
Roll Cage Braces
Throttle Body 65mm
Wheel Alignment
Heat Riser Replacement
Vent Window Repair
Center Console Mount
Straighten Bumper
Ford 6R80 6 spd
More Tech...
Fix Motor Mount
Roll Cage Braces
Throttle Body 65mm
Wheel Alignment
Heat Riser Replacement
Vent Window Repair
Center Console Mount
Straighten Bumper
Ford 6R80 6 spd
More Tech...

Install the app
-
Welcome to ClassicBroncos! - You are currently viewing the forums as a GUEST. To take advantage of all the site features, please take a moment to register. It's fast, simple and absolutely free. So please join our community today!If you have problems registering or can't log into your account, please contact Admin.
You are using an out of date browser. It may not display this or other websites correctly.
You should upgrade or use an alternative browser.
You should upgrade or use an alternative browser.
Dana 44 Gear Pattern - UPDATED 5-17!
- Thread starter jesus888
- Start date
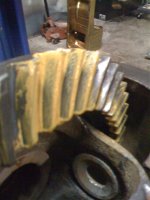
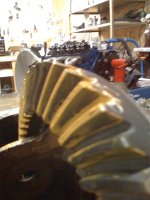
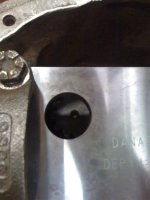
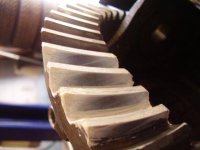
I'm not seeing anything that resembles a pattern. I suggest cleaning the paint off all the teeth. Paint both sides of three teeth. Put as much drag on the ring gear as you can. It also helps the cut the marking compound with a little motor oil to thin it out.
What thickness is the pinion shim?
Backlash?
What thickness is the pinion shim?
Backlash?
z70what
Bronco Guru
i agree with "nobody". i'm not seeing much of a pattern.. try it again and put some drag on the pinion to really get a good pattern and retake some pics for us..
Luke
Luke
Flintknapper
Sr. Member
Agree with others, the combination of out of focus pics. and lack of definitive pattern makes it impossible for us to diagnose.
Is this a "new" or "used" gear set (it makes a difference).
Also, put some pressure on the pinion gear while rotating the ring gear back and forth to establish the pattern.
Post back (with good pics) and we'll see what everyone thinks.
Is this a "new" or "used" gear set (it makes a difference).
Also, put some pressure on the pinion gear while rotating the ring gear back and forth to establish the pattern.
Post back (with good pics) and we'll see what everyone thinks.
70_Steve
Old Guy
- Joined
- Dec 13, 2002
- Messages
- 8,317
Agree with everyone else. The pattern is not clear. You need to have some drag on the ring gear to cause the marking compound to squish out from between the teeth. I pryed against the ring gear with a piece of scrap plywood to create the drag.Put as much drag on the ring gear as you can.
Flintknapper
Sr. Member
Agree with everyone else. The pattern is not clear. You need to have some drag on the ring gear to cause the marking compound to squish out from between the teeth. I pryed against the ring gear with a piece of scrap plywood to create the drag.
I suppose as with most things there is more than one way to do it, but the "accepted" method is to apply pressure to the pinion gear and then turn the ring gear back and forth to establish the pattern.
If we are to get a reliable reading... we will need for him to follow our instructions. Also, we need to know if this is a used gear set or new.
OP
OP
jesus888
Sr. Member
Well, we've been fighting this thing for the last 2 days, and I think it has to do with the measurements we're using from the dial setup we have along with the old shims that are kinda beat up in places. So, to make a long story shorter, we pulled everything back apart and got some new shims and we're gonna give it another shot... Pattern pics will follow ") thanks for all of the attention guys!!
thanks for all of the attention guys!!
thanks for all of the attention guys!!Flintknapper
Sr. Member
Well, we've been fighting this thing for the last 2 days, and I think it has to do with the measurements we're using from the dial setup we have along with the old shims that are kinda beat up in places. So, to make a long story shorter, we pulled everything back apart and got some new shims and we're gonna give it another shot... Pattern pics will follow
Good deal!
We will need to know the "back lash" figure each time you post back as well.
You can start your pinion depth the same as the one you took out. Go from there.
OP
OP
jesus888
Sr. Member
Finally...
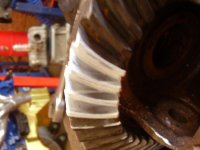
OK, I think we figured out that the problem had to do with the Pinion depth...
A little note, the housing came as a bare housing, so there was no initial shim pack to work from for anything, so we had to set pinion depth from scratch.
On top of that, the dial tool we were using, although it cost about $120, was just a joke... it bolted to where one of the end caps is, and had like 2 joints BEFORE the measurement! I mean, we're talking measurements in the thousandths, and there are 3 total possible sources of error??
Anyways, it became clear that we needed to move past this tool...
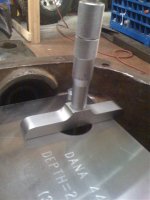
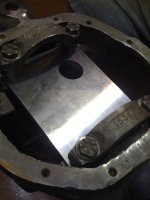
SO, i called up a buddy that works at a machine shop and had him do a little "overtime" work for me We came up with a plate that bolts to all 4 holes for the end caps...
I will tell you this... I KNOW the pinion depth is right on ;D and it only took 2 tries...
So tonight was cut a little short b/c my buddy's wife was really pushing for us to close up the "shop" by 10pm, so I only got 1 pattern after we kinda rushed through the carrier setup.
Backlash was .06 (spec we were using was anywhere between .04 and .10)
Looks a little deep, but I think once we torque that pinion nut down to 220 ft-lbs (it's currently at 100) I feel kinda confident about this one... what do you guys think of the pattern (AND the new tool!!!)
PS... Aussie locker came in today gonna go ahead and put that in too!!!
OK, I think we figured out that the problem had to do with the Pinion depth...
A little note, the housing came as a bare housing, so there was no initial shim pack to work from for anything, so we had to set pinion depth from scratch.
On top of that, the dial tool we were using, although it cost about $120, was just a joke... it bolted to where one of the end caps is, and had like 2 joints BEFORE the measurement! I mean, we're talking measurements in the thousandths, and there are 3 total possible sources of error??
Anyways, it became clear that we needed to move past this tool...
SO, i called up a buddy that works at a machine shop and had him do a little "overtime" work for me
We came up with a plate that bolts to all 4 holes for the end caps...I will tell you this... I KNOW the pinion depth is right on ;D and it only took 2 tries...
So tonight was cut a little short b/c my buddy's wife was really pushing for us to close up the "shop" by 10pm, so I only got 1 pattern after we kinda rushed through the carrier setup.
Backlash was .06 (spec we were using was anywhere between .04 and .10)
Looks a little deep, but I think once we torque that pinion nut down to 220 ft-lbs (it's currently at 100) I feel kinda confident about this one... what do you guys think of the pattern (AND the new tool!!!)
PS... Aussie locker came in today
gonna go ahead and put that in too!!!Attachments

Flintknapper
Sr. Member
Edit: Post no longer germane, info changed.
Last edited:
OP
OP
jesus888
Sr. Member
Thanks man! I did forget to mention that the gear set is new.
Flintknapper
Sr. Member
Thanks man! I did forget to mention that the gear set is new.
Well....that changes things then. Back to the "drive side" ;D
Devin
Bronco Kineticist
- Joined
- Apr 29, 2004
- Messages
- 3,956
Thin your paint out with a little bit of motor oil. Then, as stated before, make sure that you put a good amount of drag on the ring gear when you are making the pattern. Holding a hand against it just never cut it for me. I use a rolled up rag. It is really hard to see what your pattern is on the drive side.
HAIRRAZOR
Jr. Member
That tool looks like the one I built years ago and works very well. The one difference is I don't use the caps to hold it down just bolts and I have another hole where the bearing caps are so I can measure the bearing cap depth then measure the outside dia. of the bearing race to find the difference. Remember the surface of the bearing caps is not true centerline for the bearings and that will affect your pinion depth.
I gree with the others to thin out your pattern grease and keep good drag on the gears, also paint a set of teeth 180 deg from the first set to see if the carrier has any waves in it.
Hope this helps.
I gree with the others to thin out your pattern grease and keep good drag on the gears, also paint a set of teeth 180 deg from the first set to see if the carrier has any waves in it.
Hope this helps.
Pinion is too deep. Remove .009 from the pinion shim pack. Check that BL is in spec and take another pattern. It's very helpful if you post total pinion shim pack and backlash with your pics.
Pinion depth tools aren't the say all end all. They are only to get you close. The pattern is what determines final setup.
Pinion depth tools aren't the say all end all. They are only to get you close. The pattern is what determines final setup.
Flintknapper
Sr. Member
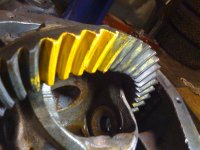
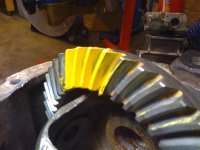
Here is one I did yesterday afternoon.
There is a variety of "acceptable" patterns depending upon whether the gear set is "used" or "new", Face Hobbed or Face Milled, etc...
But basically, this is pretty close to what you're looking for on a new set of gears.
Dana 44 TTB
3.73 & Lock-Right.
Drive side:

Coast side:

There is a variety of "acceptable" patterns depending upon whether the gear set is "used" or "new", Face Hobbed or Face Milled, etc...
But basically, this is pretty close to what you're looking for on a new set of gears.
Dana 44 TTB
3.73 & Lock-Right.
Drive side:
Coast side:
OP
OP
jesus888
Sr. Member
The pics aren't that good, but it looks like you are right in there now. I'd probably try to get the backlash a little tighter especially if they are new gears. Maybe just shim the ring gear side for preload will be enough to tighten the BL a hair.
What was the shim pack on the first pattern you posted?
What was the shim pack on the first pattern you posted?
Flintknapper
Sr. Member
The pics aren't that good, but it looks like you are right in there now. I'd probably try to get the backlash a little tighter especially if they are new gears. Maybe just shim the ring gear side for preload will be enough to tighten the BL a hair.
What was the shim pack on the first pattern you posted?
Agreed. He's "Top/Toe" just a little...but definitely in the ball park.
I'd like to see it moved toward the root a small amount, the pattern is running off the top land, but not bad. A bias toward the toe is no big deal...but it can be centered a bit better.
He's mighty darn close! ;D
Similar threads
- Replies
- 4
- Views
- 145
City: Redwood City
Price: $200
- Replies
- 0
- Views
- 113
- Replies
- 2
- Views
- 198