• Welcome to ClassicBroncos! - You are currently viewing the forums as a GUEST. To take advantage of all the site features, please take a moment to register. It's fast, simple and absolutely free. So please join our community today!
    If you have problems registering or can't log into your account, please contact Admin.

Dash removal

eb-nutt1

Sr. Member
Joined
Apr 17, 2006
Messages
612
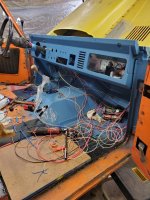
Never in 35 years have I had to remove the metal dash face, now the time has come. I have removed the two upper dash/windshield bolts, two small screw at the door frame dash junction, and lower two bolts, I assume there are still others hidden under the center dash area? Electrical fire necessitates dash removal and repair.

Thanks,
Brian
 

Madgyver

Bronco Madman
Joined
Jul 30, 2001
Messages
14,740
if you have a stock dash pad that has never been removed, there are screws on the back of the dash pad that connect to the metal dash back. windshield fold down is required to access the screws. also there is a center screw on the dash face that screws it to the firewall bracket. L-bracket on bottom corners has 3 bolts each side. above that there are a single screw each side that attaches dash to tub. driver's side bottom corner has parking brake bracket bolted to it. and of course steering wheel or column needs to be removed.
 

Attachments

  • 244942305_10220735946694628_3501942274715837990_n.jpg
    244942305_10220735946694628_3501942274715837990_n.jpg
    151.1 KB · Views: 47

helo-mech

Sr. Member
Joined
Jun 22, 2007
Messages
619
Watch it when you fold your windshield down; it WILL go all the way to the hood. I put foam blocks over my wipers to keep from having dings.

Now sure what year you have, but here is how I had to remove all of my dash components to get the dash out of my '76.

Tank Gauge Selector--Threaded washer that is removed from the front side of dash. I used a small punch and a hammer to get it to spin loose. After that the selector pulled out the back of the dash.

Ignition--Used a Paper Clip to push into the small hole under the key. Turned the key to the left until the key stopped and paper clip engaged the internal release. The pulled out on key. Once ignition was out. Turned ring on outside of dash opposite of ignition housing behind dash while pushing them together.

Brake Lamp-- Removed connector from back of dash and turned same as ignition housing.

Lights Knob--Loosened threaded washer, and kept turning to disengage hollow treaded bolt. (SEE LAST PIC) Then push release button on bottom of light diode housing. Knob and shaft will release. Took a couple of pushes to get it to let go.

Wipe/Wash--Loosened Allen Set Screw in knob and pulled off. Then loosened threaded washer. I left the control unit all together without disconnecting and wire and just let it hang behind the dash.

Lights/Wipe/Wash Lighted Indicator--Removed connector and pushed out thru the front of the dash by pushing from the rear. (Other Indicator Bar for Defrost/Heat/Temp the same)

Pull Defrost--Removed nut from behind dash that holds threaded shaft in place. Disconnected spring from flapper on air box under dash and pulled entire knob, shaft, cable and spring out thru the hole.

Heat/Fan--Same as Wipe/Wash Again I left it all connected and let it hang behind the dash.

Pull Temp-- Same as Pull Defrost. Except cable goes thru firewall to the heat control valve on the back of the engine. Once you disconnect the spring from control valve and have the nut removed from the shaft (behind dash) simply pull forward thru the front on the dash.
 

Attachments

  • Screen Shot 2021-10-11 at 11.01.08 PM.jpg
    Screen Shot 2021-10-11 at 11.01.08 PM.jpg
    73.6 KB · Views: 28
  • Picture 4.jpg
    Picture 4.jpg
    143.1 KB · Views: 29
Top