dave67fd
Bronco Guru
- Joined
- Sep 24, 2010
- Messages
- 2,863
Please tell me I'm dumb and missing something?
Here's my delema..
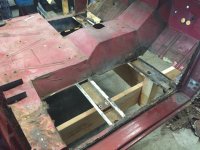
I have cut out the old front most passenger floor support channel and replaced with a new one (not yet welded). The old one is shown positioned next(below) the new floor support for comparison.
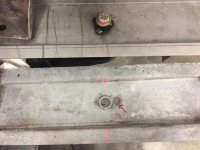
The original (old) floor support channel had a hole drilled just to the right of the factory body mount stud boss (see red arrow). In that location the flange end of the front support channel (were it meets the inner rocker) puts it "equal" with the flange end of the front "mid" floor support channel were "it" meets the inner rocker.
With the new support channel bolted in it's "proper" body mount hole, it puts the front most floor support channel flange a good 1/2" further out to the right than the "mid" floor channel flange.
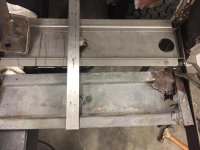
Both the "replacement" front floor support channel and the "original" front floor support channel are the same length and have the body mount stud boss hole in the same location (see laser mark lining up the holes).
The Mid support channel isin't or doesn't seem to be crushed or bent anywhere along it's length and it seemed to have been in it's relative proper location when the inner and outer rockers were removed.
This body at some point had a side hit at the lower rear passenger door/rocker area which did fold some of these areas in a bit but was pulled out (crudely enough) but was relatively in alignment after the fact.
Any ideas what might be happening here or some ideas on a resolve?
Thanks Brothers
Here's my delema..
I have cut out the old front most passenger floor support channel and replaced with a new one (not yet welded). The old one is shown positioned next(below) the new floor support for comparison.
The original (old) floor support channel had a hole drilled just to the right of the factory body mount stud boss (see red arrow). In that location the flange end of the front support channel (were it meets the inner rocker) puts it "equal" with the flange end of the front "mid" floor support channel were "it" meets the inner rocker.
With the new support channel bolted in it's "proper" body mount hole, it puts the front most floor support channel flange a good 1/2" further out to the right than the "mid" floor channel flange.
Both the "replacement" front floor support channel and the "original" front floor support channel are the same length and have the body mount stud boss hole in the same location (see laser mark lining up the holes).
The Mid support channel isin't or doesn't seem to be crushed or bent anywhere along it's length and it seemed to have been in it's relative proper location when the inner and outer rockers were removed.
This body at some point had a side hit at the lower rear passenger door/rocker area which did fold some of these areas in a bit but was pulled out (crudely enough) but was relatively in alignment after the fact.
Any ideas what might be happening here or some ideas on a resolve?
Thanks Brothers
Attachments


Last edited: