• Welcome to ClassicBroncos! - You are currently viewing the forums as a GUEST. To take advantage of all the site features, please take a moment to register. It's fast, simple and absolutely free. So please join our community today!
    If you have problems registering or can't log into your account, please contact Admin.

Hardtop resto

Torkman66

Contributor
Full Member
Joined
Apr 3, 2022
Messages
672
I’m going to start a full resto on my hardtop. Front lip is rusted out, several dents, a bit of a mess. However, I believe it is very restorable and can be made better than new.

I plan on cutting out all the rust and welding in new metal. I found that a 3/4” flat steel 1/8” thick flat stock fits perfectly flat on top of the rain gutters. I’ll fill the gutters level with epoxy resin and then cap the gutters with the 3/4” flat bars with welds every few inches. Use body short hair filler/sealer to smooth out the entire gutter areas.

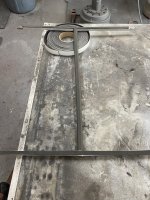
I’m making 4 additional roof supports from 1/2” square tubing that is the perfect size. I’ll place rubber between supports and roof.

Basic body work for dents including blocking. After paint, I’ll then line the entire roof with sound deadner before installing headliner.

Pics as the process takes shape. Any suggestions are very welcomed.
 
OP
OP
Torkman66

Torkman66

Contributor
Full Member
Joined
Apr 3, 2022
Messages
672
IMG_6716.jpeg
IMG_6712.jpeg
IMG_6711.jpeg
IMG_6709.jpeg
 
OP
OP
Torkman66

Torkman66

Contributor
Full Member
Joined
Apr 3, 2022
Messages
672
Dustless blasted entire top. Was very careful not to overheat and warp. Removed existing braces. Painted entire top in black epoxy 2 wet coats. Will start cutting out front lip metal and replace with new steel.
IMG_6719.jpeg
 
OP
OP
Torkman66

Torkman66

Contributor
Full Member
Joined
Apr 3, 2022
Messages
672
I have a friend that owns a dustless system. While it is a mobile system, I took the top to him. He turned the pressure way down because even though the water keeps the process fairly cool, the top's panel is so thin and large that it would be easy to warp. I had him blast to indutrial standard verses bare metal. Industrial standard means all the top material and rust is removed but not all the discolored stains embedded in the metal. You can see the result in the second pic above. Notice the variations of the metal tint. No rust left and no paint, just not taken down as deep as you can with a more stable panel. Two coats of quality epoxy primer and it is sealed.
 

Mikes79Bronco

New Member
Joined
May 26, 2023
Messages
132
Loc.
Homer Glen, IL
I have a friend that owns a dustless system. While it is a mobile system, I took the top to him. He turned the pressure way down because even though the water keeps the process fairly cool, the top's panel is so thin and large that it would be easy to warp. I had him blast to indutrial standard verses bare metal. Industrial standard means all the top material and rust is removed but not all the discolored stains embedded in the metal. You can see the result in the second pic above. Notice the variations of the metal tint. No rust left and no paint, just not taken down as deep as you can with a more stable panel. Two coats of quality epoxy primer and it is sealed.
That's a good friend to have during a restoration! I have a regular pressure pot setup, I've been curious about the dustless setups.
 
OP
OP
Torkman66

Torkman66

Contributor
Full Member
Joined
Apr 3, 2022
Messages
672
Have a few updates. Have top on 4 saw horses and that makes it the perfect height to work on. I started by reinstalling the roof supports. I removed them after blasting top and sure enough, lots of rust under them. Used wire wheel to clean up undersides.
IMG_7199.jpeg

Used roll of 1” closed cell rubber on supports and welded them back in place. I was able to use 2x4s between ground and roof wedged in and using the weight of the top to hold supports up tight against roof. I then fabricated additional supports in the center section using 1/2” square tubing. I used 1/2” solid bar stock for supports front and back.
IMG_7210.jpeg
IMG_7212.jpeg

I cut off the front rusted out gutter section. There were lots of spot welds to remove to get the old metal separated. I fabricated new metal and spot welded gutter rail. Front lip was cut straight across and then I used a 1/2” flat stock to rebuild front top edge. Welded gutter back on.
IMG_7202.jpeg
IMG_7203.jpeg
IMG_7206.jpeg

IMG_7222.jpg

I’m going to use Glass bondo to seal inside of gutters all the way around. Since the gutters are already epoxy primered and the Glass bondo is waterproof, that should seal that metal from future rust.
Today I’m using two part resin to fill gutters level all the way around. Then the gutters will all be capped with 3/4” flat stock.
 

Attachments

  • IMG_7208.jpeg
    IMG_7208.jpeg
    307.7 KB · Views: 38
Last edited:
OP
OP
Torkman66

Torkman66

Contributor
Full Member
Joined
Apr 3, 2022
Messages
672
Added more top supports so zero tin canning on top now.
IMG_7220.jpg


Cut out the last of the misc. rust holes and welded in new steel. As mentioned prior, I have used successfully in the past the "Glass" short haired bondo to seal welds. It sinks into the small weld crevasses and creates a waterproof seal. I applied a thin (approx. 1/16" thick) layer of Glass inside the rust free and epoxied gutters all the way around. Then I filled the gutters with two-part epoxy resin. The resin is waterproof, self-leveling, can be sanded and painted. It is also a bit flexible. I have built a few Dune buggies through the years, and resin works great for its adhesion, strength, and flexibility. It sands just like bondo, primes, and paints up great.
IMG_7229.jpg


Next step is to do the body work on the top and sides to include blocking, high build, and finally sealer before top coat in Wimbledon White.
Very happy with how the front edge came out. I was planning on capping the gutters on top of the resin with 3/4" steel flat bar, but have decided there is no need. The resin looks great and will sand to near perfectl;y flat along top of gutter edge.
 
Last edited:
OP
OP
Torkman66

Torkman66

Contributor
Full Member
Joined
Apr 3, 2022
Messages
672
Finished all the bondo work on the top and sides. Lots of little dings and dents to fill and block out. Finished filling in all the gutters and block sanded them level and flat. Applied two more coats of epoxy primer to the repair areas and bare steel that was exposed. Top looks great at this point, no more rust damage, and can sit as is until Im ready for high build, blocking and final top coat.
IMG_7241.jpg
IMG_7236.jpg
IMG_7239.jpg
IMG_7240.jpg

Overall this took about a week to accomplish pretty much fulltime (blasting, rust repair, final epoxy seal). These tops are very restorable as long as the rust has not penetrated too deep. The gutters, and especially the front gutter, seems to be the worst spot for rust...but that front lip is a fairly straight forward repair with new metal, alignment, and welding.

Ill post final pics in the fall when the top is painted. I'm away from my shop for the next 4 months so Bronco is on hold.:(
 
OP
OP
Torkman66

Torkman66

Contributor
Full Member
Joined
Apr 3, 2022
Messages
672
One last thing... The gutter metal is a separate piece from the top metal. The gutter metal wraps under the tops outer lip and is spot welded together on the underside. So when you "fill" in the gutters to keep future water from sitting in the gutter channels, there is a possibility that movement or twisting might happen under some conditions. This twisting might create a slight crack in the material used to fill the gutters. Given this possibility, I used SEM flexible, paintable seam sealer all around the top edge where the gutter meets the top. Of course, there was always seam sealer between the sides and the top which must be added as well.
IMG_7246.jpg
IMG_7248.jpg
IMG_7249.jpg
 
OP
OP
Torkman66

Torkman66

Contributor
Full Member
Joined
Apr 3, 2022
Messages
672
In my top fitment thread I mention how much work it takes to get gaps all correct with top, doors, windshield. One thing I’d do different with top resto is I would pre-fit it before resto and install some temporary cross supports at bottom edges where top bolts to quarters. Run two supports from passenger over to drivers side attached to the top. The top is thin metal and it bends and twists a lot when moving it. Don’t want to weld in new permanent supports or new metal if top happens to be in a slightly twisted or out of square position. The temporary cross supports will help to avoid this.
 
Top