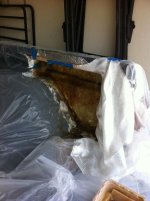
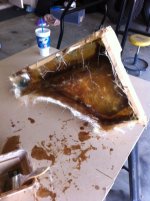
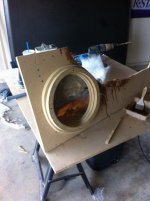
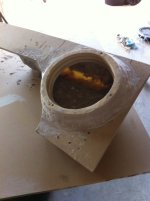
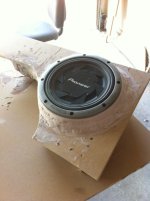
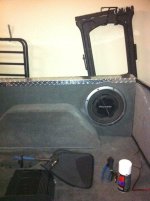
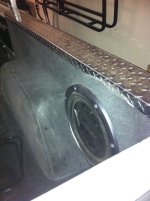
Now that I have the top off, I had to rethink the subwoofer placement. I had a box behind the rear seat, but I might as well put a neon "Steal me" sign on it the way it sat. I thought about bolting it down, but I like it easily removable for when I decide to fold and tumble the seat and load up the dogs for a ride. In the spirit of theft deterence, I went with a rear quarter install because the rear hoop of the cage will mount directly in front of it, making it impossible to remove the sub with the cage in place. Pretty basic install, fiberglassed a mold of the interior of the quarter, cut a 3/4" MDF panel, screwed/glassed them together, etc. I cut a couple spacer rings from MDF to bring the sub out 1.5" for basket clearance and overall airspace reasons. A little body filler to finish out the curves and some carpet and I'm in business. I didn't spend much time finish sanding the filler, since the carpet was backed and fairly thick, it shows nothing. Sounds pretty good for a 12" shallow mount in a topless vehicle. Here are a few pictures of the process. I'll post the final product when I get the cage, seats, etc. back in.
Community
Message Forum
Photo Gallery
Event Calendar
Book Reviews
Bronco Wallpaper
Bronco FAQ
Link Back to CB!
Photo Gallery
Event Calendar
Book Reviews
Bronco Wallpaper
Bronco FAQ
Link Back to CB!
Buy / Sell


Bronco Tech
3 Arm Wiper Setup
Fix Motor Mount
Roll Cage Braces
Throttle Body 65mm
Wheel Alignment
Heat Riser Replacement
Vent Window Repair
Center Console Mount
Straighten Bumper
Ford 6R80 6 spd
More Tech...
Fix Motor Mount
Roll Cage Braces
Throttle Body 65mm
Wheel Alignment
Heat Riser Replacement
Vent Window Repair
Center Console Mount
Straighten Bumper
Ford 6R80 6 spd
More Tech...

Install the app
-
Welcome to ClassicBroncos! - You are currently viewing the forums as a GUEST. To take advantage of all the site features, please take a moment to register. It's fast, simple and absolutely free. So please join our community today!If you have problems registering or can't log into your account, please contact Admin.
You are using an out of date browser. It may not display this or other websites correctly.
You should upgrade or use an alternative browser.
You should upgrade or use an alternative browser.
My Saturday Sub install... *PICS*
- Thread starter JK
- Start date
Chicago71Bronco
Sr. Member
Damn looks great. Wish I had your skills
Dennis112885
New Member
Did you have to make any electrical upgrades to run an amp and sub setup? I'd like to run a 4 channel for highs and a mono for a sub but my lights barely stay lit at night. So I'm thinking I might need to make some changes to do so.
Captain Ken
Full Member
That's fantastic! I'm wrestling with the same problem now and would be very happy to hire you to make a couple of more of those if you still have the mould.
WheelHorse
Bronco Guru
- Joined
- Nov 22, 2004
- Messages
- 2,492
Looks good man! How badly does the ole tin box rattle hitting the low bass?
Did you have to make any electrical upgrades to run an amp and sub setup? I'd like to run a 4 channel for highs and a mono for a sub but my lights barely stay lit at night. So I'm thinking I might need to make some changes to do so.
I did the 3G Alternator conversion. You can find it on here in a search. It's very basic and bumps you up to an internally regulated 130A charging system. I run the front highs (5.25's) off of the deck. The rear wakeboard tower speakers mounted to the cage are powered by two channels of a DB Drive Okur 125.4, with channel 3&4 bridged to the 12. Works pretty good and it fits under the rear seat.
That's fantastic! I'm wrestling with the same problem now and would be very happy to hire you to make a couple of more of those if you still have the mould.
I'd be happy to help anyone around here out if they wanted to give it a shot, but the glass mold is gonna be fairly vehicle specific. Carpet, original floors/fenders as opposed to replaced sheet metal, all things that could make the panel not fit worth a crap. You could go a bit smaller to be on the safe side, but you really need all the airspace you can squeeze out.
Totally love it - now you just need to make a few more, one for the other side and two for me!
The other side I just did a flat panel with no sub. There just isn't enough space for a real install on that side with the filler necks. An 8" maybe, a 10" tops, but no 12". I'll probably mount a fire extinguisher or something where the sub would be on the opposite side. If anyone wanted just a paper template of the actual trim panel, I could probably help ya out there...
Looks good man! How badly does the ole tin box rattle hitting the low bass?
No rattles yet. The top was the real rattle can. Now that it's off and the door inserts are in, not much left to rattle!
paul430c
Jr. Member
Great job! Enjoy.
KyleQ
Bronco Guru
- Joined
- Apr 24, 2008
- Messages
- 5,480
The other side I just did a flat panel with no sub. There just isn't enough space for a real install on that side with the filler necks. An 8" maybe, a 10" tops, but no 12". I'll probably mount a fire extinguisher or something where the sub would be on the opposite side. If anyone wanted just a paper template of the actual trim panel, I could probably help ya out there...
I'd be game for something to start with - if that entire enclose pops out you could measure each side so someone could reconstruct it out of some other material that isn't fiberglass
Looks awesome BTW - right now the only music I get form mine is a screaming 351W
SpareParts
Bronco Guru
- Joined
- Nov 13, 2004
- Messages
- 5,594
Looks good, can't wait till I'm done with my stretch so I can start my install.
Similar threads
City: San Martin, CA
Price: $12345
- Replies
- 8
- Views
- 394
- Replies
- 1
- Views
- 86
City: Berkeley Springs
- Replies
- 1
- Views
- 1K
- Replies
- 11
- Views
- 1K


