• Welcome to ClassicBroncos! - You are currently viewing the forums as a GUEST. To take advantage of all the site features, please take a moment to register. It's fast, simple and absolutely free. So please join our community today!
    If you have problems registering or can't log into your account, please contact Admin.

Repro seat cover install

Keaaubum

Newbie
Joined
Oct 4, 2017
Messages
5
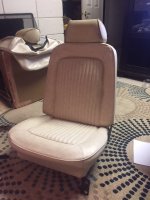
Hi all, finally at the point of installing new seat covers. I was all set to have done,but thought I might ask who may have done their own. I have adequate skills for mechanical, electrical,paint and body but have never tackled upholstery. I have TBP covers, new foam as well. Anyone care to share their experiences?
I am particular about the final appearance. Thanks in advance for advice
 

Hotrodjohn

Full Member
Joined
Feb 12, 2016
Messages
264
If you have the right hog ring pliers its not too bad. Trickiest part is getting those seat seams down through the foam and hogrings on the listing wire on bottom side. Look up 68 mustang seat rebuild, theres plenty of video on this.
 
Joined
Jun 8, 2018
Messages
34
Loc.
Garden City, MO
I put on Bronco Hut Ranger covers that have the cloth inserts, so they are at least a little different than yours. One trick I picked up was to use short wire to attach the foam rather than hog rings. It gives a lot more length to grab when trying to cinch the foam down for sharp profile shape. I don’t remember who gave me that one but it helped a ton. The hardest part for me to make look right was the top of the seat backs. You really need an extra piece of foam to bridge the seam where the front and back pieces come together. The rest of it was pretty straight forward but time consuming.
 

Pa PITT

Contributor
Bronco Guru
Joined
Jul 15, 2005
Messages
11,279
Loc.
Stephenville TEXAS
... I'd think if you have the general tech skills. Your still young with strong hands .. & Get a 2nd strong tech buddy to spend the day with you.
The 2 of you together can share ideas on howto. & Watch several You tubes .
I used to got to an upholstery shop to deleirvy paint.I watched the guys doing a lot of neat seat covers back in the day. It always seemed to me they had really strong hands. & It was all about pushing out the wrinkles.
 

SHX669

Bronco Guru
Joined
Jan 9, 2009
Messages
1,997
What they said ^ about the hog ring pliers .
I had a friend who used to do auto upholstery redo my seats . When he saw the pliers I got in " a kit" from one of the vendors he laughed and threw it back in to the box . He used silicone spray and a heat gun on the upholstery to make it easier to slide the new covers on and he was still sweating when it was over -- and said I owed him big time - LOL. - the new foam made it more difficult .
 

Rustytruck

Bronco Guru
Joined
Feb 24, 2002
Messages
10,875
The first one is really hard and will take close to 2 to 3 hours. the second one will take less than an hour once you have been through the first one. The hardest part is the seat bottom where you have to compress the springs and foam to put the hog rings on.

Use new foam if you want a good fit but it takes so much more strength to compress the assembly. Use a dry cleaners bag over the foam it helps the covers slide in place. just leave it in place it wont hurt anything. If your seat cover wires are bad use wire from coat hanger to replace it.
 

hankjr

Contributor
Bronco Guru
Joined
May 11, 2013
Messages
1,761
http://www.diyupholsterysupply.com/hog-ring-pliers-and-rings.html

buy extra hog rings too. They never give you enough hog rings for a beginner that screws up a few and have do overs.

Get a pair of compound side cutters to cut hog rings off.
https://www.amazon.com/DEWALT-DWHT70275-Compound-Diagonal-Cutters/dp/B006H8QJB8

this ^^

first cover i had less than 50% hog ring efficiency. second >90.

i made wire loops to grab listing wire and foam all at once. twisted together very tightly. wide zip ties might be easier but you would have to cut slits in listing wire pouch to get them through.

bright summer sun or a warm wood stove help make the covers easier to stretch

Hank
 
OP
OP
K

Keaaubum

Newbie
Joined
Oct 4, 2017
Messages
5
Thanks for all the replies everyone. These tips all will be useful. I always thought this was do-able, just had no idea where to start. Was unsure about the listing side step.
 

Rustytruck

Bronco Guru
Joined
Feb 24, 2002
Messages
10,875
Watch all the you tube videos on line concerning Bronco, Mustang and Cougar seat upholstery. Do only one seat at a time so if you get lost you have a finished model to look at. Do the top of the seat first. It is easier and not has hard on your hands and your strength. You need a large space to work. I used my dining room table that seats 6. Be prepared there are allot of sharp metal brackets that like to dig into stuff. The lower seat springs use to be covered in fabric and it will be wasted So have some heavy fabric to put between the springs and your new foam. Watch your language if there are kids around. You can do this, just don't take a break between stripping the seat and putting it back together. So you don't forget the steps putting it back together.
 

jbawall

Contributor
Full Member
Joined
Jul 14, 2004
Messages
317
Loc.
Edgewood, Washington
I did mine just before the northwest bronco roundup. Was a LOT harder than I thought it would be. Good tips in this thread that I think would have helped me. Zip ties and silicone spray especially. Turned out ok, most people won't notice the things that my eye keeps catching, but I can live with it. Next time around will be easier.
 

Attachments

  • IMG_2407.jpg
    IMG_2407.jpg
    165.2 KB · Views: 74
OP
OP
K

Keaaubum

Newbie
Joined
Oct 4, 2017
Messages
5
I did mine just before the northwest bronco roundup. Was a LOT harder than I thought it would be. Good tips in this thread that I think would have helped me. Zip ties and silicone spray especially. Turned out ok, most people won't notice the things that my eye keeps catching, but I can live with it. Next time around will be easier.

Now that looks real fine, makes me think patience is the key
 

hankjr

Contributor
Bronco Guru
Joined
May 11, 2013
Messages
1,761
i would like that the seat backs had an extra inch of foam on the front sides. i could not get them any tighter
IMG_3350.JPG

seats came out great
IMG_3183.JPG

i repopped these easy enough using the originals as a template
IMG_3157.jpg
IMG_3158.jpg

and this as well with burlap and music wire. i folded the burlap, ironed it nice and flat, poked the music wire through and wrapped around heavy wires, flattened back out and used 3m spray adhesive

IMG_3013.jpg
IMG_3181.JPG

Hank
 

pcf_mark

Bronco Guru
Joined
Jun 11, 2010
Messages
3,641
Rusty has some great links start there. What I would add:

1) Mark the center of the covers and the center of the seat with tape and sharpie. Always check your center a you move down each side so you do you pull it off center. This can move the pleats. You want your pleats on the bottom to align with the pleats on the back.

2) Set the covers in the sun for a few hours to soften them up

3) If you are struggling with the foam you can compress it to put the cover on the clip off what you used. For example I thread a piece of wire through the bottom of the foam, over a section if foam then back through the foam. Then I pull the wire down and tie of off. Three of these can really compress the foam an inch or so and make it small. Pull the over over get it centered and clipped in a few places. Cut the wire and pull it back through.
 
OP
OP
K

Keaaubum

Newbie
Joined
Oct 4, 2017
Messages
5
Thanks everyone. I think I am ready to try my hand at this. Tremendous amount of knowledge here
 

73azbronco

Contributor
Bronco Guru
Joined
Nov 11, 2007
Messages
8,197
Heat, heat is your friend., Not flamethrower heat, but really really warm.
 

Pa PITT

Contributor
Bronco Guru
Joined
Jul 15, 2005
Messages
11,279
Loc.
Stephenville TEXAS
FUNNY Your title says Heat Heat Heat. I remember those old shop would always have the Natural Gas Stove Pipe S HEATER RUNNING wHEN IT SEEMED LIKE wHY do you need it warn in here..
..
 
Top