|
|
Glove Box Relocation for Roll Cage
Installing
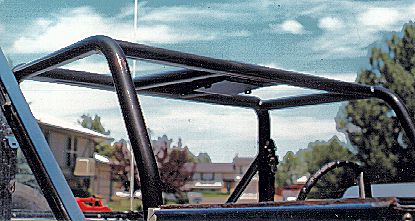
a front roll cage was actually quite a bit more
complicated and thought intensive than simply fitting some pre-bent
tubes together and welding them in place. It was all the work done to make
room for the cage that took the most time. Clearance becomes a premium
when deciding exactly where to install the cage. The main clearance problems
to consider when installing any front cage are:
-
All tops (hard, soft & bikini)
must fit after installation
-
Give adequate space between the
spreader bar and wiper motor
-
The parking brake will need enough
clearance (or modification)
-
The glove box won't have room
to open (modify, take off or keep permanently closed)
-
Wing windows need clearance (or
the door needs to be opened to fully open the wing windows)
-
Door window cranks may hit bars
 The tubes that come in the Smittybilt kit are long enough to give you some
leeway during installation. You have a few options to make sure that everything
still works the way it did before. You can either give adequate clearance
everywhere and deal with the vertical bars being very far back and possibly
interfering with driving and getting in and out of the truck...or...put
the bars right up against the dash and deal with not having your glove
box or parking brake...or...you can choose to modify everything,
create a lot of work for yourself, and turn a 3 hour cage installation
into a two week tear down of the entire interior. I went with the latter.
Glove Box Modification
 |
This is the stock glove box...and
as soon as a bar goes in there it becomes completely useless! Some people
never use their glove box anyway so it's no great loss, but if you like
the storage and (on some years) ever want to change any fuses, there are
a few options. You can take the door off and use it as an open storage
tray, you can hinge it on the right side instead of the bottom and open
it sideways (See Mr.
Ed for a good shot of this modification) or you can do what I did and
just move it. |
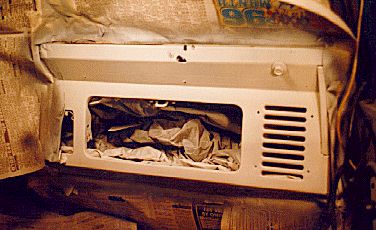
| This is what it looked like
when the jig saw blade finally came to a stop. I just traced a perfect
rectangle and cut clean, straight lines (well...not really. The corners
weren't square, and the lines were all over the place.) I should have actually
been more careful with the cuts. If I did it again I would use a square
and go nice and slow. The more square and straight the cut is the less
welding and filling you'll have to do later. |
 |
 |
The cut out frame needs a
little work before it can be turned up side down and expected to perform
the way it should. The hinges and latch need to swap positions so that
the hinges are on the new bottom and the latch is on top. Luckily there's
enough metal on both top and bottom to make this work. The lip on the old
latch side (the new bottom) is too wide for the hinges and needs to be
trimmed out as shown. The side to the left of the latch has not been trimmed
and the side to the right has. Then holes need to be drilled for the latch
and hinges. If you centered your cut top to bottom then everything should
work well with just the factory play in the hinge and latch screws (I wasn't
quite centered so I had to enlarge some holes) |
| After welding the frame back
in, grinding down all the welds, using a little bondo and repainting it,
I realized that I really should have painted the whole dash. And since
all the bezels on Bronco dashes are almost impossible to mask off, I took
the whole dash out to paint it. If I had known I was going to take it off
I would have welded it from behind and made my life a lot easier! I suppose
that's how working on a Bronco is sometimes. |
 |
 |
So here's the finished product.
The new glove box position will work out well I think. It keeps full use
of the box, door and hinges and puts the speaker grille behind the roll
bar where it really does about as much good as it did in it's stock location.
Now that the glove box problem is taken care of it's time to install
the actual cage. |
This Early Bronco site created and maintained by
Jon
Hanna -
Copyright ©
1996- All rights reserved. Privacy Statement
ClassicBroncos.com is not affiliated or associated with Ford Motor Company. Ford Bronco and Ford Bronco logos are property, copyright, trademarks and/or service marks of Ford Motor Company.
|


