Tech article by Jason Rodgers (Gummi Bear)
We’ve all had brake problems at one point or another, sometimes even the caliper is needing to be replaced. I’m going to show you how to rebuild one, to save the cost of a rebuilt unit. This is inexpensive, and pretty easy to do. Once you do one, the next one goes much faster.
For this article, I’m rebuilding the OEM calipers on my 76 Bronco. Tools: Air compressor, with blower nozzle Pick set Scotchbrite (or similar) pad Brake Cleaner Brake Fluid (Dot 3 in my case) Caliper Rebuild Kit (Autozone part # 66781) Big C-Clamp, or caliper compressor tool Safety Glasses Chemical Resistant Gloves
Safety first. Put on your safety glasses at all times when working in the shop, and use your chemical resistant gloves when using the brake cleaner.

Figure 1
The first thing is to remove the caliper from the vehicle, clean it up a little, and lay it out on your work surface (Figure 1)
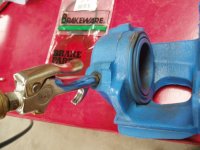
Figure 2
Next, take your air hose, with blower nozzle, and in very short bursts, work the piston out of the caliper. It will make a loud ‘POP’ sound, and is startling, so be ready, and don’t drop the piston on the floor where it can get nicked. (Figure 2) It may be necessary to put some electrical tape on the nozzle of your blower, to let it make a little better seal on the brake line opening. If the rings are so blown out that the air hose trick won’t work, you can re-attach the caliper to the vehicle, and have a buddy slowly pump the brakes to push the piston out (this will make a very big mess, be ready).

Figure 3
When it comes out, it will look like this (Figure 3)

Figure 4
My seals weren’t really leaking, but I had the axle all apart for rebuild, and there was plenty of funk on the piston anyhow. (Figure 4)
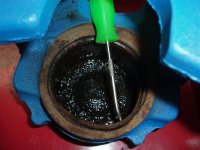
Figure 5.1

Figure 5.2
Use your picks to carefully remove the old O-Ring from the caliper body (Figures 5.1 & 5.2)

Figure 6
I don’t have a parts washer at the Farm, so I use my oil change pan for a cleaning surface. I use the brake cleaner to get the first bit of crud off of the piston and caliper (Figure 6)
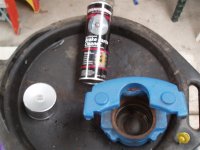
Figure 7
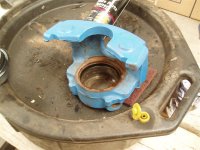
Figure 8
Scrub the inside of the caliper and the piston with the Scotchbrite pad, to remove any nicks and burrs, as well as any caked on old brake fluid (Figure 7 shows a clean piston, Figure 8 shows the crud inside the caliper body part way through cleaning) Now that it’s all clean, take the O-ring out of the kit package, coat it liberally with new brake fluid, and put it into the groove that you picked the old one out of in the caliper body.
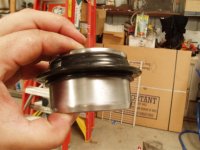
Figure 9
Slide the dust boot onto the piston, there is a groove for it, and make sure that it seats down nicely. This picture is for illustrative purposes, to show the proper orientation of it, you’ll slide it down in the next step to star the re-assembly process. When you compress the piston back in, just be sure that the skirt of the dust boot settles into this groove (I coat the dust boot with a little brake fluid where it goes onto the piston and caliper to make it slide nicely) (Figure 9)

Figure 10
Coat the o-rings, all sealing surfaces of the dust boot, and the piston itself with liberal amounts of brake fluid. Slide the dust boot down to the bottom of the piston, and work the bottom lip of it into the groove for it in the piston (the ‘flat’ side goes toward the caliper body, the ‘open’ side faces out where the brake pads will mount) (Figure 10)

Figure 11
Next, use your big C-Clamp to gently compress the piston back into the caliper (Figure 11) Be sure it doesn’t get out of line, or try to go in at an angle, take your time, and it’ll go in smoothly. If you so choose, now is a good time to replace the bleeder screw with a new one. Clean up your mess, and voila! you’ve just rebuilt your first brake caliper. It’s now ready to be re-installed on your rig for many more years of reliable service.
We’ve all had brake problems at one point or another, sometimes even the caliper is needing to be replaced. I’m going to show you how to rebuild one, to save the cost of a rebuilt unit. This is inexpensive, and pretty easy to do. Once you do one, the next one goes much faster.
For this article, I’m rebuilding the OEM calipers on my 76 Bronco. Tools: Air compressor, with blower nozzle Pick set Scotchbrite (or similar) pad Brake Cleaner Brake Fluid (Dot 3 in my case) Caliper Rebuild Kit (Autozone part # 66781) Big C-Clamp, or caliper compressor tool Safety Glasses Chemical Resistant Gloves
Safety first. Put on your safety glasses at all times when working in the shop, and use your chemical resistant gloves when using the brake cleaner.

Figure 1
The first thing is to remove the caliper from the vehicle, clean it up a little, and lay it out on your work surface (Figure 1)

Figure 2
Next, take your air hose, with blower nozzle, and in very short bursts, work the piston out of the caliper. It will make a loud ‘POP’ sound, and is startling, so be ready, and don’t drop the piston on the floor where it can get nicked. (Figure 2) It may be necessary to put some electrical tape on the nozzle of your blower, to let it make a little better seal on the brake line opening. If the rings are so blown out that the air hose trick won’t work, you can re-attach the caliper to the vehicle, and have a buddy slowly pump the brakes to push the piston out (this will make a very big mess, be ready).

Figure 3
When it comes out, it will look like this (Figure 3)

Figure 4
My seals weren’t really leaking, but I had the axle all apart for rebuild, and there was plenty of funk on the piston anyhow. (Figure 4)

Figure 5.1

Figure 5.2
Use your picks to carefully remove the old O-Ring from the caliper body (Figures 5.1 & 5.2)

Figure 6
I don’t have a parts washer at the Farm, so I use my oil change pan for a cleaning surface. I use the brake cleaner to get the first bit of crud off of the piston and caliper (Figure 6)

Figure 7

Figure 8
Scrub the inside of the caliper and the piston with the Scotchbrite pad, to remove any nicks and burrs, as well as any caked on old brake fluid (Figure 7 shows a clean piston, Figure 8 shows the crud inside the caliper body part way through cleaning) Now that it’s all clean, take the O-ring out of the kit package, coat it liberally with new brake fluid, and put it into the groove that you picked the old one out of in the caliper body.

Figure 9
Slide the dust boot onto the piston, there is a groove for it, and make sure that it seats down nicely. This picture is for illustrative purposes, to show the proper orientation of it, you’ll slide it down in the next step to star the re-assembly process. When you compress the piston back in, just be sure that the skirt of the dust boot settles into this groove (I coat the dust boot with a little brake fluid where it goes onto the piston and caliper to make it slide nicely) (Figure 9)

Figure 10
Coat the o-rings, all sealing surfaces of the dust boot, and the piston itself with liberal amounts of brake fluid. Slide the dust boot down to the bottom of the piston, and work the bottom lip of it into the groove for it in the piston (the ‘flat’ side goes toward the caliper body, the ‘open’ side faces out where the brake pads will mount) (Figure 10)

Figure 11
Next, use your big C-Clamp to gently compress the piston back into the caliper (Figure 11) Be sure it doesn’t get out of line, or try to go in at an angle, take your time, and it’ll go in smoothly. If you so choose, now is a good time to replace the bleeder screw with a new one. Clean up your mess, and voila! you’ve just rebuilt your first brake caliper. It’s now ready to be re-installed on your rig for many more years of reliable service.


