• Welcome to ClassicBroncos! - You are currently viewing the forums as a GUEST. To take advantage of all the site features, please take a moment to register. It's fast, simple and absolutely free. So please join our community today!
    If you have problems registering or can't log into your account, please contact Admin.

Tony's 69 Bronco Build

MyOriginal66

Bronco Guru
Joined
Aug 11, 2009
Messages
2,071
I can imagine. I'm in Toronto doing a show... My buddy who helped with building my chassis is 399, also Transpo mechanic.
 
OP
OP
Tom Hartz

Tom Hartz

Full Member
Joined
May 18, 2010
Messages
209
I am back from Louisiana and it feels great.
The Bronco is still at the body shop and in the next day or two I hope to see it.
I will take pictures and get you all a update.

Looking forward to getting started again.

Tom
 

MyOriginal66

Bronco Guru
Joined
Aug 11, 2009
Messages
2,071
Does this mean your ready to build me a spare tire carrier for my stock bumper :D

It's funny, I just came back today as well. But I gotta go back in a few. Sure does feel GREAT to be back in LA!

Can't wait to see the updates!
 
OP
OP
Tom Hartz

Tom Hartz

Full Member
Joined
May 18, 2010
Messages
209
Here is the update on the Bronco.
I have been out of town working for the last 7 months.
When I got home I was hoping to get the Bronco back from the body shop and do my final assembly.
Well not so much. Do to health reasons and another project (A 32 Ford.) Nick was not able to get everything done.
So in two weeks or so he should have enough done so I can bring it back to my place and get back to work.
I did take some more pictures. They are not the best because I could not get far enough back from the Bronco and the lighting is off.
So this is what I have for now.

attachment.php


attachment.php


Tom
 

Attachments

  • Photo Aug 30, 9 32 39 PM.jpg
    Photo Aug 30, 9 32 39 PM.jpg
    143.5 KB · Views: 190
  • Photo Aug 30, 9 32 59 PM.jpg
    Photo Aug 30, 9 32 59 PM.jpg
    101.3 KB · Views: 189
Last edited:
OP
OP
Tom Hartz

Tom Hartz

Full Member
Joined
May 18, 2010
Messages
209
The Bronco is back at the house.

attachment.php


The body and paint look great.

attachment.php


attachment.php


The dash was a challenge. I picked up a after market dash with the glove box moved over for the roll cage and it was blank so I could lay everything else out.
As I have found out with most of the after market body parts the fit is ok, but not great.
Nick (The body man.) took the outside of the dash where it mounts to the body and the center section of the after market one and welded them together.
He also used the original cut out for the glove box because the replacement one just did not fit right.

attachment.php


So now that she is back to my house I can get back to work.
I will keep you all posted.

Thanks again for looking...
 

Attachments

  • Photo Aug 30, 9 32 23 PM.jpg
    Photo Aug 30, 9 32 23 PM.jpg
    260.2 KB · Views: 191
  • Photo Aug 30, 9 32 34 PM.jpg
    Photo Aug 30, 9 32 34 PM.jpg
    120.5 KB · Views: 191
  • Photo Aug 30, 9 32 29 PM.jpg
    Photo Aug 30, 9 32 29 PM.jpg
    135.1 KB · Views: 191
  • Photo Aug 30, 9 32 26 PM.jpg
    Photo Aug 30, 9 32 26 PM.jpg
    95.3 KB · Views: 191
  • Photo Aug 30, 9 32 13 PM.jpg
    Photo Aug 30, 9 32 13 PM.jpg
    88.5 KB · Views: 13
Last edited:

tw322

Sr. Member
Joined
Dec 23, 2011
Messages
459
Man I really like the color, rims, cage.....it's all coming together and really looks good.
 

MyOriginal66

Bronco Guru
Joined
Aug 11, 2009
Messages
2,071
Cool, I'm in no rush. I'm in Toronto until November then more out of town till December. I'll be lucky to work on it before the holidays. But please keep me in mind if you get some time.

Anton
 
OP
OP
Tom Hartz

Tom Hartz

Full Member
Joined
May 18, 2010
Messages
209
Well I did a some work today.
The back seat needed a little help.

attachment.php


I had the frame powder coated and cut out new wood.

attachment.php


I also had the pedal assembly powder coated and put it into the Bronco.

attachment.php


The hydro boost and master cylinder were also installed.

attachment.php


Tomorrow I hope to get the lines hooked up and the fuel tanks mounted.

Again, thanks for looking...
 

Attachments

  • Photo Aug 30, 9 32 49 PM.jpg
    Photo Aug 30, 9 32 49 PM.jpg
    105 KB · Views: 204
  • Photo Aug 30, 9 32 44 PM.jpg
    Photo Aug 30, 9 32 44 PM.jpg
    83.3 KB · Views: 206
  • Photo Aug 30, 9 32 20 PM.jpg
    Photo Aug 30, 9 32 20 PM.jpg
    87.9 KB · Views: 206
  • Photo Aug 30, 9 32 16 PM.jpg
    Photo Aug 30, 9 32 16 PM.jpg
    134.6 KB · Views: 205
Last edited:

tw322

Sr. Member
Joined
Dec 23, 2011
Messages
459
Tom, I hear that you met my dad down at the building near Stock lumber. He told me you sent him a picture of this one you are working on. I really should make time to stop by since you are only about 2 mins from me. If you are ever my way, stop in. I am on Los Rogues near Santa Clarita Rd.
 
OP
OP
Tom Hartz

Tom Hartz

Full Member
Joined
May 18, 2010
Messages
209
Ok time for a update. I feel like this is the slow part of the project. Just working around the body makes me nervous and getting the parts to fit just right takes time.

I started installing the Vintage Air from BC Broncos. The first thing I did was to mount the Condenser in front of the Ron Davis radiator.

attachment.php


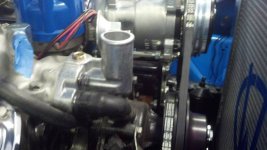
When I went to install the upper radiator hose I found out it will not clear the AC Compressor. I called Jason at BC Broncos and he said I needed to pick up a thermostat housing from a 5.0 Explorer or I think it was a 1993 to 1996 car with a 5.0.

This was the stock housing.

attachment.php


The Explorer housing goes straight up. I am also going to use a upper hose from a 1968 GTO and it looks like we will be good to go.

attachment.php


attachment.php


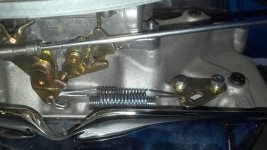
Now that we replaced the stock 2 barrel carb and manifold with a 4 barrel carb and manifold from Edelbrock the linkage would not work. I am finding out the fun just never stops. Getting the stock bell crank set up was not going to work and it was worn out. I found some parts from Mc-Master Carr and made up my own.

attachment.php


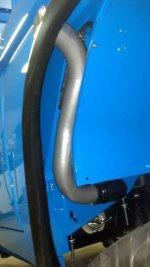
While under the hood I decided to run some of the hoses to the power steering and Hydro Boost set up from Wild Horses 4X4. The lines are not tight because I need to still install the steering and I am waiting for some brackets that are being powder coated. Also the return lines are not run because I am waiting for a power steering cooler that I ordered. With the power steering pump doing double duty I thought the fluid may heat up.

attachment.php


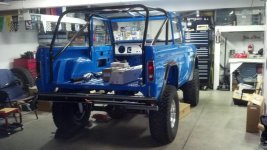
Since I am waiting for parts under the hood, I thought it would be a good idea to work under the Bronco.

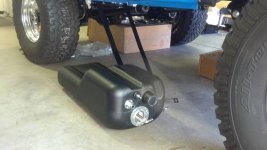
The auxiliary tank fell apart when I removed it so it had to be replaced.
Here is a shot of the replacement tank with the new sending unit installed.
The fit was great and went right into place.

attachment.php


The main tank had a crack around the filler neck and needed to be cleaned out. With all of that done, some fresh paint and a new sending unit it was ready to install.

attachment.php


The filler necks are powder coated and installed with new hoses. I also added a vent to the auxiliary tank. The factory tank did not have one but the replacement one did.

attachment.php


attachment.php


That is it for now. I will keep you all posted and again, thanks for looking.
 

Attachments

  • Photo Aug 30, 9 32 08 PM.jpg
    Photo Aug 30, 9 32 08 PM.jpg
    72.3 KB · Views: 203
  • Photo Aug 30, 9 31 31 PM.jpg
    Photo Aug 30, 9 31 31 PM.jpg
    82.4 KB · Views: 203
  • Photo Aug 30, 9 32 13 PM.jpg
    Photo Aug 30, 9 32 13 PM.jpg
    88.5 KB · Views: 201
  • Photo Aug 30, 9 29 15 PM.jpg
    Photo Aug 30, 9 29 15 PM.jpg
    87.6 KB · Views: 202
  • Photo Aug 30, 9 29 29 PM.jpg
    Photo Aug 30, 9 29 29 PM.jpg
    81.2 KB · Views: 202
  • Photo Aug 30, 9 31 55 PM.jpg
    Photo Aug 30, 9 31 55 PM.jpg
    60.7 KB · Views: 203
  • Photo Aug 30, 9 31 34 PM.jpg
    Photo Aug 30, 9 31 34 PM.jpg
    45.8 KB · Views: 200
  • Photo Aug 30, 9 31 41 PM.jpg
    Photo Aug 30, 9 31 41 PM.jpg
    38.4 KB · Views: 201
  • Photo Aug 30, 9 31 38 PM.jpg
    Photo Aug 30, 9 31 38 PM.jpg
    64.4 KB · Views: 200
  • Photo Aug 30, 9 31 28 PM.jpg
    Photo Aug 30, 9 31 28 PM.jpg
    67.2 KB · Views: 198
Last edited:
OP
OP
Tom Hartz

Tom Hartz

Full Member
Joined
May 18, 2010
Messages
209
The 1968 GTO upper radiator hose worked out great.

attachment.php


I do need to mention that the parts that I did not purchase from one of the Bronco vendors I have purchased from Johnny's Auto Parts in Santa Clarita, Ca. They are a old school auto parts store not a chain. If they don't have the part they will find it for you. Johnny's offers great service and pricing.

Before installing the Vintage Air I wanted to Dynamat behind it. I plan on doing Dynamat inside the rest of the body and the top to keep it cooler and quitter.

attachment.php


When I went to mount the Vintage Air unit on the firewall I did not like the idea of the unit hanging on 3 threaded inserts in the plastic housing.

attachment.php


I decided to make a bracket that is bolted to the firewall and will support the unit by the bottom and two of the inserts.

attachment.php


Next will be running the hoses and the controls.

The power steering cooler I ordered arrived yesterday so I wanted to mount that up and see how it fits. After I get the steering column installed I will run the hoses.

attachment.php


attachment.php


That is it for now.

Thank you.

Tom
 

Attachments

  • Photo Aug 30, 9 31 25 PM.jpg
    Photo Aug 30, 9 31 25 PM.jpg
    91.7 KB · Views: 200
  • Photo Aug 30, 9 30 28 PM.jpg
    Photo Aug 30, 9 30 28 PM.jpg
    123.5 KB · Views: 201
  • Photo Aug 30, 9 30 32 PM.jpg
    Photo Aug 30, 9 30 32 PM.jpg
    83.6 KB · Views: 199
  • Photo Aug 30, 9 31 15 PM.jpg
    Photo Aug 30, 9 31 15 PM.jpg
    86.5 KB · Views: 202
  • Photo Aug 30, 9 31 18 PM.jpg
    Photo Aug 30, 9 31 18 PM.jpg
    67.9 KB · Views: 199
  • Photo Aug 30, 9 31 22 PM.jpg
    Photo Aug 30, 9 31 22 PM.jpg
    84.5 KB · Views: 197
Last edited:

Ourobos

Bronco Guru
Joined
Jan 7, 2008
Messages
1,225
Loc.
Big Island Hawaii
Beautiful.. Wondering if your thoughts changed on the ride height now that some weight is in it? I think it has the aggressive 'can go off-road' look, and the added wheel well height shows off the great work done in that area also.
 
OP
OP
Tom Hartz

Tom Hartz

Full Member
Joined
May 18, 2010
Messages
209
Beautiful.. Wondering if your thoughts changed on the ride height now that some weight is in it? I think it has the aggressive 'can go off-road' look, and the added wheel well height shows off the great work done in that area also.

The more I look at it the more I like it. The front has dropped more than the rear. I am sure with the interior, top, glass, tailgate and the tire rack with tire and rim it should look fine. Not to mention when it does get driven the springs will settle more.
 
Top