• Welcome to ClassicBroncos! - You are currently viewing the forums as a GUEST. To take advantage of all the site features, please take a moment to register. It's fast, simple and absolutely free. So please join our community today!
    If you have problems registering or can't log into your account, please contact Admin.

Adjusting Fuel Gauge...info

Flintknapper

Sr. Member
Joined
Oct 23, 2007
Messages
582
Loc.
Deep East Texas
I've seen several posts here in the past related to adjusting the factory fuel gauge in the instrument cluster.

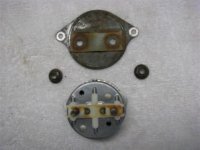
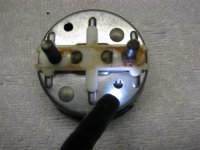
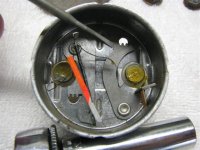
I replaced my sending unit today....and like many others here, my fuel gauge was inaccurate.

Mine always read past full when full, and showed about a 1/4 tank when empty. I adjusted it today along with a spare gauge I have.

I only post this because I took pics. of the two adjustment points for those who don't know about them.

Also, I removed the face of one the gauges so you can see exactly what it is you are adjusting (you wouldn't do this normally).

If someone is interested in posting the pics. here, email me and I'll send them to you so they can be put up here.

I like this site well enough that I think I'll become a "contributor" soon, but I don't really care to post pics. if they are going to be removed in 3 months.

Anyway, if anyone wants to post them...so others can see, just email me.
 

eb66to77

Bronc'Ownly
Joined
Mar 26, 2005
Messages
2,558
Loc.
NOVA
Flintknapper said:
The first shows the two nuts and the backing plate that need to be removed to expose the two adjustment holes.

The second pic. Shows a close up the adjuster that controls the needle in relation to the “Empty” position. The top left is for the “Full” position.

The last pic. simply shows what actually resides within the fuel gauge so that everyone can get a feel for what it is they are adjusting.

Note: The adjuster for the “Full” position has more movement in it than does the “Empty” one.

When making an adjustment be certain to put the two nuts back on the threaded studs before reattaching the leads. Otherwise, you may push the threaded stud into the gauge itself (they are just glued in).

A small screwdriver or other flat bladed object is all that is needed to move the adjuster.

Small amounts of movement (1/32”at a time) are all that is needed to get noticeable results on the gauge. Of course... this is done with the key in the “on” position and the sending unit set at the position desired (either up for full, or down for empty). Adjust one position at a time.

I did mine with the sending unit out of the tank, but the “full position” could be done “in tank” immediately after filling up, the empty position would require you to run out of fuel (not my first choice). Alternately, a person may be able to “tap” on the tank and get an idea how close to empty they were without actually running out.

I got the above from Mr Flintknapper. I am just posting pics for him. I actually need to do this myself
 

Attachments

  • fuelgage1.JPG
    fuelgage1.JPG
    34.9 KB · Views: 318
  • fuelgage2.JPG
    fuelgage2.JPG
    43.9 KB · Views: 334
  • fuelgage3.JPG
    fuelgage3.JPG
    52.4 KB · Views: 345

broncnaz

Bronco Guru
Joined
May 22, 2003
Messages
24,341
Should just write a tech article and submit it. If its accepted you can acquire contributer status for it.
 
OP
OP
Flintknapper

Flintknapper

Sr. Member
Joined
Oct 23, 2007
Messages
582
Loc.
Deep East Texas
Wow, this will come in helpful. I have never been able to get my gauge to read right with either tank.


Be certain to put the two nuts back on the threaded studs before pushing the wires back into place to test. The studs are just glued in place and when old... will push back into the gauge if you don't use the nuts. (could damage something)

Also, move the cogged arms in small increments (1/32"). It doesn't take much to get movement of the needle.

I did the "empty" side of mine first, then went to the "full" setting. I noticed when I adjusted the "full" setting it had a slight affect on the "empty" and I had to readjust it a bit.

Plan on tinkering with it few minutes, but... it's well worth the effort IMO. Mine is dead on now.
 

bknbronco

Bronco Guru
Joined
Jan 17, 2011
Messages
4,378
Loc.
North Metro, MN
Sweet!!!!!!!!!!!!!!!!!!!!!!!!!!!!!! Im gona try this. Mine only reads 3/4 when its full!

And i can repaint the needle!

Note: a torx T15 worked for me better than anyother tool i had. I could put it in the hole and the cogs matched up perfectly. Then just twist a bit. I felt better twisting slightly than prying!
 
Last edited:

surfer-b

Contributor
Bronco Guru
Joined
Sep 7, 2006
Messages
2,973
Good info, I would guess that the sending unit in the aux tank will need to be changed to the same as the rear or it will read off as well.
 

Old School

Sr. Member
Joined
Jun 22, 2011
Messages
440
Loc.
AZ
Cool!
Would this work on a temp gauge?

My 84 F150 shows about a half gauge too hot.
 

DirtDonk

Contributor
Bronco Guru
Joined
Nov 3, 2003
Messages
47,550
Great info Flintknapper. If you write a tech article, don't forget to mention to verify that the other components are working properly too. In your case, you had a new sending unit, but many may be using the original one still.
Some things to take into account:

1. Condition of wire and connections, especially if an old original harness.
2. Condition of grounding circuits between the different components, especially if still the old original wiring.
3. Ohm readings of the sending unit. Even if it's new, it doesn't hurt to verify that it's at least close to factory specs.
4. Proper grounding through it's case, and voltage readings coming out of the IVR.

Original IVR's are usually adjustable to a certain extent, so if you feel that the other gauges are reading out of spec (either all high, or all low) you can re-adjust it to factory specs.

And if adjusting the gauge does not quite get you where you need to be at both the top and bottom ends of the scale, you can fine-tune it by adjusting the sending unit stops and rod angles.

Original grounding of the instrument cluster to the dash deteriorates over time too, so adding a separate grounding wire between the cluster and the dash, and the dash and the body, won't hurt things a bit.

Checking those things first will make sure that adjusting the gauge works best and stays working for the long haul
If one or more of the other items are too far out of spec though, then adjusting the gauge will probably not be enough on it's own.

Thanks again for the tech, especially with pics.

Paul
 
Top