• Just a reminder that you won't be able to start new posts or reply to existings posts in the Archive forum.

    This is where all the old posts go so they can still be used for reference and searched.
  • Welcome to ClassicBroncos! - You are currently viewing the forums as a GUEST. To take advantage of all the site features, please take a moment to register. It's fast, simple and absolutely free. So please join our community today!
    If you have problems registering or can't log into your account, please contact Admin.

21 Pounds of welding wire .... Yes "Junko" Will live!

Stutsmo

Contributor
Bronco Guru
Joined
Jan 24, 2009
Messages
2,549
OK so here is my “new” project. This Bronco is going to be compiled of parts from 2 previous builds. 1 of the builds couldn’t continue due to titling issues, and I just wasn’t happy with the appearance of other Bronco. With today’s economy I just can’t support 2 Broncos like I would like to So I am taking the best parts from both of those builds and Then I will be selling off all the parts I’m not using except for the good 66 tub which I will save for a future project.
The half cab has always been my favorite body style so I am glad that I have a saved a U14 frame and can build this bronco and it appear somewhat “original” My plans are for a solid everyday driver that I can work it and light wheel it and then wash it off and drive it to show and shine.
One of my goals is to do this with parts I already have and do the work myself with as much help as I can get from my friends.So here are some Details on what I am building.
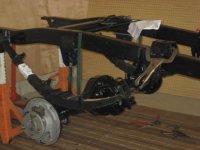
1966 U14
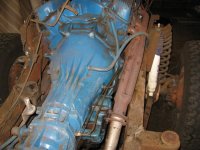
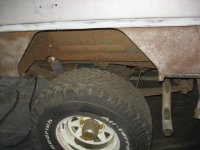
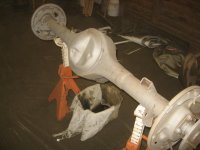
Dana 44 disc brakes limited slip front axle, 9”rear posi 3.50 gears. 351W and C6 Trans with a NP205 transfer case, 3.5” James Duff Monster Suspension with 32 X11.50 BFG All Terrains (for now). 4x4x2 steering box and hydro boost brakes 2” Body lift. I am going to paint this one surprise blue with a single stage paint I have, I can’t remember if it is a light blue or a dark blue hence the name Surprise Blue”.

I will need to buy a few more parts like Shorty headers /Exhaust and steering linkage/ adjustable trac bar, but I think that is all I will have to buy yet….

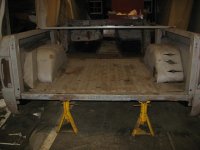
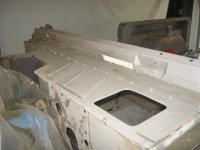
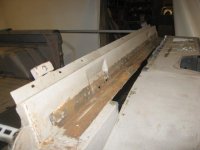
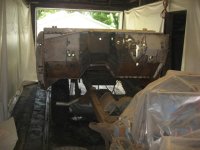
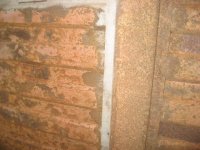
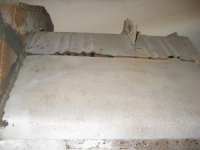
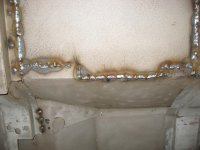
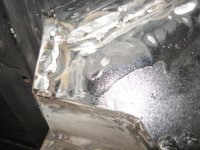
Enough of the details here are some pics! I'll start out with pics of getting parts cleaned up. This tub was pretty trashed when I got it..... you can follow this link if you want to see all the rust. 67 Build
 

Attachments

  • IMG_3233.JPG
    IMG_3233.JPG
    41.8 KB · Views: 145
  • IMG_3234.JPG
    IMG_3234.JPG
    42.6 KB · Views: 134
  • IMG_3235.JPG
    IMG_3235.JPG
    53.7 KB · Views: 141
  • IMG_3236.JPG
    IMG_3236.JPG
    49.8 KB · Views: 154
  • IMG_3237.JPG
    IMG_3237.JPG
    56.2 KB · Views: 145
  • IMG_3238.JPG
    IMG_3238.JPG
    41.3 KB · Views: 138
  • IMG_3239.JPG
    IMG_3239.JPG
    53.7 KB · Views: 139
  • IMG_3244.JPG
    IMG_3244.JPG
    60.3 KB · Views: 115
  • IMG_3243.JPG
    IMG_3243.JPG
    51.1 KB · Views: 129
  • IMG_3242.JPG
    IMG_3242.JPG
    43.5 KB · Views: 127
  • IMG_3241.JPG
    IMG_3241.JPG
    43.7 KB · Views: 121
  • IMG_3240.JPG
    IMG_3240.JPG
    55.4 KB · Views: 132
Last edited:
OP
OP
Stutsmo

Stutsmo

Contributor
Bronco Guru
Joined
Jan 24, 2009
Messages
2,549
More pics

Here are some more body pics. Thanks for the help Frenchy Smile for the camera!
 

Attachments

  • IMG_3252.JPG
    IMG_3252.JPG
    59.8 KB · Views: 231
  • IMG_3251.JPG
    IMG_3251.JPG
    50.2 KB · Views: 141
  • IMG_3250.JPG
    IMG_3250.JPG
    51.3 KB · Views: 141
  • IMG_3249.JPG
    IMG_3249.JPG
    45.1 KB · Views: 118
  • IMG_3248.JPG
    IMG_3248.JPG
    49.6 KB · Views: 146
  • IMG_3247.JPG
    IMG_3247.JPG
    51.2 KB · Views: 114
  • IMG_3246.JPG
    IMG_3246.JPG
    44.5 KB · Views: 120
  • IMG_3245.JPG
    IMG_3245.JPG
    61.9 KB · Views: 114
  • IMG_3253.JPG
    IMG_3253.JPG
    39.4 KB · Views: 126
OP
OP
Stutsmo

Stutsmo

Contributor
Bronco Guru
Joined
Jan 24, 2009
Messages
2,549
More pics

Here are some good pics of the rust that was on this body and some of the welding that has to be done to fix it.
 

Attachments

  • IMG_3264.JPG
    IMG_3264.JPG
    46.1 KB · Views: 76
  • IMG_3263.JPG
    IMG_3263.JPG
    45.5 KB · Views: 77
  • IMG_3262.JPG
    IMG_3262.JPG
    48.4 KB · Views: 82
  • IMG_3261.JPG
    IMG_3261.JPG
    46.9 KB · Views: 82
  • IMG_3260.JPG
    IMG_3260.JPG
    65.2 KB · Views: 79
  • IMG_3259.JPG
    IMG_3259.JPG
    68.4 KB · Views: 85
  • IMG_3258.JPG
    IMG_3258.JPG
    46.7 KB · Views: 87
  • IMG_3257.JPG
    IMG_3257.JPG
    42.2 KB · Views: 90
  • IMG_3268.JPG
    IMG_3268.JPG
    36.7 KB · Views: 86
  • IMG_3267.JPG
    IMG_3267.JPG
    53.1 KB · Views: 71
  • IMG_3266.JPG
    IMG_3266.JPG
    43.8 KB · Views: 70
  • IMG_3265.JPG
    IMG_3265.JPG
    39.1 KB · Views: 73
OP
OP
Stutsmo

Stutsmo

Contributor
Bronco Guru
Joined
Jan 24, 2009
Messages
2,549
More Body Pics

here are the last of weld pics and also I got alot of it covered with the first coat of POR15
 

Attachments

  • IMG_3329.JPG
    IMG_3329.JPG
    39.6 KB · Views: 87
  • IMG_3328.JPG
    IMG_3328.JPG
    46.8 KB · Views: 92
  • IMG_3327.JPG
    IMG_3327.JPG
    42.6 KB · Views: 93
  • IMG_3326.JPG
    IMG_3326.JPG
    49.7 KB · Views: 109
  • IMG_3271.JPG
    IMG_3271.JPG
    50.3 KB · Views: 103
  • IMG_3270.JPG
    IMG_3270.JPG
    51.9 KB · Views: 100
  • IMG_3269.JPG
    IMG_3269.JPG
    47.9 KB · Views: 98
OP
OP
Stutsmo

Stutsmo

Contributor
Bronco Guru
Joined
Jan 24, 2009
Messages
2,549
The "Other Bronco"

Here are some pics From yesterday when Mike and Vince came over to help things along. Thanks for the help guys!!
 

Attachments

  • IMG_3311.JPG
    IMG_3311.JPG
    45.9 KB · Views: 132
  • IMG_3310.JPG
    IMG_3310.JPG
    46 KB · Views: 159
  • IMG_3309.JPG
    IMG_3309.JPG
    48.6 KB · Views: 137
  • IMG_3274.JPG
    IMG_3274.JPG
    37.1 KB · Views: 116
  • IMG_3256.JPG
    IMG_3256.JPG
    46.4 KB · Views: 115
  • IMG_3255.JPG
    IMG_3255.JPG
    40.5 KB · Views: 108
  • IMG_3254.JPG
    IMG_3254.JPG
    50.9 KB · Views: 111
  • IMG_3312.JPG
    IMG_3312.JPG
    50.3 KB · Views: 124
  • IMG_3318.JPG
    IMG_3318.JPG
    57.9 KB · Views: 172
  • IMG_3319.JPG
    IMG_3319.JPG
    41.2 KB · Views: 149
  • IMG_3320.JPG
    IMG_3320.JPG
    44.2 KB · Views: 186
OP
OP
Stutsmo

Stutsmo

Contributor
Bronco Guru
Joined
Jan 24, 2009
Messages
2,549
It is still my Goal! but realistically it will probably be labor day weekend!;D
 

72_EB

Contributor
66to77
Joined
Feb 4, 2003
Messages
4,963
Good stuff man. Coming together nice. Sorry I missed out on the fun. Busy weekend. Keep those pics coming! ;D
 

WheelHorse

Bronco Guru
Joined
Nov 22, 2004
Messages
2,491
After the POR 15, I'd do up some waxyol or whatever that stuff is for additional protection. IN. salt is rough stuff.
 
OP
OP
Stutsmo

Stutsmo

Contributor
Bronco Guru
Joined
Jan 24, 2009
Messages
2,549
5.5 lift with 32's?

Yea might have to save up some $$$$ before I can get some new tires. I broke the bank this morning ordering some headers and exhaust. I will be putting on a 35" tire on stock 16" rims eventually.

WheelHorse After the POR 15, I'd do up some waxyol or whatever that stuff is for additional protection. IN. salt is rough stuff.


I plan on using POR 15's primer over it and then top coating with either raptor liner or Al’s liner. I haven’t decided which one to go with yet.
 
OP
OP
Stutsmo

Stutsmo

Contributor
Bronco Guru
Joined
Jan 24, 2009
Messages
2,549
Body progress....

I have been working on the bottom of the tub this week, progress is a lot slower than I wanted it to be but I am going to keep after it and get it done as quick as I can. I painted the bottom of the tub because it was starting to rust again. I still had some welding to do so I just took the angle grinder to it and cleaned the paint back off where I need to weld.

I am going over the bottom of the tub and removing the unnecessary metal that was left over from when I replaced the floor and raised the trans tunnel, I just wanted to clean it up a bit and make it so the snow and salt doesn’t have anywhere to build up on the floor. I have a few more pics and as you can see I still can’t weld very good… Oh well practice makes perfect! %)
I hope to get the rest welded up tonight so I can get the 2nd coat of POR15 on it and get it back up on the frame by the weekend.
 

Attachments

  • IMG_3334.JPG
    IMG_3334.JPG
    68.1 KB · Views: 111
  • IMG_3331.JPG
    IMG_3331.JPG
    59.5 KB · Views: 105
  • IMG_3333.JPG
    IMG_3333.JPG
    54.2 KB · Views: 103
  • IMG_3332.JPG
    IMG_3332.JPG
    37.4 KB · Views: 102
  • IMG_3330.JPG
    IMG_3330.JPG
    43.7 KB · Views: 109
  • IMG_3335.JPG
    IMG_3335.JPG
    53.1 KB · Views: 102
  • IMG_3336.JPG
    IMG_3336.JPG
    40.1 KB · Views: 95
  • IMG_3337.JPG
    IMG_3337.JPG
    50.2 KB · Views: 90
Last edited:
OP
OP
Stutsmo

Stutsmo

Contributor
Bronco Guru
Joined
Jan 24, 2009
Messages
2,549
Chassis progress.

Chassis progress…

Not much to report. I haven’t done anything on the chassis this week except order the parts that were missing out of the suspension kit. :mad: that was aggravating having to spend that money twice. Just goes to show you should always check your parts when you get them so any shortages can be taken care of immediately. I put in an order for my exhaust and adjustable trac bar.
I had to order new rear leaf retainers and u bolts because I ordered the suspension kit for a 66 which has a smaller axle tube than a 77 axle.

I am hoping to get some more help this weekend and get the front springs and shocks on. Ill update with pics when I get it done.
 
OP
OP
Stutsmo

Stutsmo

Contributor
Bronco Guru
Joined
Jan 24, 2009
Messages
2,549
I got some help today! Elkhart Bronco came over and did some welding on the body I am very happy with the way the tub has cleaned up so far. I hope to have the rest of the body patches welded in by next weekend so I can get it painted and back on the frame.

Also I had a guy that my mother in law works with come help me out today on the suspension. I only talked to him a few times before today, He heard I was “working on a Bronco” and he wanted to come help out. How cool is that?! It’s pretty cool the interest that these Bronco’s Get… And the friends that I have made just because I have one. Well I appreciate everyone that has come and helped me with this build so far I wouldn’t be this far along without them.

I learned a few things about building Bronco’s today so I figured I would share them with everyone.
1. Make sure your feet are not under the backing plate when you get done installing the U bolts on the 9”….. that axle drops farther than you think when you pull the jack out.
2. James duff suspension kits are nice, but the hardware they send seems like all the bolts are about 2” too long
3. James duff suspensions look really cool sitting on a freshly painted frame.
4. Read directions they help if you have never done it before.
5. 2 trips to the hardware store is about average for a Bronco work day.
6. Mile marker hubs are shiny and they turn really easy (don’t they Bill?!)


Last but not least it is actually pretty nice to have great vendors to go to. Without them I wouldn’t be doing this. so in case they might read this some time I just want to say thanks to Suzy, Chuck, And Jeff.

Don’t worry other vendors…. I just haven’t gotten to you yet!

I left my camera in the shop so ill post some progress pics later.
 
OP
OP
Stutsmo

Stutsmo

Contributor
Bronco Guru
Joined
Jan 24, 2009
Messages
2,549
cowl pics

WE flipped the Bronco back over and Elkhart Bronco started welding my cowl back together for me.

While he was doing that me and Travis worked on the suspension.
 

Attachments

  • IMG_3345.JPG
    IMG_3345.JPG
    46.1 KB · Views: 72
  • IMG_3346.JPG
    IMG_3346.JPG
    55.7 KB · Views: 75
  • IMG_3349.JPG
    IMG_3349.JPG
    55.7 KB · Views: 73
  • IMG_3348.JPG
    IMG_3348.JPG
    54.3 KB · Views: 76
  • IMG_3347.JPG
    IMG_3347.JPG
    53.8 KB · Views: 79
  • IMG_3350.JPG
    IMG_3350.JPG
    46 KB · Views: 95
  • IMG_3351.JPG
    IMG_3351.JPG
    64.4 KB · Views: 116
OP
OP
Stutsmo

Stutsmo

Contributor
Bronco Guru
Joined
Jan 24, 2009
Messages
2,549
Engine is out.

Today I worked on getting the engine and transmission off the old frame. I got a pretty good picture of just how close the exhaust was to the side of the transmission. I am hoping my new B.C broncos 2 into 1 exhaust will fix this problem.

I will have to clean the engine and transmission up and paint them before I put them on the new frame but friday is the goal to have them painted and installed.

The old frame and axles will be going in the classifieds this week. I need to start getting rid of some of the stuff I wont be using.
 

Attachments

  • IMG_3353.JPG
    IMG_3353.JPG
    79.3 KB · Views: 53
  • IMG_3354.JPG
    IMG_3354.JPG
    73.5 KB · Views: 54
  • IMG_3355.JPG
    IMG_3355.JPG
    75.3 KB · Views: 47
  • IMG_3356.JPG
    IMG_3356.JPG
    46.5 KB · Views: 53
  • IMG_3357.JPG
    IMG_3357.JPG
    42.1 KB · Views: 48
OP
OP
Stutsmo

Stutsmo

Contributor
Bronco Guru
Joined
Jan 24, 2009
Messages
2,549
Ok so I didnt make my due date so it is time to slow down and stop working on it every day. Ill get back to it after I take a little break. It is just time to do something else for a while.
 
OP
OP
Stutsmo

Stutsmo

Contributor
Bronco Guru
Joined
Jan 24, 2009
Messages
2,549
I changed my Username....

I changed my username but I am still the same ole Broncofreak…… Stutsmo is just variation of my last name and is how I am known buy most of my Co-Workers. Long story short I was asked to quit using the word "Freak" around home so I just decided to change it on classic Broncos also.


I did a few things this weekend on the build.

First I got the engine and transmission painted and set on the new frame. After I got that done it motivated me to keep going on this thing. So the lesson I learned the hard way this week is:
When you are doing a frame off….. make sure you put your track bar on before you set the engine and tranny on the frame and suspension. I didn’t do any damage but I thought it was all going to end up on the floor for a minute there!

Elkhart Bronco came over and did some more welding on the cowl and I believe it is all done now. So I hope that this weekend we will move on to the rest of the tub. There is a lot of welding left to do but when it is done I am going to have a decent body to work with.

Ill add the pics when my contributor status updates.
 
Top