• Welcome to ClassicBroncos! - You are currently viewing the forums as a GUEST. To take advantage of all the site features, please take a moment to register. It's fast, simple and absolutely free. So please join our community today!
    If you have problems registering or can't log into your account, please contact Admin.

Barn Find to Daily Driver - a "Drive it Ugly" '69 Bronco Project!

OP
OP
bulletpruf

bulletpruf

Contributor
Full Member
Joined
Mar 31, 2019
Messages
419
Loc.
San Antonio, TX
Your choice on the head gaskets. stock ford gaskets back when broncos were built were clad in steel after time the steel corrodes and the gaskets fail. the more it sits with bad coolant the worse it is.

You just might be right...see below update...

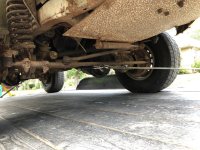
Got the tank selector valve installed and plumbed. This is the aftermarket valve, and it's just not a good fit because of how the fittings are configured. I ended up finding a good used one locally (maybe from a '73 Bronco?) that's similar to my original one. I'll either use it, or just parts from it to rebuild my original one.

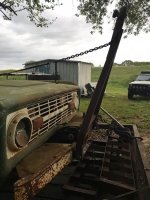
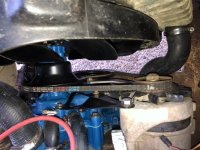
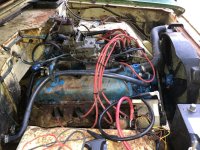
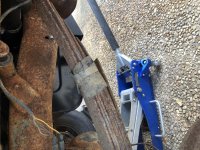
Got the radiator installed and then managed to snap off two bolts for the fan shroud mount. Par for the course for old rusty stuff. So I pulled it back out, drilled out the bolts, then tapped to the next larger size. Then I noticed the fan had some interference issues with the fan shroud, so that took some tweaking... As usual, what should have been a 5 minute job ended up taking well over an hour.

When it was all back together, it wouldn't start. Realized the rebuilt fuel pump wasn't pumping, so I swapped it out with the generic parts store pump that was on the truck when I got it. Truck is running again. I'll have to disassemble the original pump and see if I can figure out went wrong.

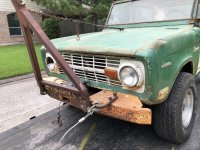
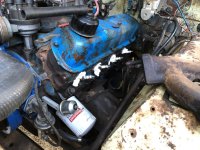
Anyway, I got it all back together, and running. No interference issues with the fan. Fuel pump is pumping fine, no fuel leaks, tank selector valve is working, freshly painted correct crank and water pump pulleys are good to go with perfect alignment and no squeaking, etc.

I did notice some coolant on the passenger side floor after it ran a bit, so my heater core has a leak. That's not surprising at all, so I yanked the heater hoses, put some rubber caps on the core inlet/outlet, and connected a single hose from the water pump to the intake.

Once that issue was addressed, I figured I'd work on tuning it a bit. Seems to like about 12* timing at idle, but before I could get timing and mixture really dialed in with a vacuum gauge, Murphy struck again...

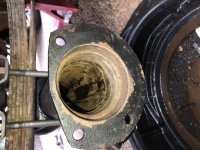
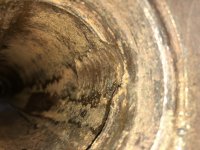
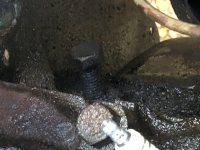
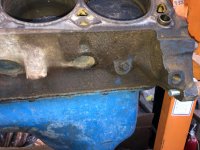
I'm getting a LOT of smoke coming off the driver's side of the motor once it warms up. It's coming from behind the exhaust manifold, and it's thick white smoke. What's weird is that it starts all at once; it's not there until it warms up a bit and then it comes on like gangbusters. Checked oil; not milky at all. Not leaking oil from the valve cover. No evidence of oil in the coolant, either. I also did a compression test on all the cylinders in that bank and none were changed from the original test.

Bottom line - it's either a head gasket or a freeze plug has a pinhole leak spraying on the exhaust manifold. Either way, the motor is coming out, and if I'm going that far, I'm going to tear it down and rebuild it. Should have done this a while back, given what I've had to do with the engine still installed, but live and learn, I guess.

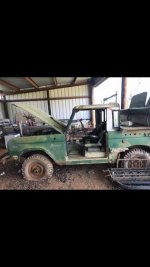
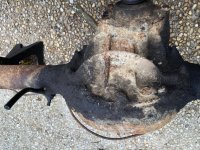
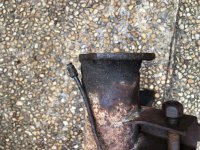
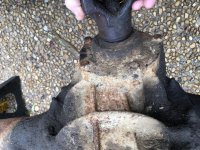
I'm a bit torn on the way ahead. I have two Broncos. One that I'll keep and one that I'll sell. The keeper is going to get a nicely built 347 with good heads (AFR aluminum with 170cc intake runners and 63cc chambers, I think), the NP-435 4 speed, and the Dana 44 front diff. The one I'm going to sell will get a mild 302 (rebuilt, .030, small cam, good intake, carb, etc), Dana 30 up front, and probably the C4 automatic.

Had planned to sell this Bronco and keep the '68, but may end up flip-flopping because this one is definitely more solid.
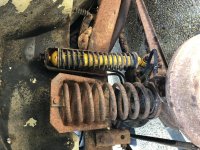
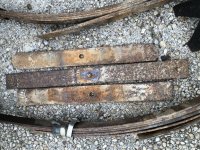
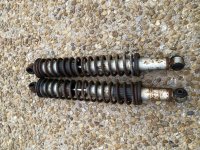
 

Attachments

  • IMG_6300.jpg
    IMG_6300.jpg
    116.8 KB · Views: 56
  • IMG_6301.jpg
    IMG_6301.jpg
    166.8 KB · Views: 56
OP
OP
bulletpruf

bulletpruf

Contributor
Full Member
Joined
Mar 31, 2019
Messages
419
Loc.
San Antonio, TX
More progress...and some interesting half-ass repairs made by the PO...

First, I managed to pull the driver's side exhaust manifold without breaking of a bolt or a stud. I'm going to chalk that up to a liberal soaking in Kroil. Anyway, I didn't see an obvious source the the leak, but I still need to clean the area up a bit and do some more looking.

I did see something interesting, however -- a bolt that really looked out of place on the side off the block below #8 cylinder. It looks out of place because it's not supposed to be there, of course. This is where the engine coolant drain plug goes, and it's supposed to be a plug, not a bolt. And it should have NPT threads, too.

So I'm guessing the leak is from coolant spewing out past the boogered up threads and onto the exhaust manifold once it gets hot enough to build up some pressure in the cooling system.

The third picture is another 69 Bronco 302 that I have sitting on an engine stand in the garage. That's what the plug is supposed to look like...

I need to remove the bolt and investigate further, but this could very well be the problem.
 

Attachments

  • IMG_6523.jpg
    IMG_6523.jpg
    141.9 KB · Views: 61
  • IMG_6499.jpg
    IMG_6499.jpg
    96.8 KB · Views: 59
  • IMG_6527.jpg
    IMG_6527.jpg
    121.9 KB · Views: 63
Last edited:
OP
OP
bulletpruf

bulletpruf

Contributor
Full Member
Joined
Mar 31, 2019
Messages
419
Loc.
San Antonio, TX
The jackassery continues on the suspension, of course.

As you can see in the picture, the PO used some metal straps to keep his homegrown "add a leaf" spring kit together. One of the added leaves was something that someone had cut using a torch; no telling what it came from. The u-bolts attaching the springs to the diff also had some redneck engineering going on.

In addition, the PO used shocks with helper coils front and rear. These are actually load bearing to a degree; the truck dropped a bit when they were removed.

There was some good news on the leaf springs, however. I was fully prepared to break out the cutoff wheel and sawzall in order to get the leaf springs off; in my experience, the bolt usually rusts to the sleeve that fits inside of the rubber bushings in the spring eyes. Not the case here! All came out without any problem, much to my surprise. They got doused with a liberal dose of Kroil, so that didn't hurt.

Anyway, now that the rear springs are out, they'll get replaced with some used OEM springs that I have stashed in the garage.
 

Attachments

  • IMG_6512.jpg
    IMG_6512.jpg
    99.3 KB · Views: 50
  • IMG_6508.jpg
    IMG_6508.jpg
    202.2 KB · Views: 49
  • IMG_6507.jpg
    IMG_6507.jpg
    184.6 KB · Views: 49
  • IMG_6505.jpg
    IMG_6505.jpg
    175.5 KB · Views: 54
OP
OP
bulletpruf

bulletpruf

Contributor
Full Member
Joined
Mar 31, 2019
Messages
419
Loc.
San Antonio, TX
And for today's episode of "Sins of the Prior Owner," we have a long nail masquerading as a cotter pin. Nice.

And for those who don't worry whether their rear end is still venting (insert fart joke here), you can see from the attached pictures that if your vent is plugged, your rear will vent itself in a less convenient manner -- usually out of the pinion seal or an axle seal -- leaving one heck of a mess to clean up on down the road.
 

Attachments

  • IMG_6506.jpg
    IMG_6506.jpg
    99.7 KB · Views: 45
  • IMG_6563.jpg
    IMG_6563.jpg
    178.7 KB · Views: 43
  • IMG_6565.jpg
    IMG_6565.jpg
    185.7 KB · Views: 42
  • IMG_6564.jpg
    IMG_6564.jpg
    159.2 KB · Views: 41
  • IMG_6567.jpg
    IMG_6567.jpg
    181.5 KB · Views: 43
OP
OP
bulletpruf

bulletpruf

Contributor
Full Member
Joined
Mar 31, 2019
Messages
419
Loc.
San Antonio, TX
Picture is of the bolt that came out of the block versus the plug that was supposed to be there. As you can see, the threads are definitely different. I'm a bit surprised that the PO didn't completely strip the threads, but I was able to thread the plug in without too much trouble.
 

Attachments

  • IMG_6571.jpg
    IMG_6571.jpg
    133.2 KB · Views: 27
OP
OP
bulletpruf

bulletpruf

Contributor
Full Member
Joined
Mar 31, 2019
Messages
419
Loc.
San Antonio, TX
A few better pics and more details on the jury rigged rear springs.

These started life as stock springs with 5 leaves (or 4 regular leaves + the overload leaf). The PO added two springs to each side, for a total of 7 leaves. He also had load bearing coil assisted shocks front and rear.

It will be interesting to see what the ride height will be after I finish installing the stock rear springs.
 

Attachments

  • IMG_6580.jpg
    IMG_6580.jpg
    257.7 KB · Views: 24
OP
OP
bulletpruf

bulletpruf

Contributor
Full Member
Joined
Mar 31, 2019
Messages
419
Loc.
San Antonio, TX
And for yet another installment of interesting repairs, we have the passenger side axle that came out of the 9" rear diff. Looks normal, you say? Take a closer look!

It looks like it snapped at some point and was welded back together. However, it gets better -- it looks like whoever did the repair had to lengthen the axle a bit in the weld area. In order to compensate for the added length, they cut the splined end off the axle, maybe trimming about 1/4"? If you compare the length of the splines between the two axles you'll see what I'm referring to.

Alternate theory - PO snapped an axle, and then robbed one from an F100 diff and had it shortened to fit the Bronco.

Again, it's as if the PO didn't have access to a dealership or auto parts store. Sure seems like it would be a lot easier to buy a new axle, but maybe he had a welding and/or machine shop or had a buddy that did?
 

Attachments

  • IMG_6573.jpg
    IMG_6573.jpg
    242 KB · Views: 39
  • IMG_6576.jpg
    IMG_6576.jpg
    236.8 KB · Views: 40
  • IMG_6577.jpg
    IMG_6577.jpg
    125.2 KB · Views: 38
Last edited:

Rustytruck

Bronco Guru
Joined
Feb 24, 2002
Messages
10,875
Bronco owners are a very creative bunch and solve their problems in many different ways. there were allot of years and no internet when ford dumped us and left us to our own accord. Broncos were very rarely found in a wrecking yard. So you had to make do with what you got. These days people complain about cheap Chinese parts but they are far better than working with nothing.
 

DirtDonk

Contributor
Bronco Guru
Joined
Nov 3, 2003
Messages
47,550
Yep. And maybe it was a ranch/work truck in it's previous life. Quicker and cheaper to fix it yourself rather than spend time (sometimes fruitlessly) in the hunt for more parts. Get it back to work quickly and all that.
Might not be as likely as the other scenarios, but might still be a part of an interesting and checkered past!

Monroe made a shock called the "Load-Level-R" or something like that. Though I seem to remember them being either red or blue over the years. Gabriel made one too (I have a hard time remembering their catchy name though), but those I thought were mostly white? Maybe the yellow is Gabriel, or private label to someone else, or some such.
We had them on Broncos as a way of stiffening up the suspension (if you can believe that!;)) for handling harder bumps, but also to keep them from sagging down when you had the top off but loaded the back end up with a week's worth of camping gear-for-three.
They worked very well for both purposes, and in the rear of a '67 Buick on a fully loaded road trip back in the day.
Good memories both...

Paul
 
  • Like
Reactions: MWM
OP
OP
bulletpruf

bulletpruf

Contributor
Full Member
Joined
Mar 31, 2019
Messages
419
Loc.
San Antonio, TX
Bronco owners are a very creative bunch and solve their problems in many different ways. there were allot of years and no internet when ford dumped us and left us to our own accord. Broncos were very rarely found in a wrecking yard. So you had to make do with what you got. These days people complain about cheap Chinese parts but they are far better than working with nothing.

I hear you, but the PO really took half-assed repairs to the PhD level on this one...

Having said that, you certainly have a valid point about no Broncos in wrecking yards.

Thanks
 
OP
OP
bulletpruf

bulletpruf

Contributor
Full Member
Joined
Mar 31, 2019
Messages
419
Loc.
San Antonio, TX
This is a suspenseful thread!

Glad you're enjoying it. I'll keep the updates coming for a few more weeks and then it will be a while before I get back after it. I'm moving for work for a few years, but leaving a lot of cars and tools back here at the mother ship.
 
OP
OP
bulletpruf

bulletpruf

Contributor
Full Member
Joined
Mar 31, 2019
Messages
419
Loc.
San Antonio, TX
Yep. And maybe it was a ranch/work truck in it's previous life. Quicker and cheaper to fix it yourself rather than spend time (sometimes fruitlessly) in the hunt for more parts. Get it back to work quickly and all that.
Might not be as likely as the other scenarios, but might still be a part of an interesting and checkered past!

Monroe made a shock called the "Load-Level-R" or something like that. Though I seem to remember them being either red or blue over the years. Gabriel made one too (I have a hard time remembering their catchy name though), but those I thought were mostly white? Maybe the yellow is Gabriel, or private label to someone else, or some such.
We had them on Broncos as a way of stiffening up the suspension (if you can believe that!;)) for handling harder bumps, but also to keep them from sagging down when you had the top off but loaded the back end up with a week's worth of camping gear-for-three.
They worked very well for both purposes, and in the rear of a '67 Buick on a fully loaded road trip back in the day.
Good memories both...

Paul

Paul - I don't know a lot about the old girl. From what I can tell, an older gentleman owned it and used it as a hunting truck in Mississippi. He got too old to hunt a while back and the truck sat in a barn dormant for about 15 years. Someone bought it from the old man's estate or family, but he didn't do much to it. I bought it from this guy about 3 years ago and I'm just now getting around to it.

On a related note, the Bronco had a kennel in the back for his hunting dogs and he had a platform with elevated seats up on top of the kennel. Had a big tow bar up front, a big homemade bumper with a winch, and a thick homemade skid plate up front, too. All told, I pulled a few hundred pounds off the front, and I'm sure the kennels and seats weren't light, either, but those were gone when I got it.

Whatever the case, the coil springs and leaf springs needed plenty of help.

BTW - the silver shocks in the picture came off the front.

Scott
 

Attachments

  • IMG_1543.jpg
    IMG_1543.jpg
    149.7 KB · Views: 52
  • IMG_1534.jpg
    IMG_1534.jpg
    149.8 KB · Views: 54
  • 57097034_2847152875508859_4505432032217661440_n.jpg
    57097034_2847152875508859_4505432032217661440_n.jpg
    22.6 KB · Views: 55
  • 56770584_2847153055508841_7125450030822981632_n.jpg
    56770584_2847153055508841_7125450030822981632_n.jpg
    37.6 KB · Views: 53
  • 56533716_2847152642175549_6492853261391888384_n.jpg
    56533716_2847152642175549_6492853261391888384_n.jpg
    47.7 KB · Views: 47
  • 56439069_2847152862175527_7783129993378267136_n.jpg
    56439069_2847152862175527_7783129993378267136_n.jpg
    51.2 KB · Views: 51
  • IMG_6149.jpg
    IMG_6149.jpg
    232.3 KB · Views: 48
OP
OP
bulletpruf

bulletpruf

Contributor
Full Member
Joined
Mar 31, 2019
Messages
419
Loc.
San Antonio, TX
The title of today's post is, "This is Why I Drink."

At this point, I have had a margarita or two, but both hands still ache from being smacked with big freaking hammers, one finger is still sore from getting chewed up a bit by the wire wheel on the bench grinder, ears still ringing from all the pounding with BFH's, eyes still watery from sandblasting grit that hasn't worked its way out yet, and leg is raw in a spot from getting hit with the wire wheel on the portable drill, and hand is raw in a spot from getting in the way of the pressure washer stream at full boost...

Much of this can be attributed to my task from the past two days -- removing the 52 year old bushings from the leaf springs. It starts off easy enough by drilling about a dozen holes in the rubber that surrounds the inner sleeve. Then I flip the spring over and drill from the other side. From there, I'll take a pick of some sort and try to dig out some of the rubber. Next up is hitting it with my 2d favorite liquid (right after margaritas) - Kroil. And then I take a brass punch, set it on the inner sleeve, and start pounding away with a large ball peen. It's usually freed after a few minutes, sometimes takes some additional drilling and picking.

Then what's left of the rubber usually slides out easily.

And then the fun begins...

There's an outer sleeve that fits just inside the eye of the spring. It's fairly soft metal, which is somewhat helpful. However, since it's quite thin, there's not a lot of room to insert something to press or drive it out. What worked fairly well for me -- use a sawzall to cut almost completely through the sleeve without touching the harder metal of the spring eye. I took it very slow, stopping very few seconds to check.

Then take a chisel use it to cut through the sleeve completely. From there, using chisels, I try to collapse the sleeve so there's no tension holding the sleeve to the spring eye. Once that's done, I drive the sleeve out with a the brass punch. Once that's done, repeat 5 more times...

I had two that were quite reluctant, and that took a LONG time.
 

Attachments

  • IMG_6590.jpg
    IMG_6590.jpg
    259.4 KB · Views: 35
  • IMG_6591.jpg
    IMG_6591.jpg
    223.4 KB · Views: 33

DirtDonk

Contributor
Bronco Guru
Joined
Nov 3, 2003
Messages
47,550
I time-honored tradition, getting those bushings to heel.
Those that like to play with flame and smell smoke in the shop will take a torch to the inner sleeve until it literally gets popped out by the expanding rubber. Some will pop right out though, so best to keep bare skin at a distance.

I still think the polyurethane companies would do us a huge favor if they made spring and shackle eye bushings of the correct size to fit inside the old outer sleeve. That way you don't even have to fight to take them out. Just put the new bushings in right over them.
Keep the normal bushings for those times when the outer sleeve is not usable.

Paul
 
OP
OP
bulletpruf

bulletpruf

Contributor
Full Member
Joined
Mar 31, 2019
Messages
419
Loc.
San Antonio, TX
Yes, it would certainly be nice if the poly bushings fit inside the sleeve. That would significantly cut down on the time needed to complete this job!
 
OP
OP
bulletpruf

bulletpruf

Contributor
Full Member
Joined
Mar 31, 2019
Messages
419
Loc.
San Antonio, TX
I do have a pneumatic air hammer, but rarely pull it out of the drawer. I'm using Milwaukee M18 battery powered stuff 99.9% of the time.
 
OP
OP
bulletpruf

bulletpruf

Contributor
Full Member
Joined
Mar 31, 2019
Messages
419
Loc.
San Antonio, TX
Rear diff was pretty nasty inside and out. A few posts up, you can see the pictures of it caked in grime. Obviously had a few leaks that attracted dirt (over 1/4" thick in spots), and inside had some pretty nasty oil in it. Once the diff was out, I hit it with a pressure washer with the pencil spray fitting - super high pressure stream. That got most of the grime off the outside and a lot from the inside.

From there, I spent a few hours with the scraper, wire wheel on a drill, wire toothbrush, brake cleaner, acetone, etc. Then hit it with some primer and semi-gloss black.

After I re-installed the bare housing, I was checking out the axle tubes and discovered some damage in the passenger side tube near the axle flange. Certainly looks like evidence that an axle let go at some point.
 

Attachments

  • IMG_6596.jpg
    IMG_6596.jpg
    127.8 KB · Views: 45
  • IMG_6598.jpg
    IMG_6598.jpg
    100.9 KB · Views: 47

omureebe

Full Member
Joined
Jun 18, 2013
Messages
402
Rear diff was pretty nasty inside and out. A few posts up, you can see the pictures of it caked in grime. Obviously had a few leaks that attracted dirt (over 1/4" thick in spots), and inside had some pretty nasty oil in it. Once the diff was out, I hit it with a pressure washer with the pencil spray fitting - super high pressure stream. That got most of the grime off the outside and a lot from the inside.

From there, I spent a few hours with the scraper, wire wheel on a drill, wire toothbrush, brake cleaner, acetone, etc. Then hit it with some primer and semi-gloss black.

After I re-installed the bare housing, I was checking out the axle tubes and discovered some damage in the passenger side tube near the axle flange. Certainly looks like evidence that an axle let go at some point.

Will a new axel seal cover that up, or a lil bead needed?
 
Top