


Coldbear
New Member
Has anyone installed the Centech harness for an early Bronco? Have you any suggestions or pictures that might help my situation? Any verbal or pictorial hints will help. Thank you in advance.


I like the Centech harness, I installed one about a year ago. The instructions are a little strange to me, there are 3 different places to look to figure some things out. Once you understand how the papers are laid out it gets easier. I would suggest pulling the dash out to wire it. It makes things a lot easier. If you don't already have them I would suggest getting the tools to put the weather pack connectors together as well. I will look and see if I have any pictures, been a couple days since I did it.
Good luck with it!


Are you guys having to change the ammeter in the gauge cluster to a voltmeter? It sounds like you have the option to switch it out with an expensive aftermarket voltmeter gauge that doesnt match the stock styling very well or hack together your own voltmeter.
Are you guys having to change the ammeter in the gauge cluster to a voltmeter? It sounds like you have the option to switch it out with an expensive aftermarket voltmeter gauge that doesnt match the stock styling very well or hack together your own voltmeter.
I've used Rocketman (https://www.rccinnovations.com/index.php?show=menu-volt-all) for voltmeters - both my Bronco and Cougar. He converts what you have and looks perfect, and with warrantee.
Centech supports the factory Alt and separate voltage reg. AAW does not, although I have made a factory Alt/reg work with AAW harness, just that you lose the AMP gauge.
Aftermarket WH's Volts gauge is a simple bolt in, and looks like it belongs there.
Your pics are helpful. I am getting back to a project that stopped over 15 years ago. My Centech is also from that era. Not sure if I have all connections and instructions. I have been printing info and pics like yours for help, so thank you.I installed a Centech and would recommend it. I resisted the idea of replacing the OEM wiring but it is a great upgrade and worked perfectly for my purposes. Meaning, safety and reliability with ability to handle a few upgrades like 3G alternator, fog lights and AC.
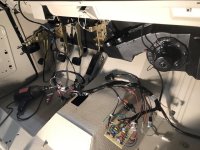
Here are some random pictures of the wiring and getting underway and the final outcome under the hood. For a more OEM / cleaner look, I took most of the ribbed plastic conduit off of the harnesses and resealed them myself using a combination of Painless wraps and Tessa tape. I also cut off the heavy rubber grommets that pass through the firewall and used some that are more likely to stay in place.
I agree that some of the instructions are a little puzzling, but it mostly makes sense. I did call a couple of times and Jim at Centech was always super helpful and knowledgeable. Make sure you have a good soldering set-up. It’s a lot of work but I tried to just focus on one wire at a time.
Your pics are helpful. I am getting back to a project that stopped over 15 years ago. My Centech is also from that era. Not sure if I have all connections and instructions. I have been printing info and pics like yours for help, so thank you.
I am trying to get the engine to turn and have a dumb question. In one pic you show the 3 pin connector blue, violet, and white. I see the white, I term goes to starter solenoid. Now violet and blue. Do I need to get a ballast resistor to run this through the coil? I have a stock 302 points dist.
Any help would be great. I am slowly removing electrical tape to figure this harness out.
Ok thank youCall Centech for tech support if needed. They’re a mom and pop operation based in Perkiomenville, PA. 610-754-0720
Good people!
Ballast resistor is needed with the stock coil and stock distributor. Centech included the resistor in my kit, so I assume one would have been in yours.Your pics are helpful. I am getting back to a project that stopped over 15 years ago. My Centech is also from that era. Not sure if I have all connections and instructions. I have been printing info and pics like yours for help, so thank you.
I am trying to get the engine to turn and have a dumb question. In one pic you show the 3 pin connector blue, violet, and white. I see the white, I term goes to starter solenoid. Now violet and blue. Do I need to get a ballast resistor to run this through the coil? I have a stock 302 points dist.
Any help would be great. I am slowly removing electrical tape to figure this harness out.
This is kind of a separate process, because it’s at the business end of the ignition coil.I am trying to get the engine to turn and have a dumb question. In one pic you show the 3 pin connector blue, violet, and white. I see the white, I term goes to starter solenoid. Now violet and blue.
What Jd said.Do I need to get a ballast resistor to run this through the coil? I have a stock 302 points dist.
OK, so the starter is not cranking. That really doesn’t have anything to do with the ignition coil or ballast resistor. Those are just for getting the ignition system working properly.Thanks for the replies. I purchased a ballast resistor through Napa and wired it up. I still can’t get the engine to do anything.
Let’s make sure what we’ve got going on here.I have the solenoid connected with red/start wire ok battery side, neg side going to starter.
Sounds good, but we need to make sure there is power to the purple/violet wire when the key is in the start position. We can test that a little later.Then I have the purple to the S and the white to the I.
So that confirms that you have the battery cable connected. Do you also have the large red Centech wire connected to the same large terminal as the battery cable?I have power to the starter solenoid but no cranking. I’m missing something.
")