• Welcome to ClassicBroncos! - You are currently viewing the forums as a GUEST. To take advantage of all the site features, please take a moment to register. It's fast, simple and absolutely free. So please join our community today!
    If you have problems registering or can't log into your account, please contact Admin.

Tom’s Steering Shaft Set Screw

NJBronk

Contributor
Full Member
Joined
Oct 11, 2022
Messages
221
I’m rebuilding my column (3 on the tree) and adding a custom collapsible lower steering shaft from Wild Horses. My upper steering shaft splines were toast, so I bought a new shaft from Tom’s.

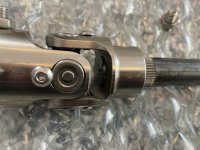
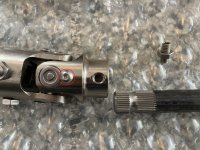
There’s a “valley” in the lower splines - should I align the set screw with this valley? Or should I put the shaft further in the u-joint and notch or drill the splines for the set screw?

It seems like the set screw tightened into the valley works pretty well (dry fit and there’s no play) - maybe that’s what the valley is for?

If I push the shaft into the u-joint all the way it interferes a bit. When the set screw is in the valley the bottom of the shaft is basically flush with the inside of the u-joint.

IMG_0944.jpeg
Set screw aligned with valley:
IMG_0945.jpeg
Shaft all the way in:
IMG_0946.jpeg
 
OP
OP
N

NJBronk

Contributor
Full Member
Joined
Oct 11, 2022
Messages
221
Thanks for the comment.

Yes, I can make some recommendations on the set screw. Collect all of them that you can find and throw them in the garbage.

The socket head set screw is a VERY poor method of attachment, and should be avoided. If you insist on using a set screw, make certain that it lands in the valley, and use a known good, high quality, grade 8 cap screw capable of withstanding at least 20 lb-ft of torque. Cross drill the head for safety wire.

You will notice that all of the factory connections are either splined and swaged, or cross bolted and clamped.

And @NJBronk your upper splines were NOT toast until you destroyed them. The NVH (rag joint) flange on your upper shaft was broached and swaged from the factory. It was a permanent installation, and was never intended to be pulled apart. I was going to comment on your other thread, but you already had it pulled apart, and it was too late to "un-break" it. (although I would have pressed the rag joint flange back on, and welded it.)

The solution that you have selected is adequate, and lots of people run it. I won't, but I'm stubborn that way.
Ugh, thanks. I did the collapsible lower shaft for safety reasons, not realizing I’m introducing another risk…

I like the safety wire idea. I was able to find grade 5 hex bolts with the hole already drilled at McMaster Carr. I assume this bolt won’t be seeing too much stress, so I would think grade 5 is sufficient?

Not sure what the shape of the bolt will be at the bottom of the threads, should I try to create a bit of a cupped shape like a set screw to fit into the valley? Or leave it alone and just torque it well?
 

dmoses42

Contributor
Bronco addict
Joined
Jan 25, 2017
Messages
357
Loc.
Brunswick, Ga
Thanks for the comment.

Yes, I can make some recommendations on the set screw. Collect all of them that you can find and throw them in the garbage.

The socket head set screw is a VERY poor method of attachment, and should be avoided. If you insist on using a set screw, make certain that it lands in the valley, and use a known good, high quality, grade 8 cap screw capable of withstanding at least 20 lb-ft of torque. Cross drill the head for safety wire.

You will notice that all of the factory connections are either splined and swaged, or cross bolted and clamped.

And @NJBronk your upper splines were NOT toast until you destroyed them. The NVH (rag joint) flange on your upper shaft was broached and swaged from the factory. It was a permanent installation, and was never intended to be pulled apart. I was going to comment on your other thread, but you already had it pulled apart, and it was too late to "un-break" it. (although I would have pressed the rag joint flange back on, and welded it.)

The solution that you have selected is adequate, and lots of people run it. I won't, but I'm stubborn that way.
James,

I'm almost to the point of needing steering shafts in my power steering conversion. Mine is a 1972, so I definitely want to get rid of that single shaft impaler it currently has. I was just going to buy the upper and lower set from Tom's, but if there is a safer way currently available, or a way to make it safer, I'd love to hear about it. Apologies to the OP for the hijack...
 

rocknhorse76

Contributor
Bronco owner since 1993 💪🏻
Joined
Jun 7, 2014
Messages
370
Loc.
Central WA
James,

I'm almost to the point of needing steering shafts in my power steering conversion. Mine is a 1972, so I definitely want to get rid of that single shaft impaler it currently has. I was just going to buy the upper and lower set from Tom's, but if there is a safer way currently available, or a way to make it safer, I'd love to hear about it. Apologies to the OP for the hijack...
The shaft set from Tom’s is a great upgrade. Just do as James said and replace the cheap set screws that come with the shaft with high quality hex head bolts, torque them using loctite, and use jam nuts, safety wire, or both.
 

Gsav69

Contributor
New Member
Joined
Feb 18, 2024
Messages
36
Thanks for all this guys. I just ordered a toms 2 piece steering shaft for my power steering upgrade on my 66. I haven't taken the stock column out yet but I was wondering how the bearings in the bottom of the column will stay in place when installing the new shaft? Apparently the previous owner rebuilt the stock column and then mentioned there's a washer or some kind of seal that he inadvertently left out when he put it back together. I'm having trouble finding diagrams or pics of the bottom side of the early columns. Thanks for any guidance.
 

ba123

Contributor
Bronco Guru
Joined
Oct 29, 2022
Messages
1,771
Loc.
CA
Ok, I won't argue that James knows his stuff even though I very much like to argue, but...

What is the concern with the cheap set screw? It seemed fine to me despite it being a little, well...little.

All it does is hold the steering shaft from moving around between the frame mounted box and the body mounted column, right?

How much does your body move from your frame?

Mine sure seems fine with a little Loctite.

Maybe I'm missing something and should swap them?
 
OP
OP
N

NJBronk

Contributor
Full Member
Joined
Oct 11, 2022
Messages
221
Safety wire question... Are these screws just holding these u-joint caps in (circled in red)? I'm thinking of maybe replacing one with a bolt with drilled head to use as the other end of the safety wire pair? Otherwise I guess I could just wrap it around the whole collar that the shaft goes into?

IMG_0944.jpg
 

thegreatjustino

Contributor
Red Head Grease Monkey
Joined
Jan 23, 2002
Messages
15,723
Loc.
Stockton, CA
Thanks for all this guys. I just ordered a toms 2 piece steering shaft for my power steering upgrade on my 66. I haven't taken the stock column out yet but I was wondering how the bearings in the bottom of the column will stay in place when installing the new shaft? Apparently the previous owner rebuilt the stock column and then mentioned there's a washer or some kind of seal that he inadvertently left out when he put it back together. I'm having trouble finding diagrams or pics of the bottom side of the early columns. Thanks for any guidance.

The bearing is pressed in and won't fall out. It needs to be removed with a bearing puller.

Here is an exploded diagram of the parts you're looking for:

https://www.lmctruck.com/steering/steering-column-parts/fbr-1966-74-steering-column-components
 
OP
OP
N

NJBronk

Contributor
Full Member
Joined
Oct 11, 2022
Messages
221
Then replace the set screw with a cross drilled cap screw about 1-1/4 inches long. Insert the bolt Thru the hole you made, and have the pinch bolt capture the DD shaft on the opposite flat.

Thanks, I'm not sure I followed what you mean about the pinch bolt? I can't picture how this is going together. So I'm not drilling fully through the yoke? And just drilling through one side of the DD shaft and pressed up against the opposite side on the inside?
 

Johnnyb

Contributor
Sr. Member
Joined
Nov 19, 2001
Messages
803
Loc.
Flagstaff
Watching this thread with interest. I've been having similar thoughts about the u-joint between my WH collapsible steering shaft and the Ididit column.
I was thinking about putting a tack weld in a couple of places between the joint and the shafts on the column end?
 

dmoses42

Contributor
Bronco addict
Joined
Jan 25, 2017
Messages
357
Loc.
Brunswick, Ga
@jamesroney I wasn't trying to poke the bear. I was genuinely asking if a better solution was available. Your solution looks pretty slick, as well as more factory looking. You mind if I PM you about it?
 

lars

Contributor
Been here awhile
Joined
Jun 29, 2001
Messages
3,051
Loc.
NorCal flatlands
Hi James. Set screws to retain shafts are stupid. I learned that when I was 12. That said, I still have to live with them. But I hate them. What is so hard about designing (and making) split collars with clamping screws? At least. And I have an "I barely dodged death because of a failed steering column set screw" story. Thank you for your descriptions. The socket head cap screws replacing the socket head set screws (one of which split where it was broached) on my steering column are safetied. But I still hate them.
 

Oldtimer

Contributor
Jr. Member with Sr. moments
Joined
Feb 4, 2005
Messages
922
Loc.
Sunnyvale, CA
Yes please, on pictures of solutions.
I need to eliminate a bunch of set screws in my collapsible steering shaft.
 
OP
OP
N

NJBronk

Contributor
Full Member
Joined
Oct 11, 2022
Messages
221
I'll definitely take some pics of mine as I attempt it. I need to measure for the DD shaft bolt and order a safety-drilled one, but hopefully in the next week or two I'll have the column back in and be ready to start assembling the shafts.
 

toddz69

Sponsor/Vendor
Bronco Guru
Joined
Nov 28, 2001
Messages
10,151
I had some conversations with @jamesroney about this and found some drilled Grade 8 bolts online that I purchased.

I'd recommend these:

https://drilledheadbolts.com/products/0-75-grade-8-drilled-head-bolt-5-16-18-x-3-4-10-pcs

I bought the 1" long versions and now I'm in the bolt-shortening business :). I changed out my first set screw last night and will gradually work through all of them. I'm planning to Loctite all the bolts in addition to using set screws and then safety wire them.

Todd Z.
 
OP
OP
N

NJBronk

Contributor
Full Member
Joined
Oct 11, 2022
Messages
221
I had some conversations with @jamesroney about this and found some drilled Grade 8 bolts online that I purchased.

I'd recommend these:

https://drilledheadbolts.com/products/0-75-grade-8-drilled-head-bolt-5-16-18-x-3-4-10-pcs

I bought the 1" long versions and now I'm in the bolt-shortening business :). I changed out my first set screw last night and will gradually work through all of them. I'm planning to Loctite all the bolts in addition to using set screws and then safety wire them.

Todd Z.

I'm glad you posted this. I looked at those but they seemed to be shouldered (thread not all the way to the head) so I wasn't sure if I'd run out of thread - is the picture misleading? I wanted to make sure I could thread the jam nut up high enough to torque the bolt and then torque the jam nut down after.
 

toddz69

Sponsor/Vendor
Bronco Guru
Joined
Nov 28, 2001
Messages
10,151
I'm glad you posted this. I looked at those but they seemed to be shouldered (thread not all the way to the head) so I wasn't sure if I'd run out of thread - is the picture misleading? I wanted to make sure I could thread the jam nut up high enough to torque the bolt and then torque the jam nut down after.
The pic is misleading - must be a stock photo of a longer length. Mine are threaded all the way to the head.

Todd Z.
 
Top