Tech article by Lars Pedersen (Lars)
The addition of rear disc brakes is a popular upgrade for early Broncos. Lots of creative people have accomplished this mod using components from Lincolns, Cadillacs, Ford Explorers and others. These days it's easier than ever due to the availability of commercial kits that include everything needed for the swap. Generally the kits are an adaptation of parts obtained from vehicles which came with them from the factory, most often based on a GM caliper found on 1980's vintage Cadillacs, Buicks and other GM luxury vehicles. The piston area of this caliper is a good match for the stock Ford calipers found on '76-'77 Broncos and F150s as well as the calipers used by Bronco enthusiasts for the Chevy front disc conversion. This GM caliper also incorporates an emergency brake mechanism that matches the cables found on early Broncos perfectly. That emergency brake mechanism doesn't always work as it should, however, particularly if the calipers came from a junkyard donor vehicle. When I first did this swap, I could find no information on how the emergency brake mechanism worked, and as it turned out, mine didn't work at all for a while. I had been told that I needed to cycle the emergency brake to adjust the calipers, which I did until my foot was numb. That didn't work, so I started experimenting with the calipers, taking them apart to understand how they worked. In this article I'll explain what I learned, and how to make those bargain junkyard calipers work as expected.
DISCLAIMER: Bad brakes can kill you. If you choose to rebuild your brakes, it is your responsibility to ensure that quality parts and good shop practices are followed in every aspect of the brake system. The follow information provides guidelines on servicing Cadillac rear brake calipers only, and is not intended to be the last word on brake system design and repair. I won't be held responsible if you make a mistake. Honestly evaluate your abilities to perform brake system diagnosis, service and modifications before touching them, and hire a professional mechanic to do the job for you if you aren't certain you can do it yourself. You, your passengers and your loved ones will be better off.
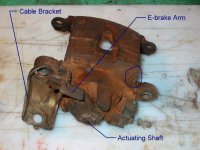
First, a photo with some terminology- I need to call the components something for explanatory purposes. These are my choices for names- GM may have used something else. The picture shows a right side caliper (note the "R" on the casting) straight from the junkyard. In a conventional disc brake caliper, the piston is advanced out of its bore as the pads wear. There is no mechanism that retracts the piston when the brakes are released, so it and the pads remain in light contact with the rotor at all times, ready to clamp when required. In the GM caliper, things are different. When the brakes are applied, the piston is forced out of its bore as always, but the parking brake mechanism inside the piston actually causes it to retract when the brakes are released. Instead, the GM caliper does indeed depend on the regular use of the emergency brake to advance the piston and remain in adjustment. When the emergency brake is applied, the lever is rotated, which causes the threaded shaft to drive the piston out of the bore and clamp the pads against the rotor. When the emergency brake is released a "one-way clutch" built into the piston slips, allowing the piston to remain extended while the clamping force is released.
The problem arises when that mechanism seizes. In the case of mine, I got them cleaned up, installed, hooked up the brake lines and bled like crazy. Tried the brakes, pedal went to the floor. A couple of pumps brought it up, but nothing I did could get a good pedal. Eventually I figured out that if I re-clocked the e-brake arm by removing it, rotating the shaft until it clamped the pads against the rotor and re-installing it angled as far back as possible, I could get my brakes to work without pumping so much. But using the e-brake still didn't make any difference. So I bought a rebuild kit from Napa (expensive at $30 per caliper) and proceeded to dismantle it. The caliper I used for the photos here was a spare, so rebuild parts aren't shown. If the caliper is in generally good condition (piston dust seal not ripped, no leaks) then a rebuild kit may not even be necessary, though some peace of mind comes from knowing that all the rubber parts in an otherwise 20 year old caliper are in good shape.
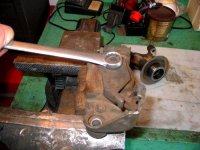
Remove the 11/16" retaining nut and wiggle the e-brake arm loose. There should be a rubber seal and a nylon washer under the arm. Remove those and set them aside (there are replacements in caliper rebuild kits). Once the arm is off, give the end of the actuating shaft a nudge and the piston will pop out, followed by a big spring. Along with a bunch of smelly old brake fluid.

Note the hex on the actuating shaft. This actually measures out to 0.55 inches, but a 9/16" wrench will turn it. The piston dust seal can be pried out carefully using a screwdriver. No need to remove the cable bracket- I've taken off a couple of them, but there is Loctite on the threads of the Torx bolt, so they are tough to get loose unless you heat the caliper bracket first in the vicinity of the bracket.

It can be seen that the actuator shaft from this caliper has a right hand thread. On a left side caliper, it's the opposite. The brass washer on the shaft is important. It's a bushing that presses against the inside of the housing to react the load of the shaft trying to force the piston out when the e-brake is engaged.
Now we come to the interesting part- disassembling the piston. The caliper used for these photos was in pretty good shape, but the piston assemblies in the calipers on my Bronco were gummed up and corroded. Most people never bleed their brakes regularly to renew the fluid. Brake fluid absorbs water and anything else it can from the environment, and eventually it corrodes metal parts. In the case of these calipers, it eventually locks up the adjuster mechanism.

To disassemble the piston, I clamp the end of it, the part that sticks out of the dust seal, in a vise. Then I use a pair of water pump pliers to carefully twist the stamped steel retainer out of the piston.

A bit blurry, but this is what's visible after the retainer is removed. All of the parts can come out, including the plug at the bottom with the female spline. If it's reluctant, it can be pushed out by inserting a small rod or punch through the hole in the face of the piston.
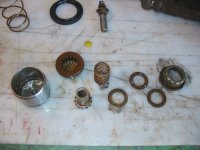
And finally, the piston and its contents laid out on the bench. It's important that the three balls captured in the round plate be able to rotate freely. If they can't the clutch mechanism won't work- it functions by jamming when a load is applied (when the e-brake is engaged) but allows everything to rotate freely relative to the piston when the force is removed. So clean those bits well before reassembly.

After cleaning and reinstalling the parts in the piston, I pushed the retainer in by hand. Then I squeezed the thing in my vise until the retainer was sticking out of the piston by 3/8".Now it's time to install the piston back into the caliper. Spin the actuating shaft into the piston and seat the spring against the retainer. With the caliper clamped in a vise, push everything into the bore until the threaded part of the actuator shaft emerges from the hole. That spring tries hard to shove the piston out of its bore, but once the piston is pushed past the o-ring seal, it tends to stay put. Install the nylon washer and rubber seal over the actuator shaft, followed by the e-brake arm and the retaining nut. The exact clocking of the e-brake arm doesn't matter at this point. The piston dust seal comes next. It's easier to do if the piston is sticking out of the bore about 3/4" or so. If you pushed it in too far, now is when you get to see how the clutch mechanism in the piston works. Cycle the e-brake arm back and forth and it should gradually "pump" the piston out of the bore. Install the seal using a blunt instrument (I used the handle end of an old toothbrush) and slide the lip down until it seats in the groove on the piston.
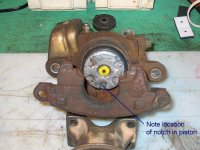
The next step is to bottom the piston in the bore and orient it correctly. See the notch in the face of the piston? It engages a square bump on the back of the brake pad. That keeps the piston from rotating when the e-brake is applied and released. It needs to be oriented a particular way, as shown in the photo. The tool in the background is for rotating the piston. It's designed to fit on a 3/8" drive ratchet. It has a square bump on the face to engage the piston notch, and a a raised boss in the middle that goes in a depression in the middle of the piston, to hold things in alignment while turning. Rotating it also retracts the piston, as it drives the piston up the actuating shaft. When doing this sometimes the piston bottoms before the notch is oriented correctly. Cycle the e-brake arm a couple of times to drive the piston back out a bit, then repeat.
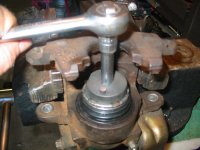
Here's a photo showing the piston retraction tool in use.

Well, sometimes that tool just won't work as advertised. If the caliper has been around the block a few times (most have) the notch in the piston may be rounded off, in which case the tool slips no matter how hard you push down on it while turning. In that case, I use my secret weapon. From the looks of the piston, I wasn't the first to use this procedure.
Once the piston is retracted and oriented correctly, pop the dust seal (yellow plug visible in some of the pictures) into the hole in the face of the piston, assuming it was still there when you got the calipers. If you bought a rebuild kit, you got a new one. The brake pads can then be fit to the caliper. One thing not shown here is a wire spring clip that fits in the groove at the top edge of the piston. It's an anti-rattle device for the inner brake pad. The spring was there when I got the caliper, but went sailing into the thorn bushes when I bumped it while taking the caliper outside to brush off some of the dirt. It's still there. My thorn bushes don't like me and it will take more than the loss of a clip to get me to wade into them again.

That's it! The caliper is now ready for installation. Once mounted on the vehicle, cycle the e-brake arm a few times before connecting the cables in order to advance the piston out and get the pads in contact with the rotor. If you bought a kit, follow the directions supplied with the kit to complete the installation. In general, disc style emergency brakes don't work as well as drums, due to the latter's self-energizing nature. But mine hold well enough with 35" tires to keep my Bronco from rolling onto the street from my sloping driveway, and of course now my rear brakes stay in adjustment. Most importantly (why we install rear discs in the first place) my Bronco stops straight and true, rain or shine, in the dust, or after water crossings.
The addition of rear disc brakes is a popular upgrade for early Broncos. Lots of creative people have accomplished this mod using components from Lincolns, Cadillacs, Ford Explorers and others. These days it's easier than ever due to the availability of commercial kits that include everything needed for the swap. Generally the kits are an adaptation of parts obtained from vehicles which came with them from the factory, most often based on a GM caliper found on 1980's vintage Cadillacs, Buicks and other GM luxury vehicles. The piston area of this caliper is a good match for the stock Ford calipers found on '76-'77 Broncos and F150s as well as the calipers used by Bronco enthusiasts for the Chevy front disc conversion. This GM caliper also incorporates an emergency brake mechanism that matches the cables found on early Broncos perfectly. That emergency brake mechanism doesn't always work as it should, however, particularly if the calipers came from a junkyard donor vehicle. When I first did this swap, I could find no information on how the emergency brake mechanism worked, and as it turned out, mine didn't work at all for a while. I had been told that I needed to cycle the emergency brake to adjust the calipers, which I did until my foot was numb. That didn't work, so I started experimenting with the calipers, taking them apart to understand how they worked. In this article I'll explain what I learned, and how to make those bargain junkyard calipers work as expected.
DISCLAIMER: Bad brakes can kill you. If you choose to rebuild your brakes, it is your responsibility to ensure that quality parts and good shop practices are followed in every aspect of the brake system. The follow information provides guidelines on servicing Cadillac rear brake calipers only, and is not intended to be the last word on brake system design and repair. I won't be held responsible if you make a mistake. Honestly evaluate your abilities to perform brake system diagnosis, service and modifications before touching them, and hire a professional mechanic to do the job for you if you aren't certain you can do it yourself. You, your passengers and your loved ones will be better off.

First, a photo with some terminology- I need to call the components something for explanatory purposes. These are my choices for names- GM may have used something else. The picture shows a right side caliper (note the "R" on the casting) straight from the junkyard. In a conventional disc brake caliper, the piston is advanced out of its bore as the pads wear. There is no mechanism that retracts the piston when the brakes are released, so it and the pads remain in light contact with the rotor at all times, ready to clamp when required. In the GM caliper, things are different. When the brakes are applied, the piston is forced out of its bore as always, but the parking brake mechanism inside the piston actually causes it to retract when the brakes are released. Instead, the GM caliper does indeed depend on the regular use of the emergency brake to advance the piston and remain in adjustment. When the emergency brake is applied, the lever is rotated, which causes the threaded shaft to drive the piston out of the bore and clamp the pads against the rotor. When the emergency brake is released a "one-way clutch" built into the piston slips, allowing the piston to remain extended while the clamping force is released.
The problem arises when that mechanism seizes. In the case of mine, I got them cleaned up, installed, hooked up the brake lines and bled like crazy. Tried the brakes, pedal went to the floor. A couple of pumps brought it up, but nothing I did could get a good pedal. Eventually I figured out that if I re-clocked the e-brake arm by removing it, rotating the shaft until it clamped the pads against the rotor and re-installing it angled as far back as possible, I could get my brakes to work without pumping so much. But using the e-brake still didn't make any difference. So I bought a rebuild kit from Napa (expensive at $30 per caliper) and proceeded to dismantle it. The caliper I used for the photos here was a spare, so rebuild parts aren't shown. If the caliper is in generally good condition (piston dust seal not ripped, no leaks) then a rebuild kit may not even be necessary, though some peace of mind comes from knowing that all the rubber parts in an otherwise 20 year old caliper are in good shape.

Remove the 11/16" retaining nut and wiggle the e-brake arm loose. There should be a rubber seal and a nylon washer under the arm. Remove those and set them aside (there are replacements in caliper rebuild kits). Once the arm is off, give the end of the actuating shaft a nudge and the piston will pop out, followed by a big spring. Along with a bunch of smelly old brake fluid.

Note the hex on the actuating shaft. This actually measures out to 0.55 inches, but a 9/16" wrench will turn it. The piston dust seal can be pried out carefully using a screwdriver. No need to remove the cable bracket- I've taken off a couple of them, but there is Loctite on the threads of the Torx bolt, so they are tough to get loose unless you heat the caliper bracket first in the vicinity of the bracket.

It can be seen that the actuator shaft from this caliper has a right hand thread. On a left side caliper, it's the opposite. The brass washer on the shaft is important. It's a bushing that presses against the inside of the housing to react the load of the shaft trying to force the piston out when the e-brake is engaged.
Now we come to the interesting part- disassembling the piston. The caliper used for these photos was in pretty good shape, but the piston assemblies in the calipers on my Bronco were gummed up and corroded. Most people never bleed their brakes regularly to renew the fluid. Brake fluid absorbs water and anything else it can from the environment, and eventually it corrodes metal parts. In the case of these calipers, it eventually locks up the adjuster mechanism.

To disassemble the piston, I clamp the end of it, the part that sticks out of the dust seal, in a vise. Then I use a pair of water pump pliers to carefully twist the stamped steel retainer out of the piston.

A bit blurry, but this is what's visible after the retainer is removed. All of the parts can come out, including the plug at the bottom with the female spline. If it's reluctant, it can be pushed out by inserting a small rod or punch through the hole in the face of the piston.

And finally, the piston and its contents laid out on the bench. It's important that the three balls captured in the round plate be able to rotate freely. If they can't the clutch mechanism won't work- it functions by jamming when a load is applied (when the e-brake is engaged) but allows everything to rotate freely relative to the piston when the force is removed. So clean those bits well before reassembly.

After cleaning and reinstalling the parts in the piston, I pushed the retainer in by hand. Then I squeezed the thing in my vise until the retainer was sticking out of the piston by 3/8".Now it's time to install the piston back into the caliper. Spin the actuating shaft into the piston and seat the spring against the retainer. With the caliper clamped in a vise, push everything into the bore until the threaded part of the actuator shaft emerges from the hole. That spring tries hard to shove the piston out of its bore, but once the piston is pushed past the o-ring seal, it tends to stay put. Install the nylon washer and rubber seal over the actuator shaft, followed by the e-brake arm and the retaining nut. The exact clocking of the e-brake arm doesn't matter at this point. The piston dust seal comes next. It's easier to do if the piston is sticking out of the bore about 3/4" or so. If you pushed it in too far, now is when you get to see how the clutch mechanism in the piston works. Cycle the e-brake arm back and forth and it should gradually "pump" the piston out of the bore. Install the seal using a blunt instrument (I used the handle end of an old toothbrush) and slide the lip down until it seats in the groove on the piston.

The next step is to bottom the piston in the bore and orient it correctly. See the notch in the face of the piston? It engages a square bump on the back of the brake pad. That keeps the piston from rotating when the e-brake is applied and released. It needs to be oriented a particular way, as shown in the photo. The tool in the background is for rotating the piston. It's designed to fit on a 3/8" drive ratchet. It has a square bump on the face to engage the piston notch, and a a raised boss in the middle that goes in a depression in the middle of the piston, to hold things in alignment while turning. Rotating it also retracts the piston, as it drives the piston up the actuating shaft. When doing this sometimes the piston bottoms before the notch is oriented correctly. Cycle the e-brake arm a couple of times to drive the piston back out a bit, then repeat.

Here's a photo showing the piston retraction tool in use.

Well, sometimes that tool just won't work as advertised. If the caliper has been around the block a few times (most have) the notch in the piston may be rounded off, in which case the tool slips no matter how hard you push down on it while turning. In that case, I use my secret weapon. From the looks of the piston, I wasn't the first to use this procedure.
Once the piston is retracted and oriented correctly, pop the dust seal (yellow plug visible in some of the pictures) into the hole in the face of the piston, assuming it was still there when you got the calipers. If you bought a rebuild kit, you got a new one. The brake pads can then be fit to the caliper. One thing not shown here is a wire spring clip that fits in the groove at the top edge of the piston. It's an anti-rattle device for the inner brake pad. The spring was there when I got the caliper, but went sailing into the thorn bushes when I bumped it while taking the caliper outside to brush off some of the dirt. It's still there. My thorn bushes don't like me and it will take more than the loss of a clip to get me to wade into them again.

That's it! The caliper is now ready for installation. Once mounted on the vehicle, cycle the e-brake arm a few times before connecting the cables in order to advance the piston out and get the pads in contact with the rotor. If you bought a kit, follow the directions supplied with the kit to complete the installation. In general, disc style emergency brakes don't work as well as drums, due to the latter's self-energizing nature. But mine hold well enough with 35" tires to keep my Bronco from rolling onto the street from my sloping driveway, and of course now my rear brakes stay in adjustment. Most importantly (why we install rear discs in the first place) my Bronco stops straight and true, rain or shine, in the dust, or after water crossings.


