• Just a reminder that you won't be able to start new posts or reply to existings posts in the Archive forum.

    This is where all the old posts go so they can still be used for reference and searched.
  • Welcome to ClassicBroncos! - You are currently viewing the forums as a GUEST. To take advantage of all the site features, please take a moment to register. It's fast, simple and absolutely free. So please join our community today!
    If you have problems registering or can't log into your account, please contact Admin.

1970 Build - For the Next Gen

OP
OP
Past_Miner

Past_Miner

Contributor
Bronco Guru
Joined
Oct 22, 2003
Messages
1,021
I needed to modify the glove box door to work with the roll cage. I made a slight modification to the swinging door hinge article in the tech section. I hope the hole I used isn't too important for mounting the glove box itself :)
 

Attachments

  • DSCF0233.JPG
    DSCF0233.JPG
    161.4 KB · Views: 94
  • DSCF0234.JPG
    DSCF0234.JPG
    189 KB · Views: 85
  • DSCF0236.JPG
    DSCF0236.JPG
    152.7 KB · Views: 82
OP
OP
Past_Miner

Past_Miner

Contributor
Bronco Guru
Joined
Oct 22, 2003
Messages
1,021
Hood Vents

I needed to cut the vent holes in our fiberglass hood on the passenger side for the heater intake. I searched a few times on the site and couldn't find any threads so I came up with a router template to keep the cuts straight. I used a 1/2" forsner bit to cut the end holes and used those holes to line up the template before clamping it down. In hind site I would build the template from steel and use a bushing in the router instead of making the template fit the outer base. A narrower template would work much better on this hood. I would also make a steel template to center pilot holes for the forsner bit. I had to fill some mistakes wth resin jelly but I think it will look pretty good when the primer is done. I also coated the back side with fresh resin to seal the glass fibers I knocked loose.
 

Attachments

  • DSCF0256.JPG
    DSCF0256.JPG
    216.7 KB · Views: 58
  • DSCF0258.JPG
    DSCF0258.JPG
    142.5 KB · Views: 58
  • DSCF0254.JPG
    DSCF0254.JPG
    142 KB · Views: 55
  • DSCF0250.JPG
    DSCF0250.JPG
    143.4 KB · Views: 59
  • DSCF0249.JPG
    DSCF0249.JPG
    149.7 KB · Views: 54
  • DSCF0251.JPG
    DSCF0251.JPG
    151.6 KB · Views: 57
  • DSCF0248.JPG
    DSCF0248.JPG
    170.7 KB · Views: 55
  • DSCF0245.JPG
    DSCF0245.JPG
    206.7 KB · Views: 59
OP
OP
Past_Miner

Past_Miner

Contributor
Bronco Guru
Joined
Oct 22, 2003
Messages
1,021
Top of the Hood

I blocked the gel coat on the top side of the hood to try to see what I'm in for. For the most part it's pretty smooth and shouldn't take more than a couple of coats of sanding primer to look nice. The exception is the front of the scoop. It looks like it has a double angle slope instead of a straight line or a smooth curve. I'm not sure what to do with that. I cleaned it up and decided to shoot the bottom with sealer and color. I will hit the top with sanding primer in the morning so I can see it a little better.

Has anyone with this hood got any pointers for the front of the scoop?
 

Attachments

  • DSCF0260.JPG
    DSCF0260.JPG
    186.9 KB · Views: 57
  • DSCF0265.JPG
    DSCF0265.JPG
    186.6 KB · Views: 56
OP
OP
Past_Miner

Past_Miner

Contributor
Bronco Guru
Joined
Oct 22, 2003
Messages
1,021
I primed and blocked the hood twice and it came out pretty good. I just smoothed the double angle at the front the best I could. I only found a few pinholes around the edges where I sanded through the gel coat. This should look good after a color sand and buff.
 

Attachments

  • DSCF0285.JPG
    DSCF0285.JPG
    205.7 KB · Views: 59
  • DSCF0282.JPG
    DSCF0282.JPG
    153.4 KB · Views: 43
  • DSCF0281.JPG
    DSCF0281.JPG
    158.5 KB · Views: 44
  • DSCF0276.JPG
    DSCF0276.JPG
    161.5 KB · Views: 44
OP
OP
Past_Miner

Past_Miner

Contributor
Bronco Guru
Joined
Oct 22, 2003
Messages
1,021
The engine had a lifter tick when I assembled the truck before paint. This engine had a lot of miles, somewhere just under 180K if I remember right, but it never used any oil and it was always a strong runner. We pulled it apart to find the problem. The cam has clearly seen better days. However, the cylinder walls are in surprisingly good shape. You can still see the cross hatch from the original honing.

We ordered a stock rebuild kit and a mild RV cam that is reportedly compatible with the SD computer. Once we get this back together we will be able to start the final assembly.
 

Attachments

  • DSCF0303.JPG
    DSCF0303.JPG
    209.9 KB · Views: 50
  • DSCF0302.JPG
    DSCF0302.JPG
    201.1 KB · Views: 49
  • DSCF0270.JPG
    DSCF0270.JPG
    200.1 KB · Views: 56
  • DSCF0268.JPG
    DSCF0268.JPG
    223.8 KB · Views: 50
OP
OP
Past_Miner

Past_Miner

Contributor
Bronco Guru
Joined
Oct 22, 2003
Messages
1,021
I loomed and wrapped the wiring harnesses until I ran out of harness wrap tape. These were all tested during the pre-paint assembly so I just wanted to clean them up. There's more tape on order so I can get the transmission harness finished and put this behind me.
 

Attachments

  • DSCF0288.JPG
    DSCF0288.JPG
    232 KB · Views: 54
  • DSCF0291.JPG
    DSCF0291.JPG
    201.3 KB · Views: 57
OP
OP
Past_Miner

Past_Miner

Contributor
Bronco Guru
Joined
Oct 22, 2003
Messages
1,021
Lookin good Miner and you shop makes me cry with envy! Pretty sweet setup! :eek:

That shop is a funny thing, it seemed so big when I moved in and now.... I need more space. It sure makes it easier to work but it's dang hard to heat in the winter. We have made some progress lately though, hopefully we will get the engine back together this weeked.

A little teaser for an upcoming tech article:
 

Attachments

  • DSCF0396.JPG
    DSCF0396.JPG
    191.2 KB · Views: 63
OP
OP
Past_Miner

Past_Miner

Contributor
Bronco Guru
Joined
Oct 22, 2003
Messages
1,021
We have worked on some of the little things that needed finished. I ran new transmission cooler lines a couple of weeks ago. The fuel pump was replaced and the fuel gauge was calibrated to the sending unit. The wiring was completed and a second VSS was installed to support the electronic speedometer.

We finished the engine rebuild and got it back in the chassis last weekend. We also have the body back on the frame - this should be the last time. We were pushing to get enough wiring installed to start the engine and break in the cam but couldn't quite get that far. The new ignition switch was sticking in start and we spent hours trying to make it work properly. I finally got that sorted out during this week after work so I'm hoping to get the dash in and wiring finished this weekend.

After that there are about 10 boxes worth of parts to bolt back on but we are close enough we can finally see the end of this project coming.
 

Attachments

  • DSCF0554.JPG
    DSCF0554.JPG
    225.4 KB · Views: 50
  • DSCF0555.JPG
    DSCF0555.JPG
    227.6 KB · Views: 46
  • DSCF0553.JPG
    DSCF0553.JPG
    202.3 KB · Views: 49
  • DSCF0551.JPG
    DSCF0551.JPG
    249.8 KB · Views: 50
  • DSCF0550.JPG
    DSCF0550.JPG
    246.6 KB · Views: 51
OP
OP
Past_Miner

Past_Miner

Contributor
Bronco Guru
Joined
Oct 22, 2003
Messages
1,021
Engine Running Again

The last three weekends have pretty much been non-stop assembly. I was struggling with some of the dash wiring so I moved to the lights and emblems then came back to the dash. We painted the steering column and got it back in place. I finally got to twist the key and... it fired right up and smoothed out. The cam break in is done and it has a few hours on it now. The oil and water gauges were not responding so I installed new senders and they started to work but were way off. We pulled the cluster and calibrated the oil and water temp to mechanical gauges and put the rest of the dash together.
 

Attachments

  • DSCF0583.JPG
    DSCF0583.JPG
    233.8 KB · Views: 116
  • DSCF0573.JPG
    DSCF0573.JPG
    227.9 KB · Views: 126
  • DSCF0571.JPG
    DSCF0571.JPG
    216 KB · Views: 101
  • DSCF0568.JPG
    DSCF0568.JPG
    202.7 KB · Views: 125
OP
OP
Past_Miner

Past_Miner

Contributor
Bronco Guru
Joined
Oct 22, 2003
Messages
1,021
We scratched the windshield frame during the body installation so I broke the paint gun back out and repaired that. All of the under hood work is complete and the hood is back on. The brake master cylinder has a bad push rod seal so we could only get minimal brakes and I had to order a replacement. That should be here next week and the brakes will be finished too.

We moved on the the roll cage and interior yesterday and got the windshield in. I hung the pasenger side door today. After a few years of sitting around in trays and moving once I have lost a bunch of the fasteners for the door so I am waiting on an order to finish the doors next week.

One more good solid weekend and we should have everything complete except for the top, which we still need to paint. So far the only issues are the brake master cylinder, brake light switch and power to the satellite radio. Otherwise, everything is working like its supposed to be.
 

Attachments

  • DSCF0617.JPG
    DSCF0617.JPG
    230.4 KB · Views: 81
  • DSCF0615.JPG
    DSCF0615.JPG
    223.3 KB · Views: 92
  • DSCF0609.JPG
    DSCF0609.JPG
    240.4 KB · Views: 87
  • DSCF0604.JPG
    DSCF0604.JPG
    252.9 KB · Views: 85
  • DSCF0603.JPG
    DSCF0603.JPG
    253.7 KB · Views: 81
  • DSCF0600.JPG
    DSCF0600.JPG
    196.2 KB · Views: 77
  • DSCF0592.JPG
    DSCF0592.JPG
    200 KB · Views: 81
  • DSCF0590.JPG
    DSCF0590.JPG
    181.4 KB · Views: 89
  • DSCF0621.JPG
    DSCF0621.JPG
    225.9 KB · Views: 93
  • DSCF0624.JPG
    DSCF0624.JPG
    214.1 KB · Views: 128
OP
OP
Past_Miner

Past_Miner

Contributor
Bronco Guru
Joined
Oct 22, 2003
Messages
1,021
Door Glass Bumper Bracket

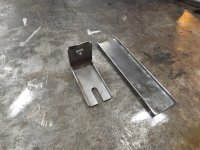
One of the door hardware parts that I was missing was the bracket that holds the glass bumper at the bottom of the door. One of the brothers here helped me find the replacement that Tom's sells but it looked a little flimsy to me so I went ahead and fabbed my own. It wasn't hard but it took some patience. I finished it up with some cold galv spray. I'm including the pictures in case it will help someone else.
 

Attachments

  • DSCF0647.JPG
    DSCF0647.JPG
    246.3 KB · Views: 28
  • DSCF0646.JPG
    DSCF0646.JPG
    198.9 KB · Views: 25
  • DSCF0645.JPG
    DSCF0645.JPG
    236.4 KB · Views: 27
  • DSCF0644.JPG
    DSCF0644.JPG
    231 KB · Views: 25
  • DSCF0642.JPG
    DSCF0642.JPG
    230.3 KB · Views: 28
  • DSCF0641.JPG
    DSCF0641.JPG
    236.4 KB · Views: 29
  • DSCF0640.JPG
    DSCF0640.JPG
    208 KB · Views: 25
  • DSCF0648.JPG
    DSCF0648.JPG
    203.1 KB · Views: 25
  • DSCF0649.JPG
    DSCF0649.JPG
    247.8 KB · Views: 27
OP
OP
Past_Miner

Past_Miner

Contributor
Bronco Guru
Joined
Oct 22, 2003
Messages
1,021
Bad Rear Main Seal

Back at the end of May I pushed hard to get the little things fixed. We changed the master cylinder and got the brakes working, which also fixed the brake switch. The pedal just wasn't firm enough for the switch to activate until the system could build some real pressure. I ran a new power cable for the satellite radio and went for a drive.

Somewhere along the drive there was a massive cloud of blue smoke that puffed out of the exhaust and it sounded like there was some sort of loud pop. We found that the rear two cylinders weren't firing at all and it was causing the engine to smoke a lot. After a new set of plug wires the smoke disappeared but there was oil pouring out of the bell housing. We assumed that we had some sort of overpressure problem with the engine and had blown out the rear main seal. I had a serious lapse in motivation at that point and let the truck sit until this weekend.

My youngest son came to visit and helped me pull the tranny and replace the seal. When we got to the block there was no obvious problem with the seal but we changed it anyway and cleaned the block up again. When we fired it up the oil poured out again. This time the block was clean enough to see that the oil was really pouring from a huge hole in the driver side valve cover gasket.

Wow - That was a lot of work to find out that it was really just a gasket. Obviously, I need to diagnose a little harder before I jump to repairs! %).

Anyway, the engine is completely leak free and running great.
 

Attachments

  • DSCF0727.JPG
    DSCF0727.JPG
    185.3 KB · Views: 39
  • DSCF0730.JPG
    DSCF0730.JPG
    204.5 KB · Views: 38
  • DSCF0731.JPG
    DSCF0731.JPG
    247.4 KB · Views: 52
Last edited:
OP
OP
Past_Miner

Past_Miner

Contributor
Bronco Guru
Joined
Oct 22, 2003
Messages
1,021
How it Looks Today

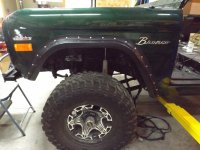
Everything works and it drives like it's brand new. We still need to paint the top but the Bronco itself is 100% finished.

We started to prep the top today and found that the PO had glued something to all of the interior surfaces and we are having trouble getting the glue off to paint. It looks like we need to get the sandblaster out and clean it that way. I will post something in the next couple of weeks when we figure that out.

Here is the rest of the finished product.
 

Attachments

  • DSCF0656.JPG
    DSCF0656.JPG
    205.2 KB · Views: 116
  • DSCF0655.JPG
    DSCF0655.JPG
    187.6 KB · Views: 128
  • DSCF0654.JPG
    DSCF0654.JPG
    195.4 KB · Views: 110
  • DSCF0653.JPG
    DSCF0653.JPG
    194 KB · Views: 131

Stutsmo

Contributor
Bronco Guru
Joined
Jan 24, 2009
Messages
2,552
What a nice looking Bronco! Its gotta feel good to finally be "Done"!
 
OP
OP
Past_Miner

Past_Miner

Contributor
Bronco Guru
Joined
Oct 22, 2003
Messages
1,021
The PO Strikes Again

So we pulled the top we are going to use out of storage and some PO along the way had glued some sort of headliner in the thing somewhere along its life. It looks like it was carpet complete with a thick layer of carpet glue and a thick layer of black paint by yet another PO. We tried to wire wheel the glue out but it wouldn't touch it so I broke out the trusty old sandblaster.

Of course, I had to unclog the blast pot and rebuild it too since I haven't used in in a few years. That took a week and I was able to get the thing cleaned out this weekend. That carpet glue is stubborn but two full days did the trick.

Hopefully I can start shooting primer before the weather turns too cold. Maybe next weekend.
 

Attachments

  • DSCF0745.JPG
    DSCF0745.JPG
    150.6 KB · Views: 39
  • DSCF0741.JPG
    DSCF0741.JPG
    171.9 KB · Views: 39
  • DSCF0739.JPG
    DSCF0739.JPG
    167.7 KB · Views: 42
  • DSCF0737.JPG
    DSCF0737.JPG
    186.1 KB · Views: 39
  • DSCF0736.JPG
    DSCF0736.JPG
    175.2 KB · Views: 39
  • DSCF0735.JPG
    DSCF0735.JPG
    153.4 KB · Views: 42
  • DSCF0746.JPG
    DSCF0746.JPG
    176.3 KB · Views: 36
Top