• Welcome to ClassicBroncos! - You are currently viewing the forums as a GUEST. To take advantage of all the site features, please take a moment to register. It's fast, simple and absolutely free. So please join our community today!
    If you have problems registering or can't log into your account, please contact Admin.

1971 Bronco Crawler Build - Texas

Yeller

Contributor
Bronco Guru
Joined
Mar 27, 2012
Messages
6,090
Loc.
Rogers County Oklahoma
I think you need a set of spare tires... let me know if you'd like a set of 4 spares cheap.

build is looking good. keep up the work
 
OP
OP
T

tribaltalon

Full Member
Joined
Dec 23, 2014
Messages
166
Loc.
Humble Texas


Ended up lowering the front almost 6 inches. Looks way better now. The front end is drooping a little since there's nothing holding up the grill.
 
OP
OP
T

tribaltalon

Full Member
Joined
Dec 23, 2014
Messages
166
Loc.
Humble Texas
Thanks Mike! I've always loved your EB.


I think tomorrow I'm going to take the plunge and cut out the old engine cross member. The trackbar can't exist with the crossmember there.
 

Scoop

Contributor
Have Bronco, Will Travel
Joined
Feb 1, 2006
Messages
10,637
Loc.
Cuchara, CO
Don, looking good. Are you going to narrow the front and/or rear? Now's the time to do it if your going to tube the front.
 
OP
OP
T

tribaltalon

Full Member
Joined
Dec 23, 2014
Messages
166
Loc.
Humble Texas


1.25 Ruffstuff Heims with 5/8 misalignment spacer and Ruffstuff brackets. These are going in the ends of my Radius Arms. BEEF. I'll be welding up this stuff after work and getting it welded onto the frame. As usual I'll be plating the frame where the bracket's are going for additional strength.

I got a set of coil cups so that the coils will sit flush on the axle like they're supposed to, and a inboard shock mount for the rear. Really all I have left to figure out on the front is how I'm going to mount the front shocks. I plan on building something that'll tie into the coil bucket towers and the engine cage (which is yet to be built) Then when everything's mocked up, it'll be time to burn it all in for good. Then all I have left to do is build a full hydro mount for the front axle, orbital mount on the firewall, install the trans and tcase, get some driveshafts built, new radiator hoses and brake lines and in theory it'll be ready to rock. Sounds simple right. LOL!
 
OP
OP
T

tribaltalon

Full Member
Joined
Dec 23, 2014
Messages
166
Loc.
Humble Texas
I've been super busy with work and life lately, haven't hardly had any chances to work on the EB. Finally got some work done on it yesterday though. My goal has been to get this thing done in time for the Lone Star Early Bronco Roundup at K2 the third weekend of April, but I'm starting to doubt that I'll make that. It's just a ton of work for me to do by myself. So I decided to go ahead and cut the cage out and redo it to where its the right size and shape for my liking. Its all going to fit like a normal family cage to where I can put a hardtop on next winter if I want. It'll end up being probably about 3 inches shorter height wise which will make this thing easily fit in the garage. before I cut the cage out the tallest point was at 80 inches, and the top of the garage door was at 81.

Also got the frame brackets for the radius arms on. It's definitely coming along pretty well, just need to quit adding additional projects onto this existing project. LOL


In that picture you can see how I raised the coil buckets. The axle wasnt centered in that picture so the spring was a little bowed out. I'm going to gusset behind the towers as well as tie them into the engine cage for strength.


OP
OP
T

tribaltalon

Full Member
Joined
Dec 23, 2014
Messages
166
Loc.
Humble Texas
havent made a ton of headway, mostly due to time.


I did manage to dust off the 3d Printer and make me some bronco emblems.


These are pretty much straight off the printer so they still need to be smoothed out and stuff. also made a bigger one that would be good to go on the tailgate. If i had a tailgate. lol.
 
OP
OP
T

tribaltalon

Full Member
Joined
Dec 23, 2014
Messages
166
Loc.
Humble Texas
Well, this thing's been collecting dust for a couple of weeks while I felt sorry for myself for not finishing the bronco in time for the roundup. I've just been crazy busy with work and life and not really having any money thanks to this crappy oilfield environment isn't helping. After going to the LEBC roundup at K2 last weekend, I think I've gotten enough of a pickmeup to push through and get this thing done, at least enough to be able to start doing some trails. I have a few things I need to order to get any real fabrication done, but in the meantime I decided to tackle something that's been bugging me. The firewall/behind the dash was super rusty, and I got a couple of spare firewalls from a fellow member of LEBC when I picked up the new motor, so I decided that's what I'd work on today. This is how i decided to do it.


the underside of the firewall was pretty rusty.


The donor firewall top I'm using


essentially totally rust free, the bubbling is that rubber undercoating and paint. MUCH better then the old one.


Tomorrow I'll work on getting it all tacked in and stuff. I'm actually kind of thinking about using some sheetmetal and screwing it to both ends, and then welding it from the inside just to make sure its strong. I only want to do this one time. I also took out the pedals since they are super rusty and stiff/sticking like crazy. My plan is to pull that pin out and clean it off real good to where the pedals have a smooth action. It'll also be getting a new brake master cylinder and the full hydro orbital is going to be mounted either to the firewall or inside the dash. havent figured that one out yet.

Next is cutting out the stock engine cross member (in the way of the track bar) and finish working on the track bar mount.
 

Mountain Ram

Contributor
Recovering Masshole
Joined
May 8, 2011
Messages
3,387
Loc.
Abingdon, VA
It looks like you cut off the the lips and edges on those panels where the factory tack welds were... if thats the case, it will be alot more work to weld these back together with any strength. There is alot of stuff mounted to the firewall- pedals, brakes steering, it needs to be structurally sound. I would recommend welding it instead of bolting it together.
 

sprdv1

Contributor
REBEL
Joined
Mar 8, 2007
Messages
81,779
Very nice work man. Like those


havent made a ton of headway, mostly due to time.


I did manage to dust off the 3d Printer and make me some bronco emblems.


These are pretty much straight off the printer so they still need to be smoothed out and stuff. also made a bigger one that would be good to go on the tailgate. If i had a tailgate. lol.
 
OP
OP
T

tribaltalon

Full Member
Joined
Dec 23, 2014
Messages
166
Loc.
Humble Texas
It looks like you cut off the the lips and edges on those panels where the factory tack welds were... if thats the case, it will be alot more work to weld these back together with any strength. There is alot of stuff mounted to the firewall- pedals, brakes steering, it needs to be structurally sound. I would recommend welding it instead of bolting it together.

Yeah I know. Thats why I was going to screw both ends to a strip of sheetmetal, and then weld the seam as well. Just to make sure its plenty strong. Really the only thing I have being held by the firewall is going to be the brake booster and pedals though, i'm going to run a tube across the dash to mount the orbital to. Good point though. I think it'll be alright. If it starts to fall apart i'll just turn this thing into a buggy with bronco skins. It's already pretty much there anyway. LOL
 
OP
OP
T

tribaltalon

Full Member
Joined
Dec 23, 2014
Messages
166
Loc.
Humble Texas
made some more progress last night. polished the pin that the pedals pivot on and I think I've got that issue resolved, should work alot smoother now without sticking. I also finished cutting out the engine crossmember in order to make room for the track bar. I tried to make the track bar as long as I could and level as possible. stood on the front of the bumper and jumped up and down and compressed the suspension and the bar never got closer then a couple inches away from the diff cover. Its still just tacked on like everything else until I get everything back on it and see how it all sits fully loaded.


The reason why its so close to level is to try and eliminate lateral steering which is typically a big issue with radius arms and full hydro.
 
OP
OP
T

tribaltalon

Full Member
Joined
Dec 23, 2014
Messages
166
Loc.
Humble Texas
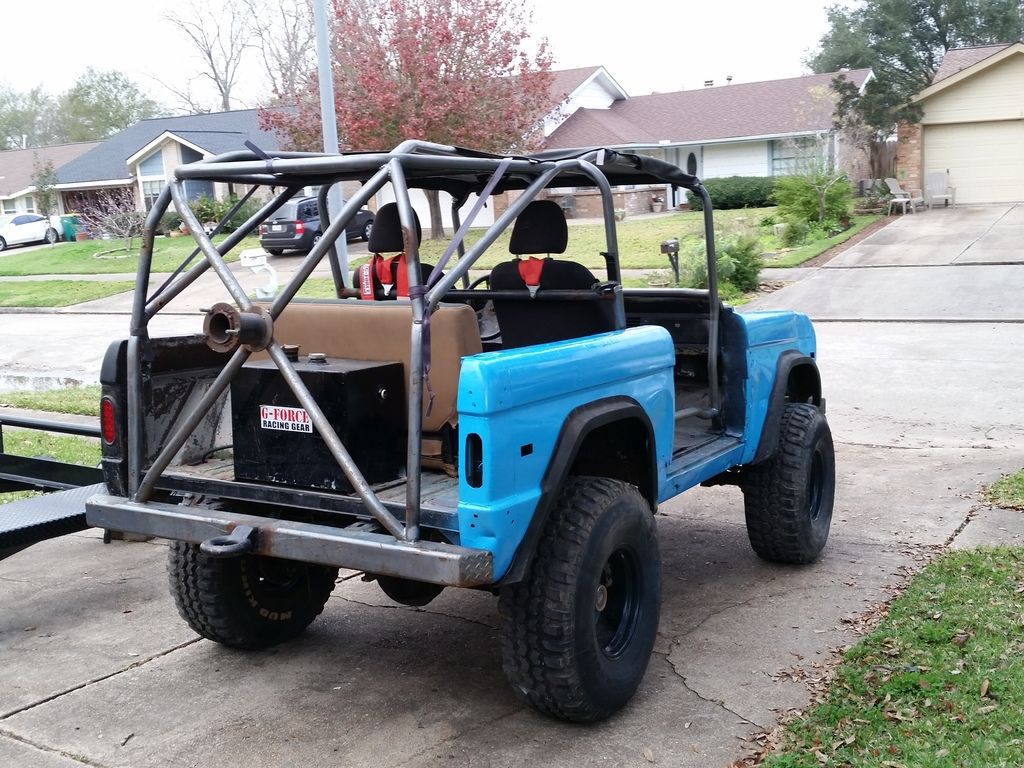
still waiting on parts to come in, so yesterday I decided to tackle the cage revamp. One of the things I hated most about this bronco was how tall the cage was. I didn't realize just how bad it was until I got a windshield frame and saw that the cage was easily 7-8 inches taller then the top of the windshield. WOW.


So what I ended up doing was simply cutting about 6 inches off of the bottom of the legs, I'm going to weld new plates on the bottoms and tie it all into the frame.


The next thing I did was flip the rear section of the cage on its end, which will allow the cage to fit inside of the bronco instead of welded to the rear bumper.

Before:


After:


It's still not the prettiest cage in the world, but its going to get a top of some kind and I'll feel alot more comfortable knowing my welds are holding it together instead of the P.O's booger welds.

I also need to go to a junkyard and pick up a Ford ranger 60/40 front seat out of an ext. cab soon so that I can build the seat mounts into the cage.
 
OP
OP
T

tribaltalon

Full Member
Joined
Dec 23, 2014
Messages
166
Loc.
Humble Texas
Making some more progress. Did some more work on the cage to fine tune it, and welded up some more of the firewall. I actually fired up the old Harbor Freight 90v Mig as I remembered the last time I used that junker that it was basically just good for sheetmetal.... and I was right! works like a charm on sheetmetal compared to my Lincoln 230v Mig. lol.

I took apart the Dana 20 finally to modify the shift rails for the twin shifters, what a freaking pain that is. While doing this and sitting with my girlfriend, we got to talking about transfer cases and how I'd end up probably pulling it back out and putting an Atlas II in and she suggested just going ahead and getting the Atlas now while I've got it all apart. What a great idea! Sooooo.. hopefully today I'll be ordering an Atlas. I found a fantastic crawl ratio calculator on one of the jeep forums I used to frequent.

http://www.grimmjeeper.com/gears.html

I've pretty much decided on running a 5:1 Atlas, with my NP435 and 5.13 gears in the 1 tons.


on the left is with the 5:1 Atlas, on the right is the 4.3:1 Atlas.

I'm really more of a crawler then anything else, if I'm really gonna get stupid with the skinny pedal I usually go into 4 high anyway. After I get the Atlas in, it'll be time to measure for my new Tom Woods driveshafts.

For shits and giggles.. here's the stock dana 20 on the left and the atlas 5:1 on the right.


I'm hoping this weekend to get the motor fired up for the first time, I'm pretty sure I can do it without having a bellhousing attached to the motor.. right?
 
OP
OP
T

tribaltalon

Full Member
Joined
Dec 23, 2014
Messages
166
Loc.
Humble Texas
Got the Atlas II ordered, and got some more work done to the cage. I've gotten the majority of the parts in that i've ordered recently so i'm going to be pretty busy the next few weeks. lol. I'm really hoping to grind away at my To-Do list to where when the Atlas does arrive that all I've got left to do is just install the NP435, Atlas and Tom woods driveshafts. One thing that would really help me out is if somebody here could take a measurement from the back of the motor where the bellhousing mounts to the front output and rear output of their Atlas II with a NP435. That way I could get something mocked up to be able to figure out driveshaft lengths and order some now. otherwise I'll have to wait until the transfer case comes in. anyway, here's a couple pics of the cage.


Still have a ton of welding left to do on the cage obviously but I'm pretty happy with it now.
 

Desert Thrasher

Bronco Guru
Joined
Jul 14, 2001
Messages
2,353
It would be best to wait until everything is installed and your sitting on your suspension to measure for driveshafts.
 
Top