BattlementFab
New Member
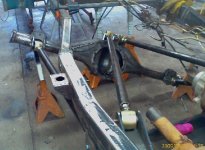
After fielding a few phone calls and emails asking about various suspension setups, we decided to show you what we can offer. Introducing the Battlement Fabrication 4-link/Radius arm setup. This is a complete setup for both axles.
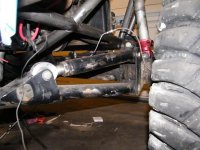
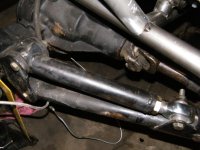
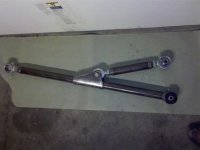
Up front we have our cool guy radius arms. These are built using 2” OD 0.25 wall tubing. All the joints and brackets for the set are:
(2) 2.63” Forged Chromoly threaded Ballistic Joints for fine adjustment
(2) 1” Ruffstuff adjustable Heims with stepdown spacers
(4) 2” Bushings w/ grease fitting
(2) Battlement Fabrication Saddle Brackets
(2) Battlement Fabrication Frame mount brackets
(2) Battlement Fabrication Radius Arm/Coilover axle mount
OR
(2) Battlement Fabrication Radius Arm/Coil spring axle mount with integrated shock mount
Misc. 9/16 hardware
Our saddle brackets are designed so you can move either the bracket or heim for tuning your caster to exactly where you want it.
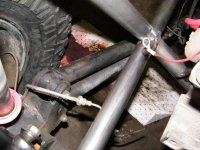
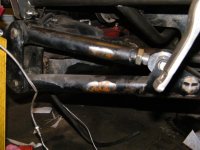
For the rear 4-link we use 2”, 2.1/4” or 2.1/2” tubing with either 1” or 7/8” adjustable Heims with the proper size tube inserts, depending on what your needs are. Bracketry includes:
(2) Battlement Fabrication Frame mount brackets
(2) Battlement Fabrication Upper Axle Mounts
(2) Battlement Fabrication Lower Axle Mount
(2) Battlement Fabrication Shock Tabs
For the rear, the Ruffstuff heims are LH/RH thread to allow adjustment while on the vehicle, utilizing locknuts to keep everything in place when you have it where you want it.
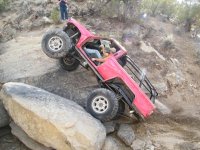
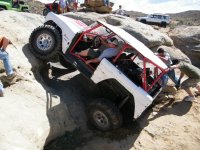
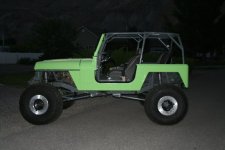
This IS NOT a one size fits all setup. We will work with you for your specific fitment. Whether you need a different style bracket, longer tubes, or whatever else you can think of. We design our suspensions to be flexible to your vehicle and your needs. This setup has been modified on our end for use on Jeeps and Toyotas as well as the Broncos it was designed for. Prices start at $1200 for front and rear. We can also do just front or rear setups.
Feel free to call, email, or PM us with any questions you may have. We look forward to hearing from you!
970-462-7180
sales@battlementfab.com
Up front we have our cool guy radius arms. These are built using 2” OD 0.25 wall tubing. All the joints and brackets for the set are:
(2) 2.63” Forged Chromoly threaded Ballistic Joints for fine adjustment
(2) 1” Ruffstuff adjustable Heims with stepdown spacers
(4) 2” Bushings w/ grease fitting
(2) Battlement Fabrication Saddle Brackets
(2) Battlement Fabrication Frame mount brackets
(2) Battlement Fabrication Radius Arm/Coilover axle mount
OR
(2) Battlement Fabrication Radius Arm/Coil spring axle mount with integrated shock mount
Misc. 9/16 hardware
Our saddle brackets are designed so you can move either the bracket or heim for tuning your caster to exactly where you want it.
For the rear 4-link we use 2”, 2.1/4” or 2.1/2” tubing with either 1” or 7/8” adjustable Heims with the proper size tube inserts, depending on what your needs are. Bracketry includes:
(2) Battlement Fabrication Frame mount brackets
(2) Battlement Fabrication Upper Axle Mounts
(2) Battlement Fabrication Lower Axle Mount
(2) Battlement Fabrication Shock Tabs
For the rear, the Ruffstuff heims are LH/RH thread to allow adjustment while on the vehicle, utilizing locknuts to keep everything in place when you have it where you want it.
This IS NOT a one size fits all setup. We will work with you for your specific fitment. Whether you need a different style bracket, longer tubes, or whatever else you can think of. We design our suspensions to be flexible to your vehicle and your needs. This setup has been modified on our end for use on Jeeps and Toyotas as well as the Broncos it was designed for. Prices start at $1200 for front and rear. We can also do just front or rear setups.
Feel free to call, email, or PM us with any questions you may have. We look forward to hearing from you!
970-462-7180
sales@battlementfab.com
Attachments
-
 18547_332321331216_294171231216_5300204_4011844_n.jpg32.6 KB · Views: 1,482
 -
 DSCF1520.jpg161 KB · Views: 934
 -
 DSCF1508.jpg138.1 KB · Views: 1,124
 -
 19547_294191131216_294171231216_5116819_4917482_n.jpg35.7 KB · Views: 1,072
 -
 19547_294211811216_294171231216_5116928_5553105_n.jpg70.7 KB · Views: 1,569
 -
 19547_294194676216_294171231216_5116840_3275636_n.jpg49 KB · Views: 1,559
Last edited: