- Joined
- May 20, 2003
- Messages
- 629
Why "FRIDAY"?- Because that's the only day I ever get to work on it!
Adiction #3 - sorry it's long!
As far as addictions go - I have this one real bad. I guess everyone needs a hobby (or should I say vice). I want to introduce you to my addiction and give you a bit of its history with me.
I moved to Colorado from California in 1993 driving this very stylish restored 1968 200D MBZ. My dad and I had rebuilt this classic and just before my wedding my Dad had it painted so I could cruise the California coastline in style on my honeymoon. I loved that car, lots of great memories restoring it and driving it as well. In college it was affectionately named Casper for its ghost white appearance and the way it seemed to float down the road.
In September of 1993 I drove Casper loaded to the windows to Colorado from California as my wife and I relocated there three week after we were married. I remember filling up on diesel fuel in Reno NV and not filling it again until I got to a truck stop on the south side of Salt Lake City, UT - something like 525 miles talk about great fuel economy! (Oh to have that in a bronco) When I arrived in Colorado Springs we parked it, unloaded it and she sat there overnight. Casper gave up the ghost that night and that engine never fired again! While Casper sat waiting on new life I purchased my first Bronco.
I was working part time in construction and passed by this Copper Bronco everyday on my way to work. I finally stopped to inquire about the newly placed 4Sale sign in her window. We struck a deal and the Bronco was now mine!
A 1972 Bronco - the addiction was on. Two years later she was gone! Uncle Sam wanted more of my measly 17,000 salary than I had anticipated. The copper bronco had to go. Needless to say, I was devastated and couldn’t wait to get my hands on another one.
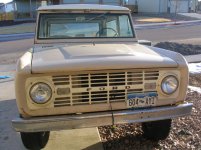
A couple years later I bought a 1974 with a C4, and power steering, a bit of an upgrade from the ’72 except for the beltline rust. In January of 2001 I acquired my third bronco, a 1966 super stock, uncut beauty with very little rust to speak of. I was now the proud owner of 2 Broncos at one time! I was in hog heaven; however my wife said one had to go. The ’74 drew the short straw and was sold to a former student for what I paid and put into it (when can a person do that?!)
I only problem with that ’66 was it was gutless. The 170 is great on torque but lousey to drive on the highway (kind of like Casper was). Despite it’s lack of get up and go I fell more into the addiction and love the nuances of owning the ’66.
There was a time when I wanted to sell it… September of 2005 I had had enough! Too many mechanical problems, no time to work on her, and still no money - I’m sure you all have been there! I was complaining to a friend of mine and told him I was going to put it on the market when I got home. I did and had 16 emails almost immediately! My friend, a true friend in deed, would not let me sell it. He called me and said to bring it down to his Shop and he would get it running right. I took him up on his offer and had it towed to his body shop.
My good friend then conspired with my wife to do a “mini overhaulin” on the Bronco and he stripped her down. His finances got really tight and the Bronco sat behind his shop for three years. I knew he really wanted to do it up right for me and I was so grateful for that blessing. In fact, one time I mentioned to my friend that the Bronco had been there over three years and he was crushed!
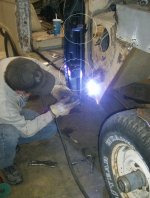
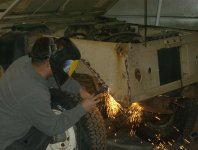
Well last November, 2008 I had had enough. I couldn’t take it any longer; the ’66 had to live! I started taking one day a week to work on the beast at my friends shop. How many guys have a buddy who owns a body shop and is willing to let you use all their cool tools? I get to do what I always intended to do and restore my Bronco, but I get to do it with his expert guidance. I’m having a blast!
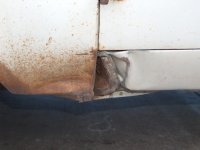
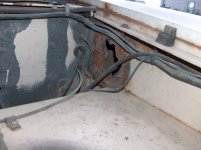
Here is what I started with and this is some of the work that I get to do on my rig! I’ll update pictures as I have time to chronicle my progress! The plan … I want to have it on the road by this summer 2009! Done? Nope! Are they ever?
Added pic of the 74 after one of my former students got ahold of it. FILLED IT WIHT NEWSPAPER!
My plans are to leave it uncut, 1” BL, mild 2.5” suspension lift, maybe 31x10.50’s or 33x9.50’s. I have a 351 and a 302 to decide about upgrading too, power steering, chevy disc conversion on the dana 30, hydroboost, 6 point chage and a bunch of other stuff!
Adiction #3 - sorry it's long!
As far as addictions go - I have this one real bad. I guess everyone needs a hobby (or should I say vice). I want to introduce you to my addiction and give you a bit of its history with me.
I moved to Colorado from California in 1993 driving this very stylish restored 1968 200D MBZ. My dad and I had rebuilt this classic and just before my wedding my Dad had it painted so I could cruise the California coastline in style on my honeymoon. I loved that car, lots of great memories restoring it and driving it as well. In college it was affectionately named Casper for its ghost white appearance and the way it seemed to float down the road.
In September of 1993 I drove Casper loaded to the windows to Colorado from California as my wife and I relocated there three week after we were married. I remember filling up on diesel fuel in Reno NV and not filling it again until I got to a truck stop on the south side of Salt Lake City, UT - something like 525 miles talk about great fuel economy! (Oh to have that in a bronco) When I arrived in Colorado Springs we parked it, unloaded it and she sat there overnight. Casper gave up the ghost that night and that engine never fired again! While Casper sat waiting on new life I purchased my first Bronco.
I was working part time in construction and passed by this Copper Bronco everyday on my way to work. I finally stopped to inquire about the newly placed 4Sale sign in her window. We struck a deal and the Bronco was now mine!
A 1972 Bronco - the addiction was on. Two years later she was gone! Uncle Sam wanted more of my measly 17,000 salary than I had anticipated. The copper bronco had to go. Needless to say, I was devastated and couldn’t wait to get my hands on another one.
A couple years later I bought a 1974 with a C4, and power steering, a bit of an upgrade from the ’72 except for the beltline rust. In January of 2001 I acquired my third bronco, a 1966 super stock, uncut beauty with very little rust to speak of. I was now the proud owner of 2 Broncos at one time! I was in hog heaven; however my wife said one had to go. The ’74 drew the short straw and was sold to a former student for what I paid and put into it (when can a person do that?!)
I only problem with that ’66 was it was gutless. The 170 is great on torque but lousey to drive on the highway (kind of like Casper was). Despite it’s lack of get up and go I fell more into the addiction and love the nuances of owning the ’66.
There was a time when I wanted to sell it… September of 2005 I had had enough! Too many mechanical problems, no time to work on her, and still no money - I’m sure you all have been there! I was complaining to a friend of mine and told him I was going to put it on the market when I got home. I did and had 16 emails almost immediately! My friend, a true friend in deed, would not let me sell it. He called me and said to bring it down to his Shop and he would get it running right. I took him up on his offer and had it towed to his body shop.
My good friend then conspired with my wife to do a “mini overhaulin” on the Bronco and he stripped her down. His finances got really tight and the Bronco sat behind his shop for three years. I knew he really wanted to do it up right for me and I was so grateful for that blessing. In fact, one time I mentioned to my friend that the Bronco had been there over three years and he was crushed!
Well last November, 2008 I had had enough. I couldn’t take it any longer; the ’66 had to live! I started taking one day a week to work on the beast at my friends shop. How many guys have a buddy who owns a body shop and is willing to let you use all their cool tools? I get to do what I always intended to do and restore my Bronco, but I get to do it with his expert guidance. I’m having a blast!
Here is what I started with and this is some of the work that I get to do on my rig! I’ll update pictures as I have time to chronicle my progress! The plan … I want to have it on the road by this summer 2009! Done? Nope! Are they ever?
Added pic of the 74 after one of my former students got ahold of it. FILLED IT WIHT NEWSPAPER!
My plans are to leave it uncut, 1” BL, mild 2.5” suspension lift, maybe 31x10.50’s or 33x9.50’s. I have a 351 and a 302 to decide about upgrading too, power steering, chevy disc conversion on the dana 30, hydroboost, 6 point chage and a bunch of other stuff!
Attachments


Last edited: