• Welcome to ClassicBroncos! - You are currently viewing the forums as a GUEST. To take advantage of all the site features, please take a moment to register. It's fast, simple and absolutely free. So please join our community today!
    If you have problems registering or can't log into your account, please contact Admin.

Centering with Adjustable Trac-Bar?

Chief Master Sergeant

Retired U.S. Air Force
Joined
Nov 6, 2002
Messages
5,219
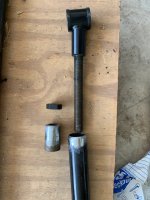
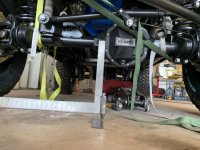
I've had my adjustable trac bar on for a few years and when I first installed it, the only way to get it centered was to omit the lock nut. Went to have an alignment done and they won't align it without that lock nut on there. So, I reinstalled it. Now, adjusted all the way in to the lock nut, the axle sticks out farther on the passenger side than the driver's side. What am I missing?
 

jamesroney

Sr. Member
Joined
Sep 11, 2007
Messages
1,952
Loc.
Fremont, CA
Your signature line shows that you are running a 2.5 inch lift. Are you running a track bar lowering bracket with that lift?

Adjustable track bars have to compromise for various lifts and various track bar brackets. The track bar is basically the hypotenuse of a right triangle. Since your axle is pushed to the passenger side, it either needs more lift, less drop bracket, or a shorter track bar.

You should measure your track bar length at static ride height. Then find a track bar that meets your specific needs. If you can weld, then shortening the track bar is straightforward. Otherwise, you'll need to get the right one.
 

rguest3

Bronco Guru
Joined
Dec 13, 2012
Messages
3,780
Something ain't right? A Bronco Adjustable Trac Bar is very adjustable and should accommodate just about all lifts (Or no lift) if it's set up correctly which means, with or without a Drop Trac Bar Bracket as needed.

What Adjustable Trac Bar do you have?

How much lift do you have? Is there a Drop Trac Bar Bracket installed?

How about some pictures of the Steering linkage and Trac Bar?
 
Last edited:
OP
OP
Chief Master Sergeant

Chief Master Sergeant

Retired U.S. Air Force
Joined
Nov 6, 2002
Messages
5,219
Something ain't right? A Bronco Adjustable Trac Bar is very adjustable and should accommodate just about all lifts (Or no lift) if it's set up correctly which means, with or without a Drop Trac Bar Bracket as needed.

What Adjustable Trac Bar do you have?

How much lift do you have? Is there a Drop Trac Bar Bracket installed?

How about some pictures of the Steering linkage and Trac Bar?


Pretty sure it’s a WH adjustable trac bar. Had it on awhile. Does have a drop bracket. 2 1/2” WH suspension lift and 1” WH body lift.


Sent from my iPhone using Tapatalk
 

SHX669

Bronco Guru
Joined
Jan 9, 2009
Messages
1,997
I'm set up almost identical to you - 2 1/2 " suspension ' 1" body , Whs adjustable trac bar - and I had to cut the lock nut in half - about the width of a jam nut - turned out perfect .
 

rguest3

Bronco Guru
Joined
Dec 13, 2012
Messages
3,780
CMS - Post some pictures of what you have.

I have had the same suspension setup as you (Drop Trac Bar Bracket/Drop Pitman Arm too) on many Broncos and have not had this issue.

Was the Body centered / aligned on the Frame when you installed the New Body Mounts? Even stock Broncos with original mounts may not be centered or square.

Is the Frame centered over the Front Axle? This is what you are really looking for with an adjustable Trac Bar.
 

RonJones

Contributor
Full Member
Joined
Jun 30, 2001
Messages
332
When I centered the body on the frame (73, 2.5” suspension lift), all the track bars I had (see below) were too long. I ended up cutting 2” off a TBP trac bar after grinding the welds off and disassembling it, then rewelding it.

The easiest and most accurate way I found to check measurement was placing a large square up against the inner flange of the axle pumpkin, which is the center of a D44 axle, parallel to the axle tube (mark concrete with 2 Sharpey points using a plumb bob, and place the long axis on that). Next, measure midway between the two frame rails, mark and tape a plumb bob string on the front crossmember. Put another square abutting the first square and adjust. The goal is putting the plumb bob on the front square.
 

Attachments

  • A82ADDFE-A2EB-47B5-AFEB-CA81C7E9188C.jpeg
    A82ADDFE-A2EB-47B5-AFEB-CA81C7E9188C.jpeg
    62.2 KB · Views: 119
  • B1D1D763-BA5A-44D2-ACC7-BCA09B78D3F8.jpeg
    B1D1D763-BA5A-44D2-ACC7-BCA09B78D3F8.jpeg
    114.1 KB · Views: 109
  • 35C7374C-DB04-4287-A832-F72262C008EC.jpeg
    35C7374C-DB04-4287-A832-F72262C008EC.jpeg
    122.4 KB · Views: 112
Last edited:

garberz

Bronco Influencer
Joined
Jun 24, 2007
Messages
6,861
Loc.
Conejo Valley, Ca.
There should be enough female threads to cut 3/4” off. You may also need to cut the same amount off the male end as well. The threaded sections are extra long, just for this situation.

Mark.
 
Top