• Just a reminder that you won't be able to start new posts or reply to existings posts in the Archive forum.

    This is where all the old posts go so they can still be used for reference and searched.
  • Welcome to ClassicBroncos! - You are currently viewing the forums as a GUEST. To take advantage of all the site features, please take a moment to register. It's fast, simple and absolutely free. So please join our community today!
    If you have problems registering or can't log into your account, please contact Admin.

Chandlers 75 build thread

Attac

Contributor
Sr. Member
Joined
Jun 29, 2015
Messages
865
So I figured I should start a build thread on my 15 year old sons bronco.
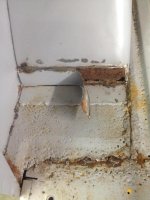
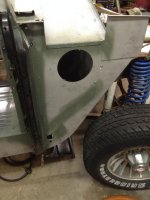
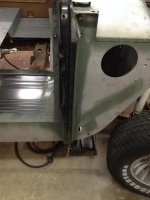
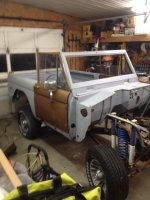
After I finished mine he told me he would like to have a bronco for his first vehicle.(just like me) so I went on the hunt and found a couple of really rusty ones here locally but got a bunch of parts in the deal. I realized that a total rebody done by us in the evenings would prob not work in the under a year timeframe to build it so I looked on the forums and other classifieds for a good tub/doors. I found two that were reasonably priced so I bought them and this is the first of the two. The other one is for Chandlers girlfriends dad.(Bronco Buster on here).
and away we go.
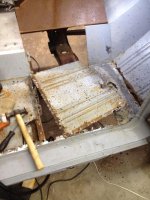
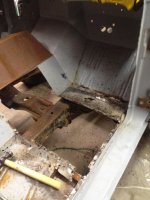
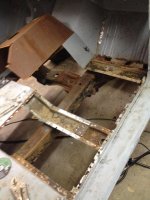
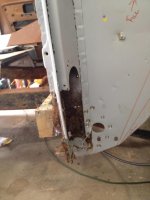
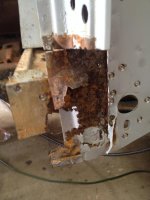
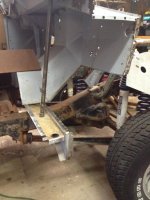
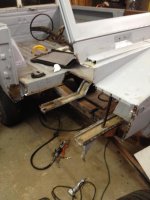
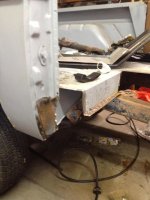
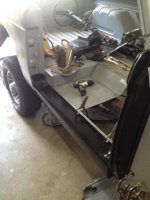
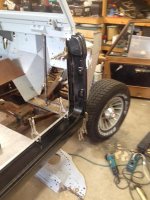
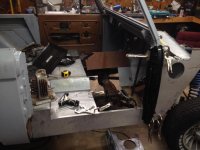
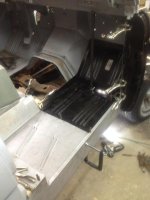
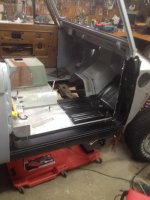
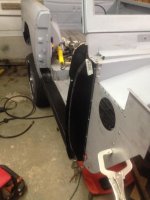
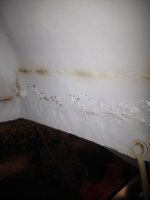
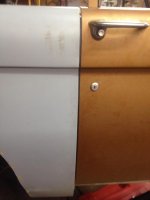
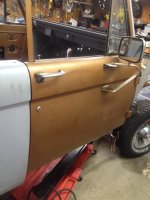
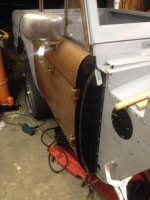
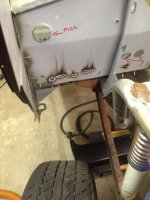
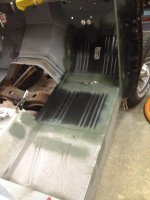
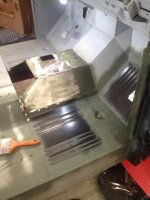
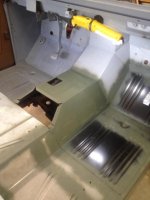
Got this one 3 hrs from the house so we went and picked it up on a sunday and brought it home stripped it down and put the body and chassis in the work shop
 

Attachments

  • 1.jpg
    1.jpg
    87 KB · Views: 246
Last edited:
OP
OP
Attac

Attac

Contributor
Sr. Member
Joined
Jun 29, 2015
Messages
865
The doors are perfect and all of the sheet metal has already been replaced except for the inner outer rocker on passenger side. The PO had all of these parts he gave me with it along with a new front pillar and kick panel but I didn't think I would need them....I was wrong. Once we opened up the rocker we could see the rust was working from the inside of the sandwiched 3 panels to the inner and outside. So this was the progression
 

Attachments

  • 2.jpg
    2.jpg
    103.7 KB · Views: 269
  • 3.jpg
    3.jpg
    89.9 KB · Views: 240
  • 4.jpg
    4.jpg
    97 KB · Views: 247
  • 5.jpg
    5.jpg
    66.6 KB · Views: 231
  • 6.jpg
    6.jpg
    76.3 KB · Views: 243
  • 7.jpg
    7.jpg
    88.2 KB · Views: 252
OP
OP
Attac

Attac

Contributor
Sr. Member
Joined
Jun 29, 2015
Messages
865
So we finished grinding all of the spot weld spots down and went to fitting the new panels. We just mocked them up tonight they still need to be ..tweeked.. and I have to coat everything hidden with rust prohibitor before screwing and then welding it together.
 

Attachments

  • 10.jpg
    10.jpg
    83.3 KB · Views: 221
  • 9.jpg
    9.jpg
    77.3 KB · Views: 220
  • 8.jpg
    8.jpg
    86 KB · Views: 227
OP
OP
Attac

Attac

Contributor
Sr. Member
Joined
Jun 29, 2015
Messages
865
Mocked up a few more of the parts tonight but we are only clamping stuff for now besides a few klecos. Things look pretty good so far did a little trimming here and there but we wont screw anything together until tomorrow night so I'm sure there will be more trimming tomorrow as things get tightened up . I had to order weldthru primer and it wont be in till the morning. Here is what we did tonight. Chandler was getting a little excited now that he sees it going back together. We talked a lot about the color and seats and tires and interior and bumpers.
 

Attachments

  • 11.jpg
    11.jpg
    83.3 KB · Views: 210
  • 12.jpg
    12.jpg
    68.6 KB · Views: 210
  • 13.jpg
    13.jpg
    101 KB · Views: 215
  • 14.jpg
    14.jpg
    83.2 KB · Views: 223

Stutsmo

Contributor
Bronco Guru
Joined
Jan 24, 2009
Messages
2,549
Looks good! I didnt take My body down quite as far as you are.... You are making it look easy!
 

rydog1130

Sponsor/Vendor
Bronco Guru
Joined
Jun 19, 2014
Messages
4,041
Nice, I'm in the same boat, except I'm replacing almost everything on both sides. Looks good!
 
OP
OP
Attac

Attac

Contributor
Sr. Member
Joined
Jun 29, 2015
Messages
865
Looks good! I didnt take My body down quite as far as you are.... You are making it look easy!

I wasn't planning on replacing all of this but I found rust pockets as I removed the layers of parts. If I'm gonna rebuild it I'm gonna at least do it right. Now is the time to do it.

Nice, I'm in the same boat, except I'm replacing almost everything on both sides. Looks good!

I got lucky as the other complete side has been done already by the body shop that owned this before I got it. I have to complete the spot welds on the other side as about half of the screws are still in the other side. They welded about every other one in prep for me moving it.

I will get more pics of progress up tomorrow night. Chandler had a football game Friday nite and my others sons birthday was this weekend so we didn't get a whole lot done over the weekend. Just a little grinding and painted everything with weld thru primer.
Chuck & Chandler
 

rydog1130

Sponsor/Vendor
Bronco Guru
Joined
Jun 19, 2014
Messages
4,041
Have you considered using panel bond? I heard its the cats meow. Once I get everything mocked up on mine I'm going that route. I'll let you know how it turns out!
 

sprdv1

Contributor
REBEL
Joined
Mar 8, 2007
Messages
81,824
I will get more pics of progress up tomorrow night. Chandler had a football game Friday nite and my others sons birthday was this weekend so we didn't get a whole lot done over the weekend. Just a little grinding and painted everything with weld thru primer.
Chuck & Chandler

One step at a time right, when you can. Good luck sir
 
OP
OP
Attac

Attac

Contributor
Sr. Member
Joined
Jun 29, 2015
Messages
865
well got everything back in place tonight and drilled a few holes for some klecos. Gonna go put screws in now so that I can hang the door and double check it. Everything fits nice But I have noticed that my outer rocker is going to have to be trimmed to fit...about a 1/4".... Not just the top but the lower curved area also. What is the best way to reshape this.
Chuck
 

Attachments

  • 15.jpg
    15.jpg
    72.5 KB · Views: 207
OP
OP
Attac

Attac

Contributor
Sr. Member
Joined
Jun 29, 2015
Messages
865
Ok so I went back outside and screwed all of the panels now. Everything looks good so I decided to put a couple of screws in the rocker and try to tweek it a little. Its amazing what tightening up the panels does.. All of my measurements are still the same but now the rocker will fit ( after I trimmed it a bit) but it is still banking hard on the back panel. gonna have to tweek it a little more but I think it will work now. Door fits nice so I am gonna start welding tomorrow night. Oh boy Spot welds, Fun Fun. I will get them started but chandler is gonna weld most of them...It is his Bronco after all ;D

Nite all
 

Attachments

  • 16.jpg
    16.jpg
    82.3 KB · Views: 219
  • 17.jpg
    17.jpg
    68 KB · Views: 192

ep67bro

Contributor
Bronco Junky
Joined
Aug 28, 2008
Messages
3,670
Loc.
Easton, MD
Man looks good. That's a lot of spot welds to drill out! I may be doing the same thing if I keep my 77!
 

rydog1130

Sponsor/Vendor
Bronco Guru
Joined
Jun 19, 2014
Messages
4,041
I'll pass this info on...harbor freight has spot weld cutters for $5 a piece and as long as you use a little oil when cutting, these things are worth the money.

Man looks good. That's a lot of spot welds to drill out! I may be doing the same thing if I keep my 77!
 
OP
OP
Attac

Attac

Contributor
Sr. Member
Joined
Jun 29, 2015
Messages
865
x2
Just came in for dinner and saw this.... Yes they do.. I bought 10 of them and used both sides of 6 so far.. but they do work good.


I'll pass this info on...harbor freight has spot weld cutters for $5 a piece and as long as you use a little oil when cutting, these things are worth the money.
 
OP
OP
Attac

Attac

Contributor
Sr. Member
Joined
Jun 29, 2015
Messages
865
Ok next step...I went and looked closer at some of the "Patches" that the previous PO had put on the rear wheelwell area. When I scraped the sealer off I could see that they had filled rust holes with sometimes 1" wide welds. Didn't remove rust just welded over it. Other places they had put "Patches" in the corners but left the rusty bits underneath so of course it just keeps rusting. So I am getting ready to order more body parts and am also gonna Start cutting out some other parts and make proper patches kinda like fordfan does. I don't have his skills but I know they will be better than the PO did.
Here are some of the spots
 

Attachments

  • 21.jpg
    21.jpg
    37.8 KB · Views: 124
  • 20.jpg
    20.jpg
    76.2 KB · Views: 131
  • 19.jpg
    19.jpg
    40.4 KB · Views: 135
  • 18.jpg
    18.jpg
    93.3 KB · Views: 150
OP
OP
Attac

Attac

Contributor
Sr. Member
Joined
Jun 29, 2015
Messages
865
So Chandler had football last night (they won, 4-0 now)so no work done but tonight I rehung the door and checked it for fit before we start welding all of the bits in. It was close but not perfect so we undid screws and trimmed and rescrewed and undid screws and adjusted and whala the door is now as close as I think I could get it. you can close it and latch with one finger. Very happy so I came inside to take a break and Chandler took off with a couple of his football team mates to grab some food. I am going to go back outside and start welding in a few. I need to cut some more bad metal out in rear wheelwells so I want to get this area secured in front of it first.
 

Attachments

  • 22.jpg
    22.jpg
    50 KB · Views: 125
  • 23.jpg
    23.jpg
    84 KB · Views: 124
  • 24.jpg
    24.jpg
    75.5 KB · Views: 120
OP
OP
Attac

Attac

Contributor
Sr. Member
Joined
Jun 29, 2015
Messages
865
Boy I hate spot/plug welding. But got about 90% of it done so far. After looking at some of the edges of the bed panel and talking to Bax and sending him a couple of pics I have decided to just replace the whole bed panel and the 4 corner extensions as well as the rear passenger fenderwell.
So I am ordering parts for it and will start drilling more spot welds on the bed section tomorrow. Yay more spot welds :cry:
 

Attachments

  • 18.jpg
    18.jpg
    93.3 KB · Views: 127
  • 28.jpg
    28.jpg
    81.1 KB · Views: 130
  • 27.jpg
    27.jpg
    78.5 KB · Views: 128
  • 26.jpg
    26.jpg
    70.6 KB · Views: 132
  • 25.jpg
    25.jpg
    84.9 KB · Views: 132
OP
OP
Attac

Attac

Contributor
Sr. Member
Joined
Jun 29, 2015
Messages
865
Ok got some more done while we are waiting on some parts. Had to massage the replacement center trans tunnel to make it fit. More spot welds hooray. Sprayed everywhere with weldthru primer that was covered up and sanded everything else and used zinc etching primer.. Got to run the DA sander over it yet but it is looking better
 

Attachments

  • 29.jpg
    29.jpg
    78.5 KB · Views: 116
  • 30.jpg
    30.jpg
    66 KB · Views: 114
  • 31.jpg
    31.jpg
    51.4 KB · Views: 107
  • 32.jpg
    32.jpg
    71.3 KB · Views: 118
  • 33.jpg
    33.jpg
    63 KB · Views: 122
Top