• Welcome to ClassicBroncos! - You are currently viewing the forums as a GUEST. To take advantage of all the site features, please take a moment to register. It's fast, simple and absolutely free. So please join our community today!
    If you have problems registering or can't log into your account, please contact Admin.

Custom Bumper & Spare Build - FINALLY FINISHED!

OP
OP
Tedster100

Tedster100

Chairman of the Bored
Joined
Aug 25, 2010
Messages
1,762
Paint or powder i have not seen a heruliner job I liked..

That is going to be one heavy bumper, did you weight it yet?? I'm guessing 150 lbs

Welding the tire carrier to the bumper may not be enough, it may fatigue after a while, the tire tends to put alot of pressure on the mounting point.

i didn't show you the bumper along side the garage in the scrap pile.

Yea, it will be close to 150# but it will match my front bumper in weight once the winch is on. I'm going for a kind of tank with a lower center of gravity thing! The tubing that holds the heim joint is 3" square 1/4" wall and it's cut so that a portion is welded to the top and a portion to the back side. If this thing fatigues or cracks I'll be suprised but anything is possible. My welding will most likely be the weakest link;D
 
OP
OP
Tedster100

Tedster100

Chairman of the Bored
Joined
Aug 25, 2010
Messages
1,762
Ok, got a little more done on the bumper. Got it all closed in and welded up, ground it down and finished welding the carrier pivot bracket. I took a couple more pictures to try and show how the piviot bracket is machined and mounted for strength. So after discussing the strength considerations I decided to test it out. I loaded the carrier with 235# of crap to see how it would handle the weight. It did very well, has a little give but overall it was really sturdy, once I make the mount and latch for the other end to lock it in it should be really stout.
 
OP
OP
Tedster100

Tedster100

Chairman of the Bored
Joined
Aug 25, 2010
Messages
1,762
For some reason the pictures didn't load, here they are.
 

Attachments

  • P3250050.jpg
    P3250050.jpg
    71.8 KB · Views: 127
  • P3250044.jpg
    P3250044.jpg
    109 KB · Views: 155
  • P3250045.jpg
    P3250045.jpg
    65.9 KB · Views: 126
  • P3250046.jpg
    P3250046.jpg
    64.7 KB · Views: 129
  • P3250047.jpg
    P3250047.jpg
    68 KB · Views: 122
  • P3250048.jpg
    P3250048.jpg
    70.3 KB · Views: 129
  • P3250049.jpg
    P3250049.jpg
    94 KB · Views: 144
OP
OP
Tedster100

Tedster100

Chairman of the Bored
Joined
Aug 25, 2010
Messages
1,762
Got my completely re-built 302 back in the garage last night! The bumper build is now on the fast track!
 

sellitall

Bronco Guru
Joined
Jul 30, 2002
Messages
1,444
Loc.
Malvern, Pennsylva
Looks good, but I would brace up the hinge area where you put the heim joints. Only because I've had the trailer hub style fail on me in the past. I was running a 37" tire which I'm sure didn't help matters out any, but Thank God I saw the broken weld on one side and it didn't let loose on the road. I could only imagine the fear traffic behind me would experience trying to avoid a 37" Super Swamper bouncing down the interstate towards them.:eek:

If I were you I would brace that section with some square tube for piece of mind. The welds look like they will fatigue quickly with a large/heavy tire especially if it's not 100% snug when latched.
 
Last edited:
OP
OP
Tedster100

Tedster100

Chairman of the Bored
Joined
Aug 25, 2010
Messages
1,762
Good point on the bracing, seems to be a common weak point in any style. I double welded the upper portion of the mount for extra strength but it would be a lot easier adding some beef now rather than later. Since the upright portion sits centered on the backside of the bumper I might just cut a gusset from some 1/4" plate and weld it to the back of the bumper and up the carrier mount for support.
 

.94 OR

Contributor
Bronco Guru
Joined
Jul 5, 2009
Messages
1,763
My bumper is not near as elaborate as yours. I also use the stock tire carrier. I built my bumpers so they stuck out from the body about 3" on the backside so that I could cover the top with diamond tread to stand on. Being that the bumper now sticks out further, my tire actually rests on the bumper taking the weight off the latch on the tailgate and the hinge points on the corner of the body. I can only imagine the stresses on every part of a carrier if a 37" tire is only supported in a few points and driven off-road much.

I see that your "spindle" mount is adjustable forward and backward of the vehicle. I would suggest tightening it down so that the lug nuts have to pull the rim up snug thus compressing the sidewall of the tire on the backside slightly against the carrier when everything is tight. This should help minimize the tire from rocking/vibrating while driving.
 
OP
OP
Tedster100

Tedster100

Chairman of the Bored
Joined
Aug 25, 2010
Messages
1,762
My bumper is not near as elaborate as yours. I also use the stock tire carrier. I built my bumpers so they stuck out from the body about 3" on the backside so that I could cover the top with diamond tread to stand on. Being that the bumper now sticks out further, my tire actually rests on the bumper taking the weight off the latch on the tailgate and the hinge points on the corner of the body. I can only imagine the stresses on every part of a carrier if a 37" tire is only supported in a few points and driven off-road much.

I see that your "spindle" mount is adjustable forward and backward of the vehicle. I would suggest tightening it down so that the lug nuts have to pull the rim up snug thus compressing the sidewall of the tire on the backside slightly against the carrier when everything is tight. This should help minimize the tire from rocking/vibrating while driving.

That's exactly what I was thinking, want to keep the tire as close as possible to the carrier to keep everything snug. I'll probably mount the tire with about 5 psi in it then pump it up once it's mounted to lock it in. The spindle mount is also designed so if it's flipped 180 degrees I can mount a 35" spare if I ever go from 33 to 35". I like the diamond plate idea, the bumper will stick out since it's designed to allow part of the tire to sit over it. I'll have to see if I can dig some diamond plate up! Thanks for the idea.
 

sellitall

Bronco Guru
Joined
Jul 30, 2002
Messages
1,444
Loc.
Malvern, Pennsylva
Good point on the bracing, seems to be a common weak point in any style. I double welded the upper portion of the mount for extra strength but it would be a lot easier adding some beef now rather than later. Since the upright portion sits centered on the backside of the bumper I might just cut a gusset from some 1/4" plate and weld it to the back of the bumper and up the carrier mount for support.

Yeah, that's sort of the same type brace I was thinking. I've seen guys run a double hinge style (one hinge on either side) to eleveate the stress you have by mounting on one side only.
 

DonaldDouchebag

Bronco Guru
Joined
Apr 17, 2008
Messages
1,098
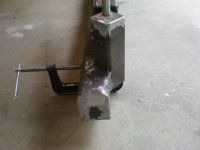
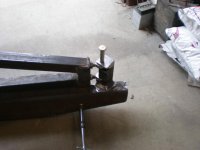
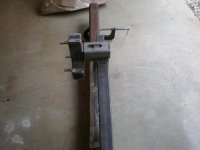
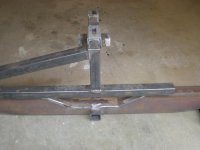
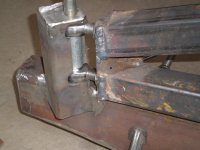
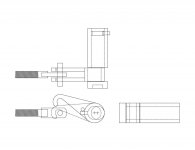
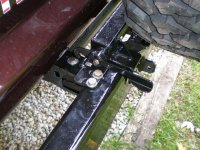
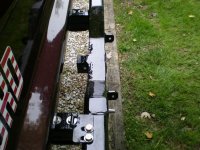
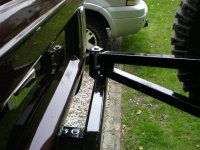
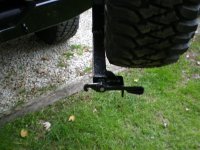
I actually started the build around using a spindle and bought the spindle and bearings. After looking at various designs and talking to Ransil who told me he had seen one of the spindles snap I decided to go the heim joint route. I don't plan on putting enough stress on the carrier to damage it but you never know. The other consideration was being able to adjust it. Once the spindle and carrier are welded in they really can't be adjusted much, especially if it moves a little under the weight of the tire. I'll have the ability to spin the joints 1/2 turn at a time to adjust if needed.

The joints are 3/4 - 16 thread with a 3/4 bore for a grade 8 3/4" bolt, others I have seen appear to be 5/8. The heim joints I picked up at Summit 
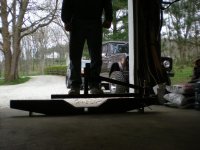
http://www.summitracing.com/parts/CEE-6162/ are rated for over 23,000 lbs. Assuming the carrier weighs 40# and the tire weighs 90# and that weight is applied at a distance of approx 30" from the pivot the effective weight would be 130# x 30" long / 3.5" high = 1114 # on the heim, if the latch works well to secure the other end there shouldn't be any dynamic load but even if there was and it was 3x the static load there would still be a pretty good factor of safety. At least it sounds good... We'll see, I'm almost ready to put it together and I plan on standing on it to see how much it may sag so I can plan the latch and keeper accordingly.

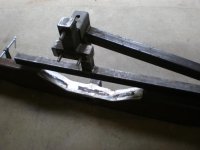
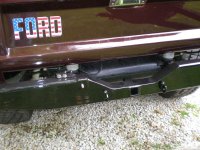
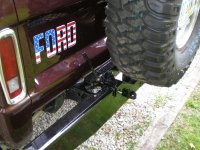
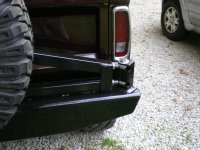
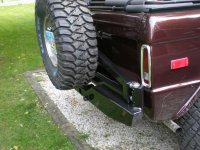
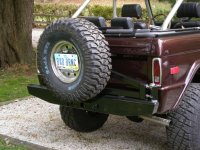
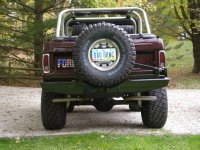
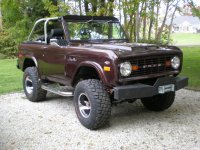
The cut out was challenging but I wanted to do something kind of unique and my goal was to keep the tire centered on the body without obstructing too much of the view and keeping it tucked in as close to the gate as possible. I'm also thinking of mounting a Jerry can to the right of the tire. Thanks for the feedback, and hey what do you think for a finish. I'm thinking of Herculiner for the bumper and Por-15 for the carrier portion, but I'm also considering powder coating, any thoughts?

Interesting. Thanks for the explanation. I'm looking at doing something similar so I appreciate your comments. Post up and let us know how it works after it's all done!
 
OP
OP
Tedster100

Tedster100

Chairman of the Bored
Joined
Aug 25, 2010
Messages
1,762
Interesting. Thanks for the explanation. I'm looking at doing something similar so I appreciate your comments. Post up and let us know how it works after it's all done!

Will do, I'll be wrapping up the latch design & adding the frame mounts in the near future. I'll put the progress and finished pictures up as it gets completed. Thanks to all for the comments and advice.
 
OP
OP
Tedster100

Tedster100

Chairman of the Bored
Joined
Aug 25, 2010
Messages
1,762
Ok, it's been all summer and I've been working on the bumpers a little bit at a time. I wanted to be done a while ago but you know how things get pushed to the side. I finally got all the bugs worked out and after a re-design on my cam latch due to clearance issues when the gate is down I got it completed and mounted.

I like the way it looks with the spare much better than without it, it just seemed like needed something. I didn't get the winch mounted yet but that should be in place next week. Only thing left is to wire the plate light and rear light.
 

Attachments

  • PA130011.jpg
    PA130011.jpg
    128 KB · Views: 152
  • PA130010.jpg
    PA130010.jpg
    145 KB · Views: 153
  • PA130009.jpg
    PA130009.jpg
    134.3 KB · Views: 143
  • PA130008.jpg
    PA130008.jpg
    118.1 KB · Views: 146
  • PA130007.jpg
    PA130007.jpg
    130.2 KB · Views: 157
  • PA130006.jpg
    PA130006.jpg
    142.6 KB · Views: 163
  • PA130005.jpg
    PA130005.jpg
    144.1 KB · Views: 165
  • PA130004.jpg
    PA130004.jpg
    148.8 KB · Views: 170
OP
OP
Tedster100

Tedster100

Chairman of the Bored
Joined
Aug 25, 2010
Messages
1,762
A few more.
 

Attachments

  • PA130018.jpg
    PA130018.jpg
    175.5 KB · Views: 90
  • PA130017.jpg
    PA130017.jpg
    154.8 KB · Views: 106
  • PA130016.jpg
    PA130016.jpg
    167.6 KB · Views: 87
  • PA130015.jpg
    PA130015.jpg
    150.4 KB · Views: 101
  • PA130014.jpg
    PA130014.jpg
    118.2 KB · Views: 93
  • PA130013.jpg
    PA130013.jpg
    133.6 KB · Views: 111
  • PA130012.jpg
    PA130012.jpg
    108.1 KB · Views: 85
  • PA130019.jpg
    PA130019.jpg
    163.2 KB · Views: 95

Hank_

Bronco Guru
Joined
May 9, 2010
Messages
1,915
Great job on the bumper. I like the use of the rod ends for the pivot. Great looking bronco.

Henry
 
OP
OP
Tedster100

Tedster100

Chairman of the Bored
Joined
Aug 25, 2010
Messages
1,762
Thanks for the comments, the rod ends worked really well. I'm glad I went that route instead of a spindle. I bought the cage as a kit and welded it myself and changed a few things on it.
 
Top