Hi Everyone,
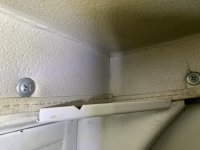
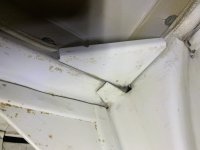
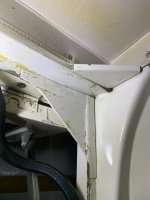
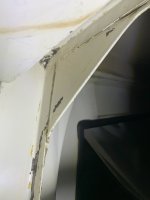
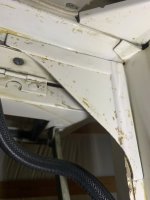
I was wondering if I could bother one of you to post a picture or give me some approximate dimensions for the gusset bracket where the lift gate weatherstripping is glued to on the 69 and up tops? The early tops have a square opening at the top of the lift gate but the 69 and later have an extra gusset that looks to be about 45 degrees. I just bought a new Dynacorn top kit and they don't come with this piece and I have to fabricate one. I don't have my original top any longer. (71 Sport) In addition, I am trying to determine the following:
1) Is the flange on the top where the weatherstrip is glued to in the same plane as the flanges of the sides or does the top flange flange sit behind the flanges of the sides?
2) If the three flanges are in the same plane...are they notched or mitered where they meet?
3) Is the gusset plate behind, in front, or in the same plane as the flanges of the top and side?
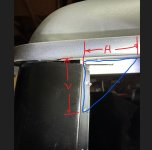
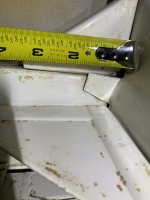
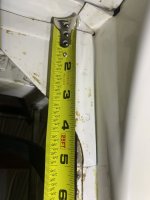
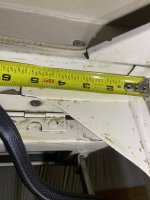
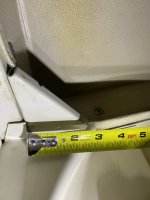
4) Horizontal distance from inside side wall to the edge of gusset (H).
5) Vertical distance from the underside of top where liftgate is bolted to, to the edge of gusset (V).
I found the excellent write up of insulating the top from Whoaa, that had a lot of really good pictures of this area but the Photobucket picture resolution is very low and doesn't let me Zoom in. You can see I also have heck a fit issue to deal with. I called Dynacorn yesterday and they let me know they have shipped hundreds of these top kits and that no one has ever complained of a fit problem....So I guess it is just my lucky day. (LOL)
Thanks in advance,
Oscar
I was wondering if I could bother one of you to post a picture or give me some approximate dimensions for the gusset bracket where the lift gate weatherstripping is glued to on the 69 and up tops? The early tops have a square opening at the top of the lift gate but the 69 and later have an extra gusset that looks to be about 45 degrees. I just bought a new Dynacorn top kit and they don't come with this piece and I have to fabricate one. I don't have my original top any longer. (71 Sport) In addition, I am trying to determine the following:
1) Is the flange on the top where the weatherstrip is glued to in the same plane as the flanges of the sides or does the top flange flange sit behind the flanges of the sides?
2) If the three flanges are in the same plane...are they notched or mitered where they meet?
3) Is the gusset plate behind, in front, or in the same plane as the flanges of the top and side?
4) Horizontal distance from inside side wall to the edge of gusset (H).
5) Vertical distance from the underside of top where liftgate is bolted to, to the edge of gusset (V).
I found the excellent write up of insulating the top from Whoaa, that had a lot of really good pictures of this area but the Photobucket picture resolution is very low and doesn't let me Zoom in. You can see I also have heck a fit issue to deal with. I called Dynacorn yesterday and they let me know they have shipped hundreds of these top kits and that no one has ever complained of a fit problem....So I guess it is just my lucky day. (LOL)
Thanks in advance,
Oscar