• Welcome to ClassicBroncos! - You are currently viewing the forums as a GUEST. To take advantage of all the site features, please take a moment to register. It's fast, simple and absolutely free. So please join our community today!
    If you have problems registering or can't log into your account, please contact Admin.

drag linkage to tierod seal (video added)

savage

Contributor
Bronco Nut
Joined
Apr 18, 2007
Messages
2,482
Loc.
Renton
I had to replace the seal between the drag linkage and tie rod. Before I had the rubber part against the tie rod and then the washer, but every time I've done it that way it deforms around the tie rod, and eventually splits, the tie rod bar is not as wide in that spot, like the old one was. So the rubber does not sit flat. so if I put the metal washer on the tie rod, then the rubber, it does not deform, and seems to fit better. Do you guys think it will work this way?
 

Attachments

  • DSCN1946.jpg
    DSCN1946.jpg
    85.9 KB · Views: 63
  • DSCN1947.jpg
    DSCN1947.jpg
    73.2 KB · Views: 72
  • DSCN1948.jpg
    DSCN1948.jpg
    66.7 KB · Views: 66
  • DSCN1949.jpg
    DSCN1949.jpg
    98.7 KB · Views: 65
  • DSCN1950.jpg
    DSCN1950.jpg
    56 KB · Views: 57
Last edited:

DirtDonk

Contributor
Bronco Guru
Joined
Nov 3, 2003
Messages
47,854
What does it do if you leave the washer off? I've used the washers, and I've left them off depending on how it looked when trying to install them.
Yours looks very compressed, like it's going to split no matter what you do. Even though it deforms over the tie-rod, I wonder if leaving the washer off will allow some extra leeway?

Not sure of course, but thought it might be worth a shot.
Is the a flat seal/boot/thingy? Or is it cupped?
Either way, the way you've got it sounds like the better of the two ways you describe. Worth a shot anyway!

Got a pic of it up near the pitman arm too? Just looking at your tie-rod angle and thinking you could use some more rotation "up" so that the draglink end is pointing more up.
You're looking for about a 60° angle there, but basically just measure between the lower end and the lower trackbar bolt (vertical plane, not actual distance from each other) and then from the upper end to the upper trackbar bolt.
The closer they are to equal distances apart the better.
And the closer you get to that 60 degrees the better. If you have your old one to compare to, you'll see how exactly to angle it.
That will tell the tale correctly, rather than relying on my to eyeball from here looking on a computer.

Paul
 
OP
OP
savage

savage

Contributor
Bronco Nut
Joined
Apr 18, 2007
Messages
2,482
Loc.
Renton
Hey Paul, the rubber pc ,is just a donut and is flat on booth sides. The washer is not thick at all with a little raised edge. I'll get a picture of the angle of both track bar and drag linkage, they seem to be at the same angle. Is their any other type of seal that my work better?
 
OP
OP
savage

savage

Contributor
Bronco Nut
Joined
Apr 18, 2007
Messages
2,482
Loc.
Renton
Hey Paul ,here's a picture of the front. I've been driving it this way since the front has been done and it seems to drive fine.
 

Attachments

  • DSCN1952.jpg
    DSCN1952.jpg
    116.8 KB · Views: 62

DirtDonk

Contributor
Bronco Guru
Joined
Nov 3, 2003
Messages
47,854
Yeah, the donut style has been coming with draglinks for a long time now. At least for the EB draglinks. Most others are probably still the cup style that covers the open area of the joint.
Guessing the monkey motion that the draglink and tie rod run through on Broncos was a reason for the change to that type?
I remember the first one I ever bought had a modified version of a cup. The next one had a lightweight foam seal, then the next one a solid rubber disc.
Not sure if any design actually one worked better than the other, but the original seemed to make the most sense. Maybe they just didn't last long enough and they kept trying to find a suitable workable style.

Paul
 

DirtDonk

Contributor
Bronco Guru
Joined
Nov 3, 2003
Messages
47,854
Oh, and savage, if it's working well, don't change it. But if for whatever reason you think the steering is a bit vague, or you experience some bumpsteer, or even accelerated wear on that same dust boot/seal (Hmm, is that already an issue then, with low mileage on the old seal?) then I would rotate the tie-rod up a bit.
The "tie-rod roll" that this type of system experiences does put the lower dust seal in a lot of stress. Rolling the tie-rod up a little bit more in it's static position reduces the instance of dynamic roll when you input steering changes in direction through the steering wheel.
Watch the motion sometime while a helper steers the wheel back and forth a few times. You should see what I'm talking about.

I would also fully weld that dropped trackbar bracket in place to the frame. Bolting is good, but at least partially welding it is even better.

Paul
 
OP
OP
savage

savage

Contributor
Bronco Nut
Joined
Apr 18, 2007
Messages
2,482
Loc.
Renton
Thanks Paul, ya I need to find someone that can weld it for me. I have a welder but don't fell confident with welding that item. I'm not sure if the seal problem is caused by the squishing of the rubber bushing or the rolling of the tie rod. I'll have someone turn the steering wheel , to see what its doing. I have notice that all the dust boots seem to be dry rotting or starting to crack, which is weird because the bronco is inside a garage and so far only see's dry weather. I see Toms sells a dust boot kit with all the stuff to replace everything .https://www.tomsbroncoparts.com/product/tie-rod-boot-kit-w-drag-link-isolator-noew


Thanks Steve for the link ,I'll look into replacing the cracked ones.
 

Steve83

Bronco Guru
Joined
Jul 16, 2003
Messages
9,022
Loc.
Memphis, TN, USA, Earth, Milky Way
...all the dust boots seem to be dry rotting or starting to crack, which is weird because the bronco is inside a garage and so far only see's dry weather.
Weather & exposure aren't what causes vulcanized rubber to age, dry-rot, & crack. Oxygen does, because vulcanized rubber is made from tree sap (organic material). Poly isn't affected because it's synthetic - nothing eats or rots it. That's why I recommend switching every rubber component available to poly (but only black Energy).
 

DirtDonk

Contributor
Bronco Guru
Joined
Nov 3, 2003
Messages
47,854
And the rubber these days often seems to be much less durable than in the old days even in good conditions. Which is just another point in poly's favor.

An old tie-rod boot might be expected to last 20 years or so if not abused. While a new one seems to be good or bad in five years or less, depending on it's position, or manufacture. I've seen some modern ones last a good while, at the same time others are dying an early death.
Same thing for those stupid vacuum caps that only seem to last six months before causing a vacuum leak!

Paul
 
OP
OP
savage

savage

Contributor
Bronco Nut
Joined
Apr 18, 2007
Messages
2,482
Loc.
Renton

Attachments

  • DSCN1969.jpg
    DSCN1969.jpg
    73.6 KB · Views: 22
  • DSCN1970.jpg
    DSCN1970.jpg
    71.1 KB · Views: 22
  • DSCN1974.jpg
    DSCN1974.jpg
    76.2 KB · Views: 22
  • DSCN1977.jpg
    DSCN1977.jpg
    121.1 KB · Views: 20
Last edited:

DirtDonk

Contributor
Bronco Guru
Joined
Nov 3, 2003
Messages
47,854
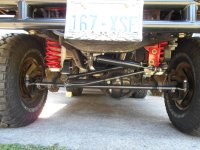
Nice quick work! Does roll less for sure. I'd keep it in that more upward position.
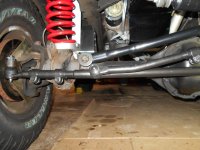
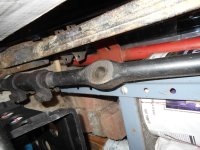
And is it my imagination, or is the trackbar bracket flexing visibly in the vid? It's hard to say (because the frame is moving), but going just by the clue of the frame moving, it would seem to be the bracket flexing on the frame. Hence the necessity of welding it eventually.
Glad you'll be having that done at some point. In the meantime, you could mount the camera to the frame and point it at the bracket to see which part is moving and how much.
Don't know if you can find an easy way to mount the camera, but if not it's no big deal. We know they should be welded anyway. Hopefully you'll notice the difference in driving it afterwards.

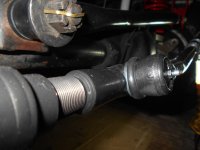
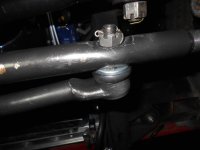
Regarding the washer, it seems to me that a thin washer (not the included one, whichi s just too thick for that side) should be fitted to the tie-rod side to add that surface area and spread out so there are no edges for the seal to roll over on.
Or reduce the amount that the seal is being compressed by leaving the thick washer out altogether. Doing that would lessen the pressure on the seal and perhaps make spreading the load an unnecessary thing.

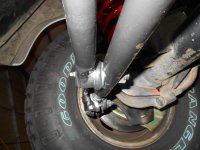
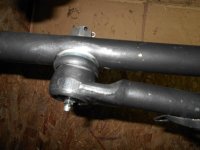
Either way though, there should be something to encompass the rod end itself to better seal the ball and socket. Which is the point of this part in the first place.
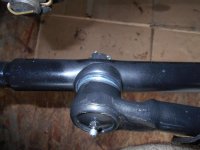
So if the washer is cupped, try turning it around and running it back on the rod end side. If it's not cupped, leave it off.

Most of the washers I've seen in all brands of replacement tie-rods have been flat, but the very earliest ones I remember had cupped washers only, but most had both.
Some of the cupped washers were large enough to cup the metal rod end, while others were smaller and had to be installed cupped-end towards the bushing/seal.
Still others were too small to fit around the base of the stud at all, and therefore could not be fitted except against the tie-rod, which didn't really make sense at the time because there was no obvious need for a washer against the stock tie-rod.

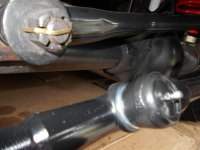
So if yours is cupped I would flip it so that the cup wraps around the rod end where you can see in the pics there is an un-painted surface. If it's too small to wrap around the casting, then I'm back to just leaving it completely out to see what the seal does by itself.
I've run draglinks without a washer before with no obvious ill effects.

Obviously the bottom line is you want it to seal the joint and last more than a few months. Anything towards that end would be a workable solution to my way of thinking. Meaning that even if the kit includes a washer, if it's better to leave it out then it should be left out.
It's just too thick to be just a spacer on the bushing and would only be used to take up extra space if needed. Which yours does not seem to need.

Paul
 
Top