• Welcome to ClassicBroncos! - You are currently viewing the forums as a GUEST. To take advantage of all the site features, please take a moment to register. It's fast, simple and absolutely free. So please join our community today!
    If you have problems registering or can't log into your account, please contact Admin.

explorer coil pack /hood clearance

papy

Contributor
Sr. Member
Joined
Jun 13, 2012
Messages
825
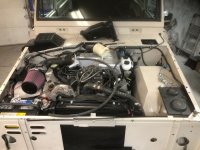
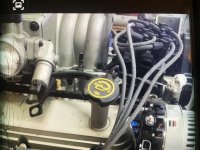
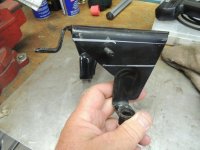
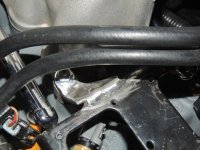
anyone else experiencing hood clearances with the 96 explorer 5.0 coil pack hitting the hood brace? looks like i can cut the coil pack bracket down a good inch or so and reweld it however not sure if 1" +/- is enough to clear the brace?

any alternatives to the bracket? anyone making a relocation bracket of some sort?

also the oil fill tube is hitting which is an easy fix unless we have other donor parts that will work?

also what are we all using for air filters? having clearance issues with the K&N one i bought as well. hitting the same front brace as the coil pack

part numbers would be nice for the filter and prefer a dry one.

JP
 

Attachments

  • bronco engine bay.jpg
    bronco engine bay.jpg
    99.8 KB · Views: 152

Jedeka

Contributor
Full Member
Joined
Oct 5, 2014
Messages
258
I cut my coil bracket down, based on some older posts. My engine is still on the stand.
 

Attachments

  • image.jpg
    image.jpg
    104.9 KB · Views: 112

904Bronco

Contributor
Bronco Guru
Joined
Sep 28, 2004
Messages
6,022
Loc.
San Martin, CA
Yes you cut about an inch out, some random pictures below...

Drivers side rear is a close fit to the fuel rail, you may have to shorten the coil bolt in that corner.

Also taper the coil mounting surface down in the front for additional clearance from the hood brace.

K&N RU3130 works

Oil filler neck needs cut down too...
 

Attachments

  • DSCN1904.jpg
    DSCN1904.jpg
    83.6 KB · Views: 108
  • DSCN1923.jpg
    DSCN1923.jpg
    103.1 KB · Views: 127
  • DSCN1919.jpg
    DSCN1919.jpg
    110.8 KB · Views: 108

JKH67302

Jr. Member
Joined
Apr 25, 2009
Messages
186
I can't remember my numbers, but I think I cut the back down .75 inch and the front down 1.25ish. I drew some lines on the bare bracket until it looked good. It's as low as I can get the back without it hitting the fuel rail on bank 2. I still had to leave the one screw out of the coil pack as it would have hit the rail.
James
ffca6873564ca94a0b749c17ca44cfc0.jpg
b7ca3929e6bd917c649744fa60a776a9.jpg


Sent from my SM-G975U using Tapatalk
 

Slednut10

Contributor
Guru? That's funny!
Joined
Sep 26, 2013
Messages
2,397
Look for MIGS on here or pm him. He has made these in the past.
 

hankjr

Contributor
Bronco Guru
Joined
May 11, 2013
Messages
1,761
I cut mine down and lilted forward as well. with 351 i needed every bit of room

not a hard job, mark, cut, tack, do over until you like it then clean up the cuts and weld.

Hank

coil bracket 1.jpg

coil bracket 2.jpg

coil bracket 3.JPG

coil bracket 4.JPG

coil bracket 5.JPG

coil bracket 6.JPG

coil bracket 7.JPG
 
OP
OP
papy

papy

Contributor
Sr. Member
Joined
Jun 13, 2012
Messages
825
this is great! thank you all for responding and posting pics.

cheers!
 

pcf_mark

Bronco Guru
Joined
Jun 11, 2010
Messages
3,646
I cut mine down also but it makes the front of the engine crowded / squished for room for the heater hoses etc. You can mount the coils anywhere. I have them mocked up on the fenders, valve covers and down low on the front of the engine on either side of the pan. You can split them up they do not need to be together either as long as you can route your wires. I am probably going to mount them on the firewall by the heater box when I re-wire.
 
Top