• Welcome to ClassicBroncos! - You are currently viewing the forums as a GUEST. To take advantage of all the site features, please take a moment to register. It's fast, simple and absolutely free. So please join our community today!
    If you have problems registering or can't log into your account, please contact Admin.

Help inspect pinion depth

Montoya

Sr. Member
Joined
Feb 22, 2007
Messages
518
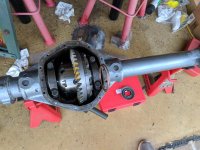
Hi guys, I'm finally getting the ARB in the front of the HP44 and I think everything looks good but I wanted another opinion before I put it together for the last time.

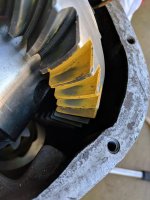
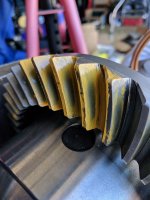
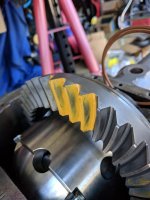
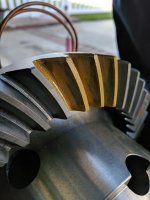
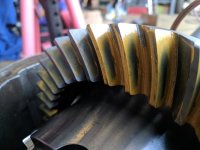
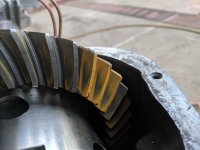
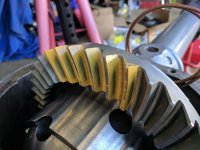
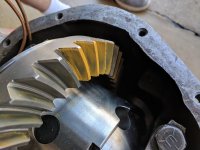
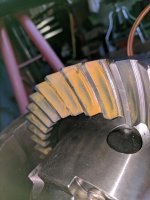
I think the pattern looks good but I was only able to get about 30 lbs of torque on the wrench using a wood block to wedge it and everyone says a minimum of 50. I'm wondering if anyone has experience with this and what you think. I assume the torque applied to the diff is more so you get a solid reading and not a hard to read smudge but I think it's pretty clear.
 

Attachments

  • IMG_20171106_123859.jpg
    IMG_20171106_123859.jpg
    97 KB · Views: 64
  • IMG_20171106_123921.jpg
    IMG_20171106_123921.jpg
    97.5 KB · Views: 57
OP
OP
M

Montoya

Sr. Member
Joined
Feb 22, 2007
Messages
518
I did check a few more spots. Thoughts? This is my first time doing this so I'm going slow but from everything I'm reading this looks ok. Just hoping someone else can confirm.
 

Attachments

  • IMG_20171104_151430.jpg
    IMG_20171104_151430.jpg
    81.5 KB · Views: 44
  • IMG_20171104_151437.jpg
    IMG_20171104_151437.jpg
    84.7 KB · Views: 40

00gyrhed

Bronco Guru
Joined
Aug 3, 2006
Messages
2,428
If .008 is the smallest backlash you have and that first pair of pics is almost as good as it gets you don't really have much choice but to run it. I wouldn't tighten up the backlash any or drive the pattern in the first two pics any lower down the tooth.

My 9" backlash varied .004 across the full revolution and I had patterns that looked a lot like yours and I have a very slight whine under some load conditions in coast. That is just how the ring gear was cut, no amount of adjusting would help. You can only get it as good as the R-P will allow. If it's noisy with your set up its not your fault.
 

NC-Fordguy

Bronco Guru
Joined
Jan 30, 2006
Messages
1,317
Loc.
Bethel/Greenville NC
I see, the 50 pounds was the authors way of creating drag.

Assuming the backlash and pinion pre-load are within spec the first set of pictures look like an acceptable pattern. The second set of pics.....ehhhhh. Looks like the pinion is too shallow.

This is either the ring not sitting on the locker flush or the cut on the gears. If you ran a file across the holes drilled in the ring gear for the bolts to remove any burrs then its in the machining of the gears. Certain brand names are worse than others in my experience.

To check this, place the dial indicator on the flush side of the ring gear and spin the carrier a full turn. It shouldn't read any more than 2-3k, assuming the backlash is correct, if it falls at or under it's in the cut of the gears.
 
OP
OP
M

Montoya

Sr. Member
Joined
Feb 22, 2007
Messages
518
NC, thanks for the info. I checked it last night based on what you were saying and everything seems good when installed. When I rotate the diff I only get about .0015" deviation around the ring.

I took the diff out (for the 7th time now) and put it on my granite table and checked that the ring was seating properly and everything came back within .0005" so that should be good to go. BTW these are G2 gears...never heard of them before but I got a deal and they seem fine so time will tell.

The second set of images was actually my first try at this. I didn't have much drag at all because I tried to wedge a rag between the diff and the housing but it didn't provide much resistance. I think this is why it didn't wipe it as clearly and also why it looks a little off. I did it in another spot and it looks a little better but I think the pinion could still be a little on the shallow side.

I'm going to put it together again later tonight and check one final time. I've got it down to a 10 minute operation now with all my setup bearings and the setup race for the pinion.

Thanks for all the help!
 

SteveL

Huge chevy guy
Joined
Jun 24, 2001
Messages
11,704
Loc.
Hawthorne ca
The genuine gear are known for being inconsistent. Frank at south bay 4x4 told me to return em and get a better brand.
 
OP
OP
M

Montoya

Sr. Member
Joined
Feb 22, 2007
Messages
518
You did put red loctite on the bolts?

Yes Sir. I heated the ring up in the oven to get it on first, used the red loctite, and torqued the bolts according to the pattern in the link from before. I think the diff side is all good to go.

I'm going to add one more .0020" shim under the pinion and check it one more time. I have the backlash all set so it's just a question of which pinion depth looks better on the gears.

More pics to come.
 

englewoodcowboy

Lick Creek Restorations
Joined
Jul 25, 2010
Messages
4,200
Tighten your lash up to .010 and check the pattern. Being it is a used gear set you will not get a perfect setup pattern of a football type shape, it will be more like a tic tack type shape elongated. If I know I am going to reuse a gear set, I try to run a pattern prior to disassembly as well as measure existing back lash.
 

Joe473

Sr. Member
Joined
Jul 16, 2012
Messages
954
Tighten your lash up to .010 and check the pattern. Being it is a used gear set you will not get a perfect setup pattern of a football type shape, it will be more like a tic tack type shape elongated. If I know I am going to reuse a gear set, I try to run a pattern prior to disassembly as well as measure existing back lash.
I agree on old sets you need to keep it close to old pattern. I've done used gears a couple of times with no issues.

On previous post keep in mind backlash changes with pinion depth. They are not mutually exclusive. You may have backlash set but once you move pinion it changes. If you bring the pinion In the backlash gets tight and when you bring it out it gets loose. Get pinion depth close and then modify backlash and check pattern again. This is where pinion depth Guage and setup bearings help.

Also on the 44 with the gears you have and HP are you running on coast or drive side of gears? Makes a difference on which side of tooth is more important to look at.

Sent from my SM-G900V using Tapatalk
 
OP
OP
M

Montoya

Sr. Member
Joined
Feb 22, 2007
Messages
518
Hi guys, I put it back together but I added a .0010" shim under the pinion and as expected the backlash tightened up a smidge. These are new G2 gears, not used so should I see a better pattern?
 

Attachments

  • IMG_20171107_164824.jpg
    IMG_20171107_164824.jpg
    78.1 KB · Views: 20
  • IMG_20171107_164849.jpg
    IMG_20171107_164849.jpg
    77.8 KB · Views: 17
OP
OP
M

Montoya

Sr. Member
Joined
Feb 22, 2007
Messages
518
Retested it this morning and took more pictures in the better light. I think it looks like the pinion is a little too close but I'll let you guys tell me what you think. Backlash is now .006".
 

Attachments

  • IMG_20171108_093840.jpg
    IMG_20171108_093840.jpg
    92.3 KB · Views: 18
  • IMG_20171108_093826.jpg
    IMG_20171108_093826.jpg
    94.6 KB · Views: 12
Last edited:
OP
OP
M

Montoya

Sr. Member
Joined
Feb 22, 2007
Messages
518
Took it apart again. Realized I went the wrong way with my pinion shim last time. Moved it the other way this time and it's a little better but I need to adjust the backlash a little more. I think with the right backlash it'll be perfect. More pics later
 
OP
OP
M

Montoya

Sr. Member
Joined
Feb 22, 2007
Messages
518
Ok, so I finally got this set and I'm happy with it. Backlash measures out to .007"-.0075" in multiple spots. Pattern looks as good as it gets, either more or less on pinion height and the pattern isn't as good as it looks now.

Pop I think overall I took this thing apart and put it back together 10 times. The bitch of it versus a 9" is the backlash and the fact it all is done in axle. With a 9" it's so much easier to get it all done on a bench.

SteveL met me (and lent me all the tools so big thanks for that) thus he can vouch I'm not a big guy so this was a challenge for me solo. Torquing the pinion nut really sucks if you're not yoked but I put my whole 155 lbs into it and got that f-n wrench to click! I always joked if God wanted me moving heavy shit he wouldn't have put me in such a bitch body!

Anyway, next hard part is getting it mounted but I've got a good system now.
 

Attachments

  • IMG_20171109_165753.jpg
    IMG_20171109_165753.jpg
    118.4 KB · Views: 17
  • IMG_20171109_165259.jpg
    IMG_20171109_165259.jpg
    85.8 KB · Views: 20

Rustytruck

Bronco Guru
Joined
Feb 24, 2002
Messages
10,875
That looks great. Despite all the hassle it was worth it in the end. You saved a chunk of cash and looks to be done better than most shops would do. When I did my upgrade to 4:11 and Trutrac on my dana 44 it was done in the truck and it was hard work laying on your side under the truck and getting it done.
 
OP
OP
M

Montoya

Sr. Member
Joined
Feb 22, 2007
Messages
518
Rusty, I have no idea how you did this on your back, you're a beast! I was just thinking if this breaks, it's great I know how to fix it but I'll probably leave it broken for a year now that I know how much of a pain in the back it was.
 

Rustytruck

Bronco Guru
Joined
Feb 24, 2002
Messages
10,875
At the time I was a machinest by trade. Having tbe ability to make precision measurements before and after and setting up the bearings and differentials on a granite surface plate helps allot. Using dana gears is a real plus since they are marked with offset from normal on the gear set. So if you have a negative .005 gear set and your new gear is marked positive .010 then you know that your bearing shims have to take in account that there is .015 difference from where the 2 different gears set in the housing. This helps getting the pinion in the right place. Then your dealing with getting the ring gear in place and checking back lash. Using thick cut gears instead of changing to a different differential offset took out another variable that gets in the way. I will admit I was very lucky it worked out so well. I put in the pinion gear once. And pulled the differential and moved shims on the differential twice. I built my own case spreader so I didnt have to fight getting the carrier in and out. My only real problem was my surface plate, press and proper measuring equipment was at work and my truck and housing was at home so any measuring or changes meant going to work the next day to make a simple shim pack change then taking it home and finding out if it worked or not.
 
Top