


After having a local racing shock place rebuild and re-valve my Bilstein 7100's a few times, I finally got tired of waiting in line and paying money so decided to look into what it would take to do it myself and took the plunge. I felt it would make a great write up to help those of you who have never tried or even thought about doing so to try and save some time and money.
You will not only learn something new but get to know how your shocks work - and how to work on your own stuff.. this really is easy stuff and I found it fun.
I recently picked up a set of 14" Bilstein remote reservoir 7100's to replace my 12" ones however I could not get the higher valving I wanted (400/100) as my previous 12" 7100's were just way too soft.. (360/80).
First off you will need to read over the 7100 series guide from Bilstein - it has all the info you need for oil capacity, measurements and even the valve stacks needed for rebound and compression.
you can find the guide here: http://www.bilsteinus.com/fileadmin/user_upload/user_upload_us/pdfs/7100_Rebuild_01.pdf and here: http://www.almostmadeit.com/g/galleries/140420_Bilstein_revalve/7100_Rebuild_01.pdf
To re-valve you will need:
Valve stacks for the compression and rebound you want - you can order the correct valving from various stores, most places that deal with off-road can order them directly from BIlstein - they are around $10 - $15 for a set of two.
Tools you will need:
A couple of picks
A wood chisel or something similar, a sharp flat head screw driver will work but it needs to be very thin..
A small hammer or deadblow
Red Loctite
1/2 end wrench / Torque wrench
First things are first.. you will need a CLEAN area to work in. You will want to make sure everything is kept clean and free from dirt, metal chips, crap etc etc...
Next you want a way to hold the shock while you work on it. As it happens the 7100 shock body is 2" around. I used a 2" hole saw and cut into a 2x4 then cut it in half to hold it in securely in a vice so it didn't damage the shock or scar it up.
Next - and this is very important, you need to release the nitrogen pressure - you can do this by unscrewing the little cap on the end of the reservoir and simply pushing the Schrader valve in and releasing the nitrogen... you can remove the valve like you do on a tire but if your just re-valving then I would advise against it.

After releasing all the nitrogen out you can mount it with the rod up securely in the vice with your wooden holder...

Now take your chisel or sharp edged wedge tool and find the seam on the end cap and put the edge to the seam and LIGHTLY give the chisel a few smart taps. it really doesn't take much to get the cap off as its just pressed in. I had to go around in a few different spots to get the cap to separate.


Once you have a nice gap it should just pop off, if not pry it lightly with a couple of screw drivers.

then you have the end cap ready to slide to the end of the rod...


next you will be LIGHTLY tapping the rod guide. thats the next fitting sitting inside the tube, try not to hit the edge of the tube or the rod. You will need to tap it down slightly to expose the first snap ring. It doesn't take much since there is no nitrogen charge. Give it a few smart taps with your small hammer working your way around the rod - be careful not to hit the rod you don't want to nick or scratch it! Use a deadblow if you need to, you might have to hit it a bit harder.

this is what your tapping..

It only needs to go down a few millimeters...
you can see the snap ring in there...

take your pick and remove it.. its not hard, you can push it down a little and lift up on this one...

remove it - now your ready to move the rod guide out of the tube and up the rod out of the way.
To do this use two flat head screw drivers on opposite sides of the tube and use the edge of the tube as a fulcrum and pry it up evenly.

ok so you will soon notice that you will only get so far and then you will not have a fulcrum point to get the rod guide past the tube edge..

Bilsetin sells a special took for this thats $40.. or you can use whatever you have laying around that is taller than the tube body to use a higher fulcrum point, for me i had scrap tubing left over from my trans crossmember... even better if you have two.. you want to make sure you put even pressure so you don't damage the seals and o rings...

Pry it up slowly.. it will pop out of the tube.

move it to the end of the rod out of the way

There is one more snap ring in there... you can see it in this picture..
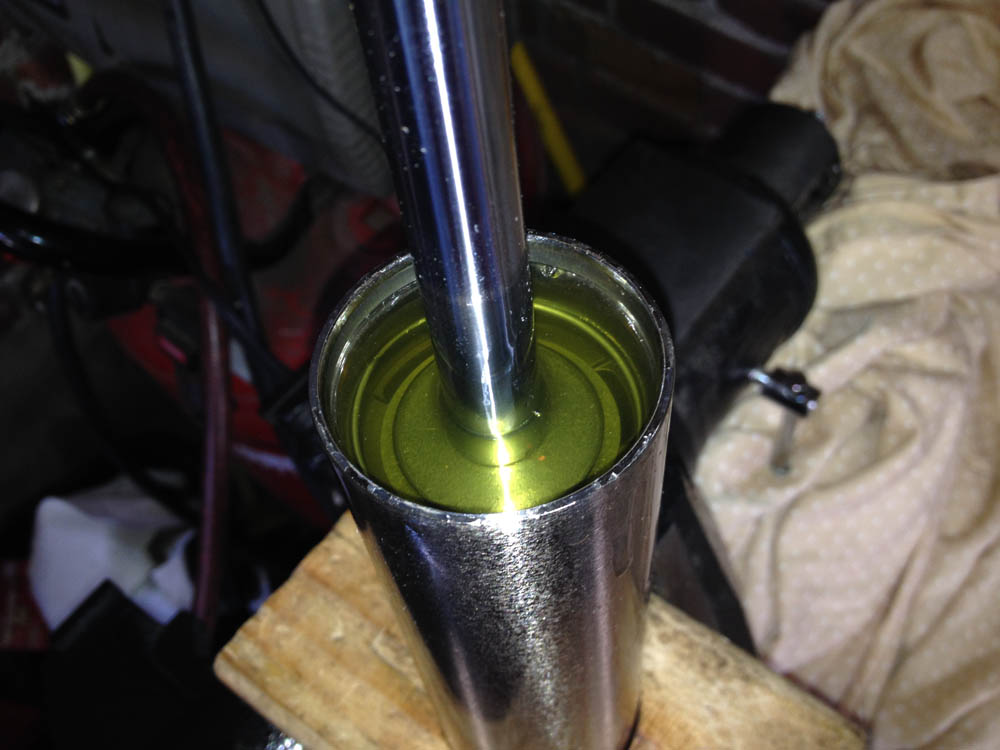
You can push the rod into the tube a little bit to displace some of the oil in order to see the snap ring.. this one was tough for me thank god for picks. Remove the snap ring and then your ready to remove the guide and valve stack.. if your just re-valving make sure you tilt the stack into the tube to drain of the oil and not make such a mess.

Ok nice job, that was the hard part! Now we are ready to re-valve.
You are going to want to put the end of the rod (the one that you bolt to the truck) into a vice with the nut up.

remove the nut - its 1/2"

with the nut removed you will now be able to remove the entire valve stack - its very important that you keep the SAME ORIENTATION as everything works ONE WAY. the compression stack is on the bottom and the rebound stack is on the top just under the nut you removed. It does matter what order the valves are placed in... I would recommend you zip tie the ones you remove in the exact order you removed them in.
Carefully remove the piston and valve stack. Lay them on your clean work area.

keep the piston in the sam orientation as you removed it.. whatever works for you to help you remember...
Next layout the new valve stack.. (my new ones are on the bottom..

put everything on the rod in the correct order.

Put some red loctite on the threads and then torque the nut to 7 ft lbs...

Alright nice job.. easy eh?
Lets put everything back together...
Make sure everything is clean.. its ok for oil to be on stuff.. but not dirt..
put the valve stack/piston back into the tube, it doesn't have to go far - just far enough to get the inner snap ring back in. Don't press the rod too far into the tube, it just needs to go down a little ways. The whole idea here is to keep as much air out of the system as possible so you might get a little oil seeping past the edges of the seals when you are installing.. but not allot.. thats ok.


once you get the lower snap ring in slide the rod guide back down and center it into the tube.

LIGHTLY tap it back into the tube so you can get the upper snap ring in.. again you might get a little bit of oil past the seal.. thats ok won't hurt anything.


Now slide the outer press cap down the rod and put a light coat of red loctite around the edge and lightly tap it back into the tube.

and your done!

Thats it.. congrats you just re-valved your 7100 shocks - you are now ready to recharge them with Nitrogen and enjoy the ride!
I will add a bit more in my next post on how to change the oil and set the shock up after rebuilding the seals or replacing damaged parts..
You will not only learn something new but get to know how your shocks work - and how to work on your own stuff.. this really is easy stuff and I found it fun.
I recently picked up a set of 14" Bilstein remote reservoir 7100's to replace my 12" ones however I could not get the higher valving I wanted (400/100) as my previous 12" 7100's were just way too soft.. (360/80).
First off you will need to read over the 7100 series guide from Bilstein - it has all the info you need for oil capacity, measurements and even the valve stacks needed for rebound and compression.
you can find the guide here: http://www.bilsteinus.com/fileadmin/user_upload/user_upload_us/pdfs/7100_Rebuild_01.pdf and here: http://www.almostmadeit.com/g/galleries/140420_Bilstein_revalve/7100_Rebuild_01.pdf
To re-valve you will need:
Valve stacks for the compression and rebound you want - you can order the correct valving from various stores, most places that deal with off-road can order them directly from BIlstein - they are around $10 - $15 for a set of two.
Tools you will need:
A couple of picks
A wood chisel or something similar, a sharp flat head screw driver will work but it needs to be very thin..
A small hammer or deadblow
Red Loctite
1/2 end wrench / Torque wrench
First things are first.. you will need a CLEAN area to work in. You will want to make sure everything is kept clean and free from dirt, metal chips, crap etc etc...
Next you want a way to hold the shock while you work on it. As it happens the 7100 shock body is 2" around. I used a 2" hole saw and cut into a 2x4 then cut it in half to hold it in securely in a vice so it didn't damage the shock or scar it up.
Next - and this is very important, you need to release the nitrogen pressure - you can do this by unscrewing the little cap on the end of the reservoir and simply pushing the Schrader valve in and releasing the nitrogen... you can remove the valve like you do on a tire but if your just re-valving then I would advise against it.
After releasing all the nitrogen out you can mount it with the rod up securely in the vice with your wooden holder...
Now take your chisel or sharp edged wedge tool and find the seam on the end cap and put the edge to the seam and LIGHTLY give the chisel a few smart taps. it really doesn't take much to get the cap off as its just pressed in. I had to go around in a few different spots to get the cap to separate.
Once you have a nice gap it should just pop off, if not pry it lightly with a couple of screw drivers.
then you have the end cap ready to slide to the end of the rod...
next you will be LIGHTLY tapping the rod guide. thats the next fitting sitting inside the tube, try not to hit the edge of the tube or the rod. You will need to tap it down slightly to expose the first snap ring. It doesn't take much since there is no nitrogen charge. Give it a few smart taps with your small hammer working your way around the rod - be careful not to hit the rod you don't want to nick or scratch it! Use a deadblow if you need to, you might have to hit it a bit harder.
this is what your tapping..
It only needs to go down a few millimeters...
you can see the snap ring in there...
take your pick and remove it.. its not hard, you can push it down a little and lift up on this one...
remove it - now your ready to move the rod guide out of the tube and up the rod out of the way.
To do this use two flat head screw drivers on opposite sides of the tube and use the edge of the tube as a fulcrum and pry it up evenly.
ok so you will soon notice that you will only get so far and then you will not have a fulcrum point to get the rod guide past the tube edge..
Bilsetin sells a special took for this thats $40.. or you can use whatever you have laying around that is taller than the tube body to use a higher fulcrum point, for me i had scrap tubing left over from my trans crossmember... even better if you have two.. you want to make sure you put even pressure so you don't damage the seals and o rings...
Pry it up slowly.. it will pop out of the tube.
move it to the end of the rod out of the way
There is one more snap ring in there... you can see it in this picture..
You can push the rod into the tube a little bit to displace some of the oil in order to see the snap ring.. this one was tough for me thank god for picks. Remove the snap ring and then your ready to remove the guide and valve stack.. if your just re-valving make sure you tilt the stack into the tube to drain of the oil and not make such a mess.
Ok nice job, that was the hard part! Now we are ready to re-valve.
You are going to want to put the end of the rod (the one that you bolt to the truck) into a vice with the nut up.
remove the nut - its 1/2"
with the nut removed you will now be able to remove the entire valve stack - its very important that you keep the SAME ORIENTATION as everything works ONE WAY. the compression stack is on the bottom and the rebound stack is on the top just under the nut you removed. It does matter what order the valves are placed in... I would recommend you zip tie the ones you remove in the exact order you removed them in.
Carefully remove the piston and valve stack. Lay them on your clean work area.
keep the piston in the sam orientation as you removed it.. whatever works for you to help you remember...
Next layout the new valve stack.. (my new ones are on the bottom..
put everything on the rod in the correct order.
Put some red loctite on the threads and then torque the nut to 7 ft lbs...
Alright nice job.. easy eh?
Lets put everything back together...
Make sure everything is clean.. its ok for oil to be on stuff.. but not dirt..
put the valve stack/piston back into the tube, it doesn't have to go far - just far enough to get the inner snap ring back in. Don't press the rod too far into the tube, it just needs to go down a little ways. The whole idea here is to keep as much air out of the system as possible so you might get a little oil seeping past the edges of the seals when you are installing.. but not allot.. thats ok.
once you get the lower snap ring in slide the rod guide back down and center it into the tube.
LIGHTLY tap it back into the tube so you can get the upper snap ring in.. again you might get a little bit of oil past the seal.. thats ok won't hurt anything.
Now slide the outer press cap down the rod and put a light coat of red loctite around the edge and lightly tap it back into the tube.
and your done!
Thats it.. congrats you just re-valved your 7100 shocks - you are now ready to recharge them with Nitrogen and enjoy the ride!
I will add a bit more in my next post on how to change the oil and set the shock up after rebuilding the seals or replacing damaged parts..