• Welcome to ClassicBroncos! - You are currently viewing the forums as a GUEST. To take advantage of all the site features, please take a moment to register. It's fast, simple and absolutely free. So please join our community today!
    If you have problems registering or can't log into your account, please contact Admin.

Hows this weld? -

Broncofan76

Sr. Member
Joined
Jul 2, 2010
Messages
432
Loc.
Atlanta
I am a relative newb to welding although I did build some sliders that are welded to the chassis and replaced floor pans etc.

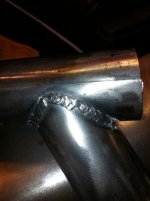
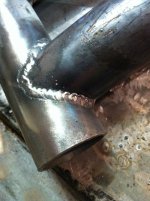
I have in my shop a roll cage from extreme custom fab and some custome pieces that i had bent that I would like to install. I have been practicing on scrap for a while in order to become at least competent at welding. Sooooo have I done it? are these welds okay? decent? or bad?

Keep in mind that I will not be building a rock crawler or hard core off road vehicle, nor will these welds ever be instected by any sanctioning body for racing. I would like to have sufficient welds that also look good.

Skiddy? you out there? go easy on me. any advice or tips are welcomed.

thanks in advance
 

Attachments

  • IMG_0854.jpg
    IMG_0854.jpg
    81.8 KB · Views: 318
  • IMG_0853.jpg
    IMG_0853.jpg
    100 KB · Views: 320

Quick & Dirty

Sr. Member
Joined
Feb 15, 2004
Messages
835
Looks don't tell how strong it is. A weld can be pretty, but not have penetration or strength.

Take your samples and torture them. Squish them in a vise. Pound on them with a hammer till something fails. If the weld breaks off, you have more practice to do. If the tube fails before the weld, you're doing ok.


Something along these lines;
test.jpg
 

BroncKrawler

Sr. Member
Joined
Dec 3, 2006
Messages
802
Loc.
Harrisburg, Oregon
Turn your amps up, and make sure your metal is as clean as possible. The extra prep work will help your weld penetrate better and look better. I like to have a 3/32" gap all the way around the joints when I weld pipe together and also a small bevel just to help get full penetration. Keep practicing running stringers and then step up to "whipping" to get that stack of dimes look. Are you using a 110 or a 220 welder?
 

Pokey71

Bronco Guru
Joined
Feb 24, 2007
Messages
1,010
A little hotter but looks like you are steady enough for a beginner pattern
 
OP
OP
Broncofan76

Broncofan76

Sr. Member
Joined
Jul 2, 2010
Messages
432
Loc.
Atlanta
I prepped the metal pretty well with a flapper disk and wire disk on the grinder. I also beveled the edges. I saw great improvement when i did these two steps. The welder is a 110v and I am seeing blueing on both pieces and also able to see a line where the weld is on the inside of the tubing - both indications of at least decent penetration (right?).
I understand that a 220v is more ideal but I have the 110v for free. I could buy a 220v machine but i think this job CAN be done with the 110v. I do have one more heat setting to go up on this machine though. I'll try that tomorrow on some scrap.
thanks for the input so far - keep em coming.
 

Tram

Bronco Guru
Joined
Mar 21, 2005
Messages
1,189
Look good to me, but I'm a total newb. My 220 line is being run tomorrow. I took some time today to make up an extension cord. Hopefully my helmet will be here tomorrow.
 
OP
OP
Broncofan76

Broncofan76

Sr. Member
Joined
Jul 2, 2010
Messages
432
Loc.
Atlanta
Flux cored wire, so no gas. I'm not set up for gas.

Tram - good luck with the new welder. I just missed a local deal on a miller 211.... sigh. Trying to hold out for one.
 

nkhd1

Full Member
Joined
Jan 25, 2011
Messages
198
one of the keys to strength of the weld is the fit up - nice tight joints. Looks like you did a good job on the fitup. A little gap will improve penetration and therefore strength. Too much gap will weaken and make this little stuff hard to weld without burning through.

Voltage is what makes a weld hump or flatten but many machines do not have separate knobs for amps and voltage.
 

Tram

Bronco Guru
Joined
Mar 21, 2005
Messages
1,189
Flux cored wire, so no gas. I'm not set up for gas.

Tram - good luck with the new welder. I just missed a local deal on a miller 211.... sigh. Trying to hold out for one.

Got my Hobart 187 for $550 shipped. ;)
 

grant_71

Bronco Guru
Joined
Aug 6, 2002
Messages
1,933
Did you spot weld your way around? If so laying down a constant bead will give you a stronger weld. But it looks pretty good

That is what I was wondering, You should be laying a constant bead and working your way back and forth between the two pieces. If that is what you are doing, you might be going a bit fast since you can see connected arcs on the edges of your weld. It should be a pretty straight line. I would practice a little more before tackling a cage, turn up the amps a bit, and keep practicing.

That being said for a beginner on flux core, they are pretty good.
 

GrillMaster

Bronco Guru
Joined
Jun 5, 2008
Messages
2,484
looks good but more practice would be a good idea. This thing is supposed to save your life so better safe then sorry right. I would try more heat and a slower pattern. It will put more material down deeper in the joint. 1 continuous bead is tough when your learning, you could do it in two or three and pay attention to blending the two. Also keep gun angle and distance to metal consistent. Using a 220 would be ideal. I am debating using my 110 or borrowing a 220 to do my cage.

just my 2 cents
 

bingison

New Member
Joined
Aug 26, 2011
Messages
4
Loc.
antigo
tighten up your motions and watch your travel speed learning to read the puddle is what its all about the color changes in the steel indicate the heat affected zone of the weld and the better you blend the toes of the weld into the parent material the stronger the weld as you will reduce stress risers pay attention to your electrode stick out distance uniformity is your goal the weld should as stated above look like a stack of dimes similar to this (((((((((((((((((( An increase or decrease in the current will increase or decrease the weld penetration respectively An increase in the tip-to-work distance will decrease welding current and penetration. Of course, the converse is also true this link will help some http://www.esabna.com/EUWeb/MIG_handbook/592mig7_1.htm
 
Last edited:

DirtyDave

Jr. Member
Joined
Apr 16, 2011
Messages
59
A couple other things that will be helpful is to keep the power cord going from the wall to the welder as short and heavy gauge as possible. I would also recomend turning the machine to the max setting and using the standoff from the tip of the gun to adjust your heat imput. Closer is hotter and further away will be cooler. You should be able to notice a difference with as little as 3/8" of difference. This is easier to do with the flux core wire because the shielding gasses are generated within the wire and aren't as suseptible to being blown away with a slight breeze. This site is also very helpful. Good luck.
http://www.weldingtipsandtricks.com/Mig-welding-tips.html
 

Rustytruck

Bronco Guru
Joined
Feb 24, 2002
Messages
10,875
For a small machine you will need it on highest settings. You need to slow down some. What I do is make slow circles and watch the weld burn into the tube as you cross over from side to side. Learn to watch your weld burn into the tube and not just the path you want to lay the bead. With a flux core set-up you will run into duty cycle issues or just over heat and burn up the gun. So take it slow and run your welds in about 3/4" stitches. Take a break clean up your stitch and then move on to the next bead. As for the weld you laid on pratice welds, saw through the weld and grind the saw cut a little to clean it up and look at what your weld is actually doing. You need it to burn into the edges of the weld and not sit on top like glue. You cant tell until you actually cut a test piece.
 
Top