• Welcome to ClassicBroncos! - You are currently viewing the forums as a GUEST. To take advantage of all the site features, please take a moment to register. It's fast, simple and absolutely free. So please join our community today!
    If you have problems registering or can't log into your account, please contact Admin.

installing rear quarters

jagbucket

Full Member
Joined
Aug 9, 2013
Messages
251
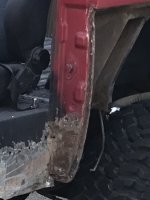
I've finally made the decision to go back to uncut and wanted to install the full panel without removing the tail light post or the rocker. so far ive cut the old panel out and cleaned spot welds across top and fwd area at the door i'm stuck now on how to clean up the vertical seam at the rear with out destroying the light panel . any suggestions appreciated
 

Matt@Wildhorses

Sponsor/Vendor
Newbie
Joined
Nov 27, 2013
Messages
56
When i did mine, i spread the tail light seam a little, with a screw drive or chisel, then used a 3" cutoff wheel in the seam. Worked pretty well.
 
OP
OP
J

jagbucket

Full Member
Joined
Aug 9, 2013
Messages
251
yes that is what i found also just drove my air chisel in at the seam . what concerned me was that when looking from inside the wheel well i thought the fender was welded to that bulkhead piece you see, it is not .. fender is welded to the light housing so i'm able to use entire new panel with flanges intact
 

Jamie Chriss

Sr. Member
Joined
Feb 28, 2015
Messages
577
Of all the metal I have removed the quarter was the easiest. I think you will run into issues with the rocker panels, they cover the last few inches and there are a few heavy welds, once the welds are broken your can spot weld from when wheel well but I had issues getting the lowest welds and sheet metal off. Good luck, send pics
 

Attachments

  • FullSizeRender.jpg
    FullSizeRender.jpg
    56.8 KB · Views: 218

bronkenn

Contributor
Bronco Guy
Joined
Apr 27, 2017
Messages
2,688
Loc.
Southeast Ohio
With that inner panel covering up the taillight to quarter panel seam I bent the piece out of the way and cleaned the taillight piece up and plug welded the two together then bent that flange piece back. Ken
 
OP
OP
J

jagbucket

Full Member
Joined
Aug 9, 2013
Messages
251
thanks ken thats what i was thinking also. drill through all three or two and then plug weld all three . able to get the rocker end moved enough to cut the weld . tomorrow will be final clean up and fitting . doing all this with left arm in a sling from rotator cuff repair last week so im slower than normal. have to be more creative, hardest part so far is changing the air tools with one hand but cutting is with a plasma so not to bad.

my 32 x 11.50's are not going to work at all even though there's a 1" bl.
'
 

bronkenn

Contributor
Bronco Guy
Joined
Apr 27, 2017
Messages
2,688
Loc.
Southeast Ohio
It was a real pain to get the taillight and quarter panel clamped together to weld. I found an offset pair of vise grips that was able to clamp it through the taillight opening. Man, if your doing that with a rotator cup repair just done, you must have a red cape under your shirt! It was hard enough with both limbs. Ken
 
OP
OP
J

jagbucket

Full Member
Joined
Aug 9, 2013
Messages
251
yeah not much progress today just cleanup playing with pictures but cant see what im selecting so far
 

BradinEDH

Newbie
Joined
Nov 30, 2013
Messages
55
Any more progress? I am in the middle of putting both quarters on after I was re-ended at a stop light. I fitted the right side and now planning out all the plug welds. Any photos of how you welded it up would be great. Considering panel gluing the top edge instead of plug welding. Seems like it would seal it up real nice.
 
OP
OP
J

jagbucket

Full Member
Joined
Aug 9, 2013
Messages
251
bradinedh just noticed your post so im more than likely to late to help but i just burned through to spot weld on inner seam or if already a hole in both a piece of brass jammed on the backside helps . be carefull when pulling panel up to seam i found it easy to bow the fender out at the wheel well and then unable to get a straight line from the door/rocker to new quarters dont know if its the way i fit it or afternarket part but easy to fix by making a vertical cut at the door edge and i did it at the tail light. did the driver side and have yet to do the pass although not as bad as the driver. happy with straight sides as factory .
Ive noticed since that some do not pay attention to this on high dollar rides and seem perfectly happy with the shiny paint which to me just makes this fault stand out more until that is all i see but thats just me after chasing panel fit on totals i used to repair ocdc?
 

BradinEDH

Newbie
Joined
Nov 30, 2013
Messages
55
Thanks, I think I am going to glue the top flange first and work my way down the panel to fit it. These quarters seem to fit real nice and line up. A bit of adjusting a the bottom and making it match the curve on the door is taking a bit of time. One step at time. Working on the Driver side now.
 
Top